

Quick Answer: How to Start a John Deere Riding Lawn Mower
To start your John Deere riding lawn mower: Sit on the seat to engage the safety switch, set the throttle to half-speed, position the choke based on temperature (full cold, half warm), insert the ignition key, turn it to START, and release once the engine catches. Modern models may use an electric start button instead of a key. Always perform pre-start checks, verify fuel level, check oil, and ensure the battery is charged, before attempting to start.
Pre-Start Safety Checks: The Foundation for Reliable Starting
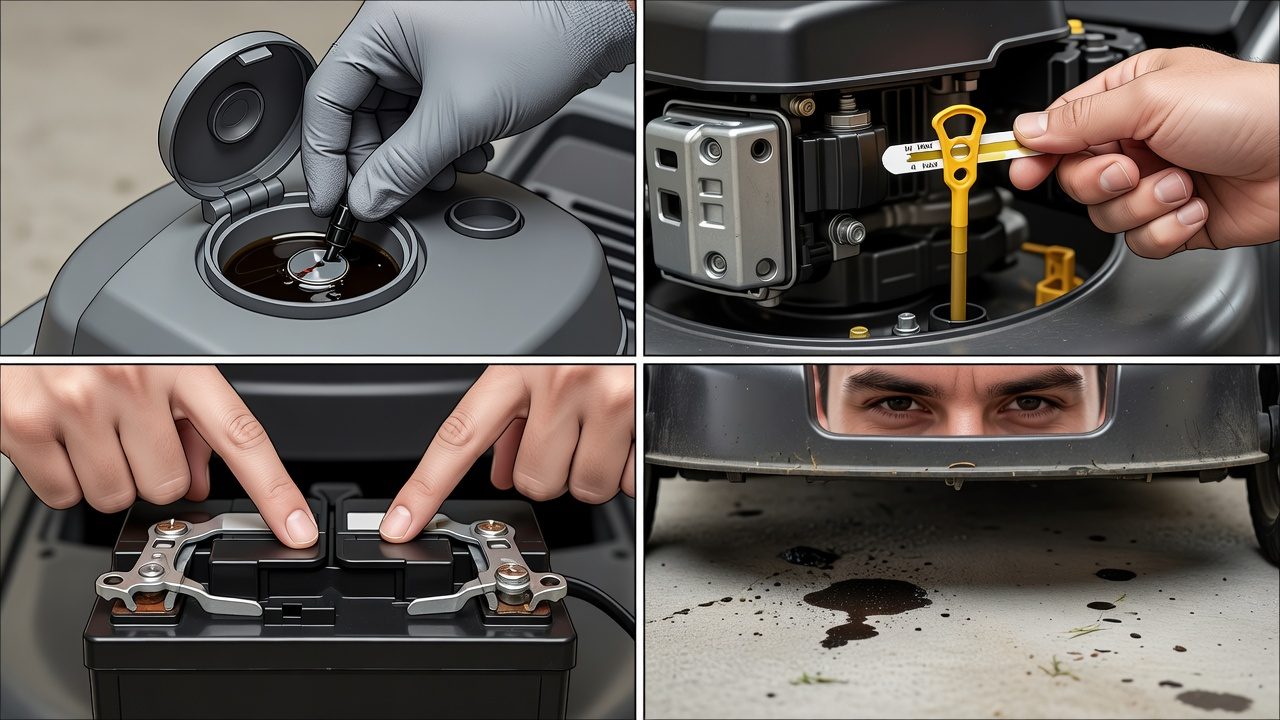
Before you touch the ignition, completing a five-minute pre-start inspection prevents damage, ensures safe operation, and significantly increases your odds of a successful first-crank start.
Fuel System Inspection
- Check fuel level: Open the fuel cap and visually confirm the tank is at least half-full. John Deere riding mowers typically hold 2-5 gallons depending on model.
- Verify fuel freshness: Fuel older than 30 days (or sitting through winter) can gum carburetors and prevent starting. If you’re starting the mower after seasonal storage, consider draining old fuel and refilling with fresh gasoline.
- Use appropriate fuel: Standard 87-octane unleaded gasoline works for all current John Deere residential models. Avoid ethanol blends higher than E10 (10% ethanol) unless your owner’s manual specifies otherwise.
- Inspect for leaks: Look under the fuel tank and along fuel lines for drips or cracks. Fuel leaks are a fire hazard and must be addressed before operation.
Oil Level and Quality
- Locate the dipstick: Most John Deere mowers use a twist-off cap dipstick on the side of the engine. Consult your model’s manual if you cannot locate it.
- Check level: Wipe the dipstick clean, reinsert it fully, then withdraw it again to read the level. Oil should reach the “full” mark or between “min” and “max” lines.
- Low oil will prevent starting: Many modern John Deere models have a low-oil safety shutoff that prevents the engine from cranking if oil is insufficient. Top up with the correct viscosity (typically SAE 10W-30 or 15W-40 depending on climate) if low.
- Inspect oil condition: If oil appears black or gritty, schedule an oil change before extended use, but the mower will still start with existing oil.
Battery and Electrical Connections
- Check battery terminals: Pop open the engine compartment and locate the battery. Terminals should be clean and tight (no white or blue corrosion visible).
- Clean corrosion if present: A mixture of baking soda and water applied with a wire brush removes corrosion. Rinse and dry thoroughly.
- Test battery charge: If the mower hasn’t been used in weeks, the battery may be discharged. Attempt a start; if you hear only a clicking sound or nothing at all, charge the battery with a standard automotive charger (most John Deere batteries are 12-volt).
- Verify connections: Both the positive (red) and negative (black) battery cables should be firmly connected to their respective terminals.
Mower Placement and Immediate Environment
- Level ground: Place the mower on flat, level terrain. Starting on a slope can damage the carburetor due to fuel slosh and prevent proper engine flooding.
- Clear space: Ensure there are no obstacles, children, or pets within 10 feet of the mower during startup.
- Outdoor or well-ventilated area: Always start the mower outside or in a garage with the door open. Running mower engines produce carbon monoxide, which is odorless and lethal in enclosed spaces.
Understanding Your John Deere Mower’s Control Layout
John Deere riding mowers feature a consistent control arrangement across models, though exact positions and styles vary by model year and series.
Choke Control: Location and Function
The choke restricts airflow to the carburetor when the engine is cold, enriching the fuel mixture for easier starting.
- Lever-style choke (older models): A black or red lever on the engine or dashboard marked “CHOKE” or with a snowflake symbol. Pull the lever fully toward you for cold start (full choke), then push it away as the engine warms.
- Push-button choke (mid-range models): A red button labeled “CHOKE” on the dashboard or control panel. Press and hold during the initial crank for cold starting.
- Automatic choke (newer models with electronic fuel injection): No manual choke control, the system adjusts automatically based on engine temperature.
Throttle Control: Speed Adjustment
The throttle lever controls engine RPM and fuel flow.
- Location: Usually a black lever on the dashboard to the left of the steering column, marked with a tortoise (slow) and hare (fast) symbol, or numbered 1-5.
- Cold-start position: Move the throttle to position 2 or 3 (mid-range) for cold starting. Full throttle (position 5) should not be used during the initial crank.
- Warm-start position: Once the engine is running, throttle can remain at mid-range for the first few seconds of idle, then adjust as needed for mowing.
Ignition System: Key, Button, or Switch
John Deere mowers use one of three ignition methods depending on model age and complexity.
- Traditional key ignition (most common): A keyed ignition switch on the dashboard with OFF, ON, and START positions. Turn the key clockwise to ON to power the mower, then continue to START to engage the starter motor.
- Electric start button (newer residential models): A red or black button on the dashboard. Press and hold for 1-2 seconds to crank the engine. Release immediately once the engine catches.
- Keyswitch with integrated safety (D-Series and older X-Series): A multi-position key that may include a LIGHTS or ACCESSORIES position in addition to OFF, ON, and START.
Safety Seat Switch: Engagement Requirement
All modern John Deere riding mowers have a seat-mounted safety switch that prevents engine start if no operator is seated.
- Location: A small button or contact strip under the seat cushion, connected by wires to the ignition system.
- Engagement: Simply sit fully on the seat before attempting to start. You should feel the seat compress fully and hear a faint “click” as the switch engages (though this is often not audible).
- Troubleshooting: If the engine won’t crank even with the key turned to START, stand up and sit back down firmly on the seat, ensuring full compression. If the switch still doesn’t engage, the wiring may be damaged and requires professional service.
Universal Step-by-Step Startup Procedure for John Deere Riding Mowers
Follow this sequence for 95% of John Deere residential and commercial riding mower models (D-Series, X-Series, X300 and above, Z-Series).
Step 1: Pre-Start Verification (30 seconds)
- Walk around the mower and visually inspect for obvious damage, flat tires, or loose parts.
- Place the mower on level ground and ensure the cutting deck is lowered to its storage position (if applicable).
- Check fuel, oil, and battery as outlined in the Pre-Start section above.
Step 2: Sit on the Mower Seat (5 seconds)
- Open the gate or approach the mower from the side (never jump on from behind).
- Settle fully onto the seat, feeling it compress completely. This engages the safety switch.
- Place your hands on the steering wheel or armrests for stability.
Step 3: Position the Throttle (5 seconds)
- Cold start (first start of the day or after storage): Move the throttle lever to position 3 or “mid-range.”
- Warm start (engine warm from previous mowing): Leave the throttle at position 2 or “low-mid.”
- Do not set throttle to maximum (position 5) during startup, this can flood the carburetor and prevent starting.
Step 4: Engage the Choke (5 seconds)
- For lever-style choke: Pull the choke lever fully toward you until it stops. You should hear a faint click or feel resistance when fully engaged.
- For push-button choke: Press the red choke button and hold it down; do not release until the engine catches or you release the key in the next step.
- For automatic choke (newer models): Skip this step, the system handles choking automatically.
- Temperature guide: If the air temperature is below 50°F, use full choke. Between 50-70°F, use half choke (push lever halfway). Above 70°F, no choke is typically needed, though a half choke often helps with cold metal.
Step 5: Insert and Turn the Ignition Key (10 seconds)
- Locate the key slot: On most John Deere mowers, this is on the right side of the steering column or on the dashboard directly in front of you.
- Insert the key fully until you feel it seat in the cylinder.
- Turn the key clockwise: First to the ON position (the dashboard lights illuminate if equipped). Pause for 1-2 seconds, then continue turning to the START position.
- Hold in START while the starter motor cranks the engine. Do not force the key, it should turn smoothly.
Step 6: Listen for Engine Catch (5-10 seconds)
- Typical startup sequence: You will hear a grinding sound (starter motor) followed by rapid firing sounds (engine combustion). Once combustion begins, the grinding sound will stop.
- When to release: Release the key to the ON position immediately once the engine catches. Continuing to crank after the engine is running can damage the starter motor.
- If the engine doesn’t catch: Release the key, wait 10 seconds, then attempt again. After three failed attempts, stop and troubleshoot (see Troubleshooting section below).
Step 7: Choke Adjustment After Starting (10-15 seconds)
- With lever choke: Once the engine catches, slowly push the choke lever away from you (toward “OFF”) while listening to engine speed. If the engine stutters or dies, pull the choke slightly back in. Gradually move the choke to fully off as the engine warms (usually 30 seconds to 1 minute).
- With push-button choke: Release the choke button immediately after the engine catches. If the engine dies, press the choke button again briefly.
- Normal idle sound: A healthy John Deere engine idles smoothly at 1,200-1,500 RPM with a steady, regular chuffing sound. Rough idle or sputtering suggests incomplete choke disengagement.
Step 8: Let the Engine Warm (30-60 seconds)
- Allow the engine to idle for at least 30 seconds before engaging the mower deck or moving at speed.
- Listen for smooth idle. If the engine continues to sputter or stall, pull the throttle to position 3 to increase airflow and clear any remaining fuel residue from the carburetor.
- Once the engine settles into a smooth idle (usually within 60 seconds), the mower is ready for operation.
Model-Specific Variations: D-Series, X-Series, and Z-Series
While the universal procedure above applies to most models, certain John Deere product lines have minor differences worth noting.
D-Series (D100-D180): Classic Design with Manual Controls
- Choke: Lever-style choke pulled toward you for cold start. May require a full choke pull even in warm weather on first start after storage.
- Key ignition: Traditional three-position key (OFF, ON, START). Some D-Series models have a fourth “LIGHTS” position.
- Throttle: Five-position lever (1-5). Use position 2-3 for cold start, position 5 for mowing.
- Unique note: D-Series mowers sometimes have a fuel valve (petcock) on the bottom of the fuel tank that must be turned on before starting after long storage. Check your manual for this valve’s location.
X-Series (X300 and X500 series): Mid-Range with Enhanced Features
- Choke: Mix of lever-style (older X-Series) and automatic (newer models with fuel injection). Consult your owner’s manual or the control panel markings.
- Key ignition: Three-position key with possible integrated dashboard (lights, deck controls). Some X-Series models add an “ON” position that powers the deck without starting the engine.
- Throttle: Lever or electronic dial depending on model year. Electronic throttles may have preset positions marked on the dashboard.
- Safety enhancements: All X-Series models include the seat safety switch, rollover protection, and integrated circuit breakers for the electrical system.
Z-Series (Z225, Z435, Z645 and larger): Zero-Turn with Modern Electronics
- Choke: Automatic in nearly all Z-Series models (fuel-injected engines). No manual choke control needed.
- Ignition: Key-start or electronic push-button start, depending on model year and tier.
- Throttle: Electronic throttle control, sometimes with preset “cruise” settings for consistent mowing speed.
- Start procedure: Sit on the seat, press the choke button (if manual choke present), turn the key to START or press the start button. Z-Series mowers often start on the first or second attempt due to fuel injection precision.
- Unique consideration: Z-Series mowers with advanced electronics may have a brief “self-check” period of 3-5 seconds after the key is turned ON, before you attempt to start. Wait for the lights to stabilize before turning the key to START.
Seasonal Startup Considerations
Spring Startup After Winter Storage
Winter storage can challenge mower starting due to fuel degradation and component corrosion. Readers comparing setup options can review our technical analysis on marshall stanmore iii vs harman kardon onyx studio 8.
- Fuel replacement: If the mower was stored with fuel in the tank over winter (more than 30 days), drain the old fuel and replace it with fresh gasoline. Old fuel forms varnish in the carburetor, preventing normal fuel flow.
- Oil change: Consider changing the oil if the mower has been stored for more than three months. Fresh oil ensures proper lubrication on cold starts.
- Battery charging: Batteries naturally discharge during storage. Charge the battery fully (4-8 hours on a standard automotive charger) before attempting to start.
- Cold-start procedure: Use full choke (pull the lever all the way). Spring temperatures often hover around 50°F, requiring more enriched fuel for reliable starting.
- First-start challenges: After winter storage, expect the engine to crank longer than usual (10-15 seconds) before catching. This is normal. If it doesn’t start within 30 seconds of continuous cranking, stop and let the battery rest for 10 minutes before trying again.
Mid-Season and Warm-Weather Startup
- Warm-start procedure: No choke or half choke typically needed when air temperature exceeds 70°F and the engine is not ice-cold.
- Throttle setting: Use position 2-3 (mid-range) rather than full throttle to avoid flooding the carburetor with excess fuel.
- Expected start time: On the first crank of a warm day, the engine should catch within 3-5 seconds. Anything longer suggests a fuel or ignition system issue.
- Fuel stabilizer: If mowing frequency drops (e.g., during drought or after lawn maintenance), adding a fuel stabilizer (such as Sta-Bil) to the fuel tank extends fuel life and prevents carburetor buildup.
Troubleshooting: Why Your Mower Won’t Start
Engine Cranks but Won’t Catch (Fuel or Spark Issue)
Symptoms: The starter motor turns the engine over, but combustion never begins. The engine sounds like it’s trying to fire but never catches.
- Check spark: Remove one spark plug (consult your manual for location) and reconnect the spark plug wire. Hold the plug against the engine block (metal part) using an insulated tool. Turn the key to START and observe if a visible spark jumps between the plug electrode and the block. No spark indicates a faulty plug or ignition system.
- Inspect fuel flow: Turn the key to ON and listen near the fuel tank for a faint “buzz”, this is the fuel pump priming. No buzz suggests a dead fuel pump or clogged fuel filter.
- Clear the carburetor: If the mower has been unused for 2+ months, drain the carburetor by locating the drain plug (a small screw at the bottom of the carburetor housing) and turning it counterclockwise until fuel drains into a container. Refill the tank with fresh fuel and retry starting.
Engine Won’t Crank at All (Electrical Issue)
Symptoms: Turning the key to START produces no sound, no clicking, and no attempt to turn the engine over. For complementary field maintenance guidelines, examine our breakdown of dyson v8 cyclone vs bissell featherweight stick.
- Check the seat switch: Stand completely up off the seat, then sit back down firmly. Ensure you hear the faint click of switch engagement. If not, the switch may be broken and requires replacement.
- Verify battery charge: Try using the mower’s lights or dashboard (if equipped). If lights are dim or non-existent, the battery is discharged. Charge it fully before attempting to start.
- Inspect battery cable connections: Open the engine compartment and look at both battery terminals. They should be shiny and tight. Corrosion (white, blue, or green buildup) should be cleaned with a wire brush and baking soda solution. Tighten any loose terminal clamps with a wrench.
- Test the ignition switch: If you have a multimeter, turn the key to ON and measure voltage at the ignition switch input (consult the manual). If you see no voltage or significantly lower voltage than expected, the key switch may be faulty.
Clicking Sound During Attempted Start (Weak Battery or Bad Starter)
Symptoms: When you turn the key to START, you hear rapid “click-click-click” rather than the grinding sound of the starter motor.
- Charge the battery: This is almost always the cause. Charge the 12-volt battery fully on a standard automotive charger, then retry. Charging takes 4-8 hours depending on the battery’s depth of discharge.
- Clean battery terminals again: Even if terminals look clean, corrosion can form a thin invisible layer. Disconnect the cables, scrub the terminals and cable ends with a wire brush, and reconnect firmly.
- Check starter motor: If the battery is fully charged and connections are clean but clicking persists, the starter motor may be faulty and requires replacement by a technician.
Engine Starts but Dies Immediately (Choke or Carburetor Issue)
Symptoms: The engine catches and runs for 1-3 seconds, then dies. Retrying produces the same result. To evaluate matched hardware tolerances, consult our detailed overview of bissell crosswave hydrosteam vs shark stainforce.
- Verify choke position: If using a manual choke, the lever may not be fully pulled in during cold start. Attempt to start again with the choke lever pulled all the way toward you.
- Carburetor flooding: If you’ve made multiple start attempts without success, the carburetor may be flooded with excess fuel. Wait 10 minutes for fuel to evaporate, then try again with no choke and the throttle at position 2.
- Dirty fuel filter: A clogged fuel filter restricts fuel flow, causing the engine to starve and die. Locate the fuel filter (inline between the fuel tank and engine, or on the engine block) and replace it if it appears dark or clogged. Replacement takes 5-10 minutes and costs $10-20.
Engine Starts Rough or Sputters (Incomplete Choke Disengagement)
Symptoms: The engine catches but runs unevenly, sputtering and misfiring for 30+ seconds even as it warms.
- Manual choke models: Slowly push the choke lever away from you while the engine is running and listening. As you push it, the sputtering should smooth out. If the engine dies, pull the choke back slightly and try again.
- Automatic choke models: This usually resolves on its own within 60 seconds as the engine warms and the choke disengage automatically. If sputtering continues beyond 60 seconds, there may be a fuel quality issue or a faulty automatic choke mechanism.
Buyer FAQs: How To Start A John Deere Riding Lawn Mower Solved
Q: Why do I need to sit on the mower seat to start it?
A: Modern John Deere mowers have a safety seat switch that prevents the engine from starting if no operator is seated. This prevents unattended operation and protects you from accidental deck engagement or movement. Simply sitting on the seat fully compresses the switch and allows the ignition to function.
Q: Can I start my John Deere mower with the choke off in cold weather?
A: Cold engine combustion requires a richer fuel mixture, which the choke provides. Starting with the choke off in cold temperatures is very difficult and may result in extended cranking that drains the battery. Always use full choke if the engine is below 60°F. You can reduce choke gradually as the engine warms.
Q: How long should I let my mower warm up before mowing?
A: Allow the engine to idle smoothly for 30-60 seconds after starting. Once the engine settles into a steady, regular idle sound and the choke is fully disengaged, the mower is ready to mow. Mowing immediately after starting is acceptable but running the deck at full speed during the first 30 seconds can stress the engine.
Q: What should I do if my mower won’t start after sitting in the garage for a year?
A: Drain and replace the fuel (old fuel turns to varnish and clogs the carburetor), charge the battery fully, and inspect the oil. If the mower still won’t start, you may need to clean or replace the spark plugs and carburetor. A professional tune-up at a John Deere dealer often resolves year-long storage issues ($75-150 labor).

Pros
- Strong 300CCA rating delivers solid starting power for lawn and garden equipment
- Sealed AGM construction is leak-resistant and requires no maintenance
- Direct fit Group U1 size matches many John Deere, Toro, Cub Cadet, and Craftsman machines
- Clear polarity markings and nut-bolt terminals simplify connections
- Durable build suits year-round light-duty outdoor use
Cons
- At 18.68 lbs the battery can feel heavy during handling and installation
- Positive terminal fixed on the left side requires careful polarity matching to avoid issues
- Battery returns must be arranged directly with the seller rather than through standard channels
The WEIZE 12V 300CCA BCI Group U1 AGM SLA starting battery is built specifically for lawn tractors, garden mowers, and light utility vehicles. It measures 7.68 inches long, 5.12 inches wide, and 6.22 inches high with a total height of 7.09 inches and weighs 18.68 lbs. The unit uses nut-and-bolt terminals with the positive post on the left (red) and negative on the right (black), giving a solid, purpose-built appearance for outdoor power equipment.
Performance centers on its 300 cold cranking amps and AGM sealed design that supplies reliable starts and high reserve capacity. This makes it well suited for light-duty seasonal use in equipment from John Deere, Toro, Cub Cadet, and Craftsman. The maintenance-free AGM construction resists vibration and supports consistent power delivery without fluid checks, helping keep tractors and mowers ready throughout the year.
Considerations include the 18.68 lb weight, which can make lifting and positioning more demanding. The fixed left-side positive polarity also requires confirmation of vehicle wiring before install. Additionally, any warranty or return support involves contacting the seller directly because of battery-specific policies.
The WEIZE Group U1 battery is a practical choice for owners of compatible lawn and garden machines who need a straightforward AGM replacement with solid cranking power and brand fitment. It delivers the most value to users seeking durable, maintenance-free starting performance for light-duty tractors and mowers.

Pros
- Extensive compatibility with dozens of John Deere and Cub Cadet riding mower models
- Constructed from high-performance ABS and quality copper wire for strong conductivity
- Replaces multiple OEM part numbers including AM138068 and 725-04439 in one unit
- Standard 12V design with 1/4 inch terminal studs for straightforward mounting
Cons
- Compatibility is limited to the listed models only so users must double-check fitment
- Package contains solely the solenoid with no extra hardware or printed wiring diagram
- As an aftermarket part it may require basic electrical knowledge for optimal installation
The Tecreddy Starter Solenoid is a 12V relay purpose-built as a direct replacement for popular John Deere, Cub Cadet, MTD and Troy-Bilt riding lawn mower tractors. Its housing uses high-performance ABS combined with QA-1/155 copper wire, creating a compact and robust unit that feels solid and ready for outdoor service right out of the package.
In real-world use the solenoid delivers reliable cranking performance thanks to its excellent conductivity and 1/4 inch terminal studs. It grounds through the terminal and supports the full range of listed models from John Deere L-series and D-series to Cub Cadet LTX and RZT tractors, restoring starter function when the original part fails. The design prioritizes durability under vibration and heat typical of lawn tractor engines.
Potential drawbacks include the need to confirm exact model match because the unit is engineered only for the specified machines. The package supplies just the solenoid itself, so installers must rely on existing vehicle wiring diagrams or the product images for reference. As an aftermarket component it assumes basic electrical familiarity for safe connection.
Overall this Tecreddy solenoid offers strong value for owners of compatible John Deere or Cub Cadet riding mowers who need a quick, conductive replacement that mirrors OEM form and function. Users with matching equipment will appreciate the straightforward fit and materials quality for dependable seasonal operation.

Pros
- Extensive model compatibility list for Jo-hn Deere lawn tractors and several other brands
- Includes six keys for excellent value and spare inventory
- Matches multiple OEM part numbers for accurate plug-and-play replacement
- Suitable for riding mowers, zero-turn and lawn tractors listed in the specs
Cons
- Compatibility limited strictly to the listed models and part numbers with no universal guarantee
- No material durability or weather-resistance details provided beyond basic replacement function
- Pack of six may exceed needs for single-mower owners seeking only one or two spares
The gradora 6PCS GY20680 lawn mower ignition keys serve as practical replacement starters for a wide range of residential riding mowers. Packaged as a six-key set, they immediately convey value for owners who want backups on hand. Build is straightforward functional keys that match common OEM profiles without extra frills.
In real-world use these keys restore ignition on Jo-hn Deere models such as the D100 series, LA100 series, X300 and X500 lines, plus select Mu-rray, Toro and AYP units. Matching multiple cross-reference numbers like AM131946 and 725-1745 means they slide into existing switches for reliable starting performance when original keys are lost or worn.
Potential drawbacks include the fact that fitment is restricted to the explicitly listed models, so verification against your mower’s part number is essential. Material longevity and resistance to outdoor elements are not detailed, leaving durability dependent on typical metal-key expectations.
Overall this set is ideal for Jo-hn Deere lawn tractor owners and multi-brand users who need affordable, ready-to-use spare ignition keys. Those with matching models will appreciate the multi-pack convenience and broad compatibility for seasonal maintenance.
Technical Standards and Compliance
Mechanical safety standards, operational tolerances, and protective gear guidelines align with benchmark specifications established by the American National Standards Institute (ANSI).









