

Direct Answer: How to String a Weedwacker
To string a weedwacker, first disconnect the power source for safety. Remove the trimmer head and spool, cut a new line to the correct length (typically 10 to 25 feet depending on your head size), and insert one end into the spool’s anchor point. Wind the line tightly in the direction shown by the arrows on the spool, secure the ends in the holding slots, feed them through the eyelets on the trimmer head, and reassemble. For bump-feed heads, tap the head on the ground to advance the line before you start trimming.

Pros
- Includes both the trimmer and blower in one combo kit
- Automatic line feed improves ease of use compared with bump-feed trimmers
- Telescoping pole adds flexibility for trimming and edging tasks
- Blower performance is strong enough for typical light-to-medium cleanup jobs
Cons
- Uses a brushed motor rather than a brushless design
- No detailed battery runtime, charging time, or weight information is provided in the manufacturer listing
- Best suited for basic residential yard maintenance rather than heavy-duty landscaping
Overview: The CRAFTSMAN CMCK197M1 is a 20V MAX combo kit that pairs a string trimmer with a leaf blower. It is aimed at homeowners who want a practical, battery-powered solution for routine lawn edging and light yard cleanup.
Performance: The trimmer offers a 13-inch cutting swath and automatic 0.065-inch line advance, which helps simplify everyday trimming jobs. The blower adds up to 340 CFM and 90 MPH, giving it enough output for clearing leaves and debris from common outdoor surfaces.
Considerations: This kit uses a brushed motor, which is a more basic design than brushless alternatives. The manufacturer listing also does not include battery runtime, charge time, or weight, so shoppers looking for long-run or heavy-duty performance may want to compare carefully.
Verdict: The CMCK197M1 is a sensible choice for homeowners who want a straightforward trimmer and blower combo from CRAFTSMAN. It offers useful core features and convenient operation, but it is best matched to light-to-moderate residential use.

Pros
- 6.5-amp motor, marketed for tough overgrowth
- Push-button feed for 0.065-inch line
- Quick switch between trimming and edging
- Adjustable-length pole for different user heights
- Integrated hook for VERSATRACK wall storage
Cons
- VERSATRACK wall system is sold separately
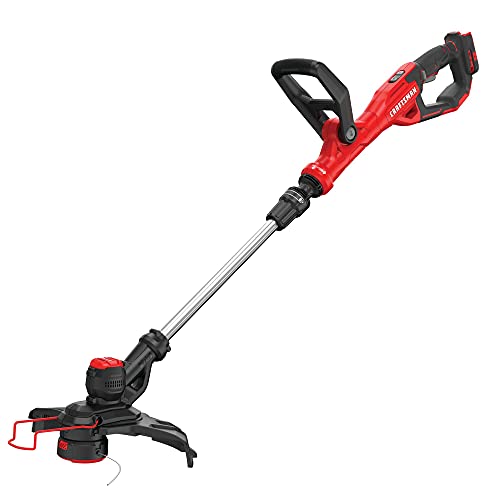
Pros
- Functions as both a string trimmer and an edger
- Automatic line feed reduces the need for manual bumping
- Two speed settings provide more control over performance and runtime
- Telescoping pole adds convenience when edging or adjusting reach
Cons
- Battery and charger are not included, so first-time buyers need compatible V20 power tools accessories
- The 13-inch swath is practical for home use, but not ideal for heavy-duty commercial-scale jobs
- Uses 0.065-inch line, which may require more frequent replacement in tougher grass or thicker weeds
Overview: The CRAFTSMAN V20 WEEDWACKER CMCST900B is a cordless string trimmer and edger designed for routine lawn maintenance. As a bare tool, it is aimed at users who already own compatible CRAFTSMAN V20 batteries and want a simple, versatile trimming solution.
Performance & Key Features: Its 13-inch cutting swath helps cover ground efficiently, while the 2-speed setting gives users a choice between more power and more runtime. The automatic line advance feeds 0.065-inch line without bumping, and the turn-to-edge function makes switching between trimming and edging straightforward.
Drawbacks & Considerations: This model does not include a battery or charger, which adds to the total setup cost for new users. It is also best suited to typical residential yard work rather than demanding, heavy-duty cutting jobs.
Verdict: The CRAFTSMAN V20 CMCST900B is a practical pick for homeowners who want a cordless trimmer with edging capability and automatic line feed. It offers the most value for users already in the CRAFTSMAN V20 platform or shoppers looking for an easy-to-use yard maintenance tool.
Understanding Your Trimmer Head Type
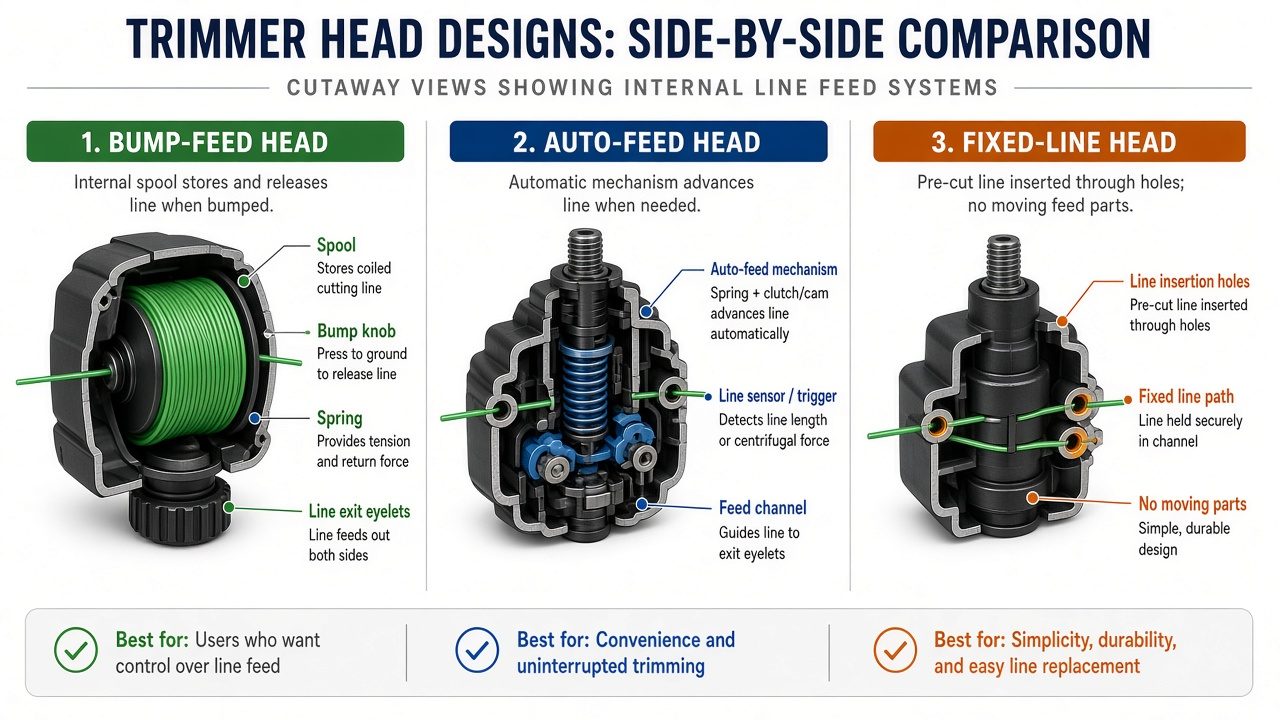
Before you restring a weedwacker, it is important to identify which type of trimmer head you own. Although the basic principle is the same, replace worn line with fresh line wound on a spool, the exact steps differ depending on the design. Using the wrong method can lead to jams, tangled line, or a head that does not feed properly.
Bump-Feed Heads
Bump-feed heads are the most common design on residential string trimmers. The line is stored on a spool inside the head, and a spring-loaded mechanism releases more line when you tap the head on the ground while the trimmer is running. To restring a bump-feed head, you normally remove the entire head, take out the spool, and wind fresh line onto it. The direction of winding is usually marked on the spool or inside the head.
Auto-Feed Heads
Auto-feed heads release new line automatically when the engine speed changes, without the need to tap the head. Many auto-feed systems use a pre-wound spool that you simply drop into the head and thread through the eyelets. Some models, however, allow manual rewinding. Check your owner’s manual to see whether your auto-feed head accepts pre-wound spools or requires hand winding.
Fixed-Line Heads
Fixed-line heads do not use a spool at all. Instead, you cut short pieces of line and insert them through holes in the head, then twist or snap the head closed. These heads are common on lightweight electric trimmers and are the easiest to restring. You do not need to wind anything, but you must use the correct line diameter and cut both pieces to the same length so the head stays balanced.
Why is it important to identify your trimmer head type before restringing? Because the steps for a bump-feed head will not work on a fixed-line head, and forcing a pre-wound spool into a manual-wind head can break the internal spring. A quick look at the head, does it have a spool inside, or just holes for line?, will tell you which procedure to follow.
Safety Preparations Before Restringing
Restringing a weedwacker is a simple job, but it involves sharp edges, spring-loaded parts, and, in the case of gas trimmers, fuel and engine components. Taking a few safety precautions will prevent injury and damage to the tool. For broader ecosystem context, read through our operational guide on z890 vs x870e motherboard.
Disconnect the Power Source
Always disconnect the power before you touch the trimmer head. For electric trimmers, unplug the cord or remove the battery. For gas trimmers, switch the engine off and disconnect the spark plug wire. This is not optional, many trimmer heads have sharp cutting blades or metal guards, and some spools are under spring tension. If the trimmer accidentally starts while you are working on the head, you could be seriously injured.
Wear Protective Gear
Wear work gloves to protect your hands from the sharp edges of the trimmer head and the cutting line. Safety glasses are also recommended, especially when removing the old line, because fragments can snap and fly. If you are working on a gas trimmer, allow the engine to cool before you begin. For troubleshooting and reliability insights, consult our in-depth marshall stanmore iii vs harman kardon onyx studio 8 report.
Work in a Clean, Open Area
Restringing is easier on a workbench or a clean patch of ground. The spool and spring are small parts that are easy to lose in grass. Lay out a towel or drop cloth to catch any pieces that fall when you open the head.
Step-by-Step Restringing Instructions
The following steps apply to most bump-feed and auto-feed spool-type heads. If your trimmer uses a fixed-line head, skip to the notes after step 7. Readers comparing setup options can review our technical analysis on dyson v8 cyclone vs bissell featherweight stick.
Step 1: Remove the Trimmer Head and Spool
With the power disconnected, press the tabs on the side of the trimmer head to release the outer cover, or unscrew the head from the shaft. On many models, the head has two small tabs that you press together while pulling the cover off. Once the cover is off, lift out the spool. Note the order of the parts: cover, spool, spring, and base. Take a photo with your phone before disassembly so you can reassemble correctly.
Step 2: Remove Old Line and Clean the Spool
Pull any remaining line off the spool and discard it. Check the spool and the inside of the head for debris, grass clippings, or dirt, and wipe them clean. A dirty spool can cause the line to bind or feed unevenly. Also inspect the spring and the eyelets for damage; if the eyelets are worn or cracked, replace the head before restringing. For complementary field maintenance guidelines, examine our breakdown of bissell crosswave hydrosteam vs shark stainforce.
Step 3: Cut the Correct Length and Diameter of Line
Most trimmer heads need between 10 and 25 feet of line, depending on the spool size. Check the side of the spool or the trimmer manual for the recommended length. If the line is too long, it will be difficult to wind and may jam. If it is too short, you will run out of line quickly.
You must also use the correct line diameter. Common diameters are 0.065, 0.080, 0.095, and 0.105 inches. Using line that is too thick can jam the head or strain the engine; using line that is too thin will break easily. The trimmer manual or the head itself usually lists the maximum diameter. When in doubt, use the diameter that came with the trimmer.
| Line Diameter | Typical Use | Common Trimmer Types |
|---|---|---|
| 0.065 in | Light trimming, grass only | Small electric trimmers |
| 0.080 in | General residential trimming | Standard electric and small gas trimmers |
| 0.095 in | Heavy grass and light weeds | Mid-size gas trimmers |
| 0.105 in | Thick weeds and brush | Commercial and high-power trimmers |
Step 4: Insert the Line into the Spool Anchor
Find the small slot or hole in the center of the spool. Fold the line in half and insert the midpoint into the anchor point, or insert one end as directed by the arrows on the spool. On most spools, you fold the line in half, hook the loop into the slot, and then wind both halves together. Make sure the line is seated firmly in the anchor so it does not pull out while winding.
Step 5: Wind the Line in the Direction Indicated
This is the most common point of confusion. Look for the arrows on the spool or inside the head, they show the direction in which the line must be wound. On most trimmers, you wind the line in the same direction that the spool rotates during use, but this varies by brand. Winding the wrong way will cause the line to unwind immediately or fail to feed.
Wind the line tightly and evenly, keeping the coils side by side without overlapping. If your spool has two separate channels, wind one end of the line in one channel and the other end in the other channel. Stop winding when you have about 4 to 6 inches of line left sticking out of each side.
Step 6: Secure the Line in the Holding Slots
Most spools have small notches or slots on the rim. Tuck the loose ends of the line into these slots to hold them in place while you reassemble the head. If you skip this step, the line will unwind as soon as you put the spool back into the head.
Step 7: Feed the Line Through the Eyelets and Reassemble
Place the spool back into the head, aligning the tabs or notches. Pull the two loose ends of the line out through the eyelets on the outer cover. Hold the line taut while you press the cover back on, then snap it into place. Give each end of the line a firm tug to confirm it is not caught in the mechanism.
Fixed-Line Head Notes
If your trimmer has a fixed-line head, cut two pieces of line to the length specified in the manual (usually 6 to 12 inches). Insert each piece through the holes in the head until the ends poke out the opposite side, then snap the head closed. Make sure both pieces are the same length so the head does not vibrate.
Step 8: Test the Trimmer
Reconnect the power source and start the trimmer. Let it run at low speed and listen for unusual vibration or rattling. For bump-feed heads, tap the head on the ground to advance the line, then trim a small patch of grass. If the line does not feed, the spool may be wound in the wrong direction or the line may be caught in the holding slots. Stop the trimmer and recheck your work.
Troubleshooting Common Restringing Issues
Even experienced users run into problems after restringing. Here are the most common issues and how to fix them.
Why Does the Trimmer Line Jam or Not Feed?
The most common cause of a jam is line that is wound too loosely, crossed over itself, or wound in the wrong direction. Remove the spool and rewind the line tightly, keeping the coils neat and parallel. Another cause is using line that is too thick for the head; check the maximum diameter marked on the head. Dirt or debris inside the head can also prevent the spool from turning, so clean the head before rewinding.
What Happens If You Wind the Line in the Wrong Direction?
If the line is wound opposite to the arrow direction, it will unwind as soon as the spool rotates, and the line will either fly out of the head or tangle inside the cover. The trimmer may also stop feeding line entirely. The fix is simple: remove the spool and rewind in the correct direction. Look for the arrow on the spool or inside the head housing.
How Do You Fix a Line That Breaks Immediately After Restringing?
If the line snaps right away, you are likely using a line that is too thin for the job, or the line is rubbing against a sharp edge on the head. Check the eyelets for burrs or cracks and file them smooth if needed. Also make sure the line is not too long; line that extends too far beyond the cutting head will flex and break. Shorten the line to the recommended length and try again.
Why Does Only One Side of the Line Feed?
This usually happens when the two halves of the line are not wound evenly, or when one end is caught in the spool’s holding slot. Unwind the spool, make sure both ends are the same length, and rewind them together so they stay balanced. Also verify that both eyelets are clear of debris.
Tips for Maintaining Your Trimmer Line
A well-maintained trimmer line lasts longer and cuts more cleanly. Follow these practices to get the most out of every spool.
Check the Line Before Each Use
Inspect the line before you start trimming. If it is cracked, brittle, or shorter than the recommended length, replace it. Running a trimmer with worn line puts extra strain on the engine and produces ragged cuts. A quick visual check takes ten seconds and prevents mid-job failures.
Store the Trimmer Properly
When you finish trimming, store the weedwacker in a dry place out of direct sunlight. UV light and heat make nylon line brittle and prone to breaking. If the trimmer will sit for more than a few weeks, consider removing the spool and storing it in a sealed bag to keep the line flexible.
Choose the Right Line for the Job
Round line is the standard choice for general trimming. Twisted or star-shaped line cuts through thicker weeds more aggressively but wears out faster. If you only trim grass, a standard round line at the recommended diameter is the most economical option. If you regularly cut weeds and brush, a heavier line may be worth the extra cost.
Replace Line at the Right Time
There is no fixed schedule for replacing trimmer line because it depends on how often you trim and what you cut. As a rule of thumb, replace the line when it becomes shorter than the guard or when it breaks frequently. Some users restring at the start of each mowing season, which is a good habit if you store the trimmer over the winter.
Frequently Asked Questions About How To String Weedwacker
How much line do I need to string a weedwacker?
Most spool-type trimmer heads hold between 10 and 25 feet of line. Check the markings on the spool or the owner’s manual for the exact capacity. Using too much line makes winding difficult and can cause jams; using too little means you will run out quickly.
Do I need to remove the spool to restring a bump-feed head?
Yes, on most bump-feed heads you must remove the outer cover and lift out the spool to wind new line. Some newer models accept pre-wound spools that you drop in without winding, but the spool still needs to be removed from the head. Always disconnect the power source before opening the head.
Can I use any trimmer line on my weedwacker?
No. You must use the line diameter recommended by the trimmer manufacturer. Line that is too thick can jam the head and overwork the engine, while line that is too thin breaks easily. The maximum diameter is usually printed on the trimmer head or listed in the manual.
Why does my trimmer line keep coming out of the head?
The line is likely wound in the wrong direction, or it was not secured in the spool’s holding slots before reassembly. Remove the spool, rewind the line in the direction of the arrows, tuck the ends into the slots, and make sure the line passes cleanly through the eyelets when you close the head.
Eye and Hand Safety Basics
Trimmer line can snap back at speed, so keep the head pointed away from your face. Good eye protection is a simple habit to build early. Readers who want a general overview of outdoor power tool safety may consult American National Standards Institute (ANSI).









