

Quick Answer
Boot MemTest86 from a USB drive, run all 13 tests for at least two full passes, and watch the error count column. Zero errors across two passes = RAM is healthy. Any non-zero error = a faulty DIMM, bad slot, or marginal XMP/EXPO profile requiring immediate action.

Pros
- Rated for speeds up to 6400MT/s with AMD EXPO profile
- Tight CL30-39-39-102 latency timings at 1.40V
- Designed and validated for AMD X870, X670, and B650 platforms
Cons
- Requires manual BIOS overclocking to exceed base JEDEC speeds
- Peak speed depends heavily on motherboard and CPU capability

Pros
- 32GB capacity handles demanding games, multitasking, and creative workloads
- 6000MT/s speed with CL30 latency is well suited for AMD Ryzen performance
- AMD EXPO profiles make enabling rated speeds simple in BIOS
- FURY Beast series is a well known Kingston memory line for desktop builds
Cons
- DDR5 memory requires a DDR5 compatible motherboard, so it will not work with older DDR4 systems
- EXPO is designed for AMD platforms, so Intel users may need to rely on XMP or manual settings
The Kingston FURY Beast 32GB 6000MT/s DDR5 CL30 is best for AMD builders who want high capacity memory with easy overclocking through EXPO profiles. The 6000MT/s speed and CL30 latency pair well with modern Ryzen systems for responsive gaming and multitasking. The main trade-off is that this is DDR5 only, so it requires a compatible DDR5 motherboard and will not fit older DDR4 systems.
Capacity: 32GB
Type: DDR5
Speed: 6000MT/s
Latency: CL30
Overclocking: AMD EXPO
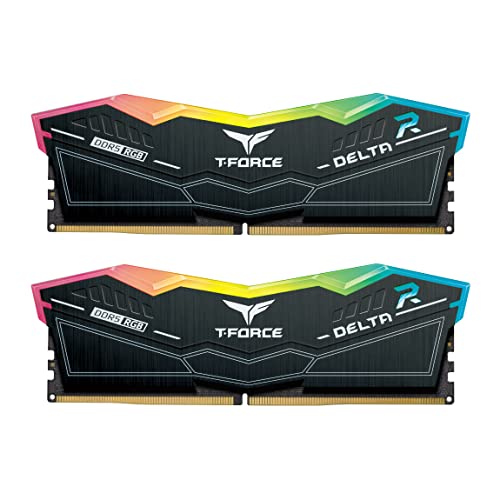
Pros
- Very high 7200MHz DDR5 speed rating for a performance-focused desktop build.
- 32GB capacity in a 2x16GB configuration supports dual-channel operation.
- XMP 3.0 support makes performance tuning more convenient on compatible boards.
- Power management ICs are included for stable and efficient power usage.
Cons
- Requires a compatible 600 or 700 series chipset platform to fully benefit from its rated performance.
- High-speed DDR5 kits like this can be more expensive than lower-frequency alternatives.
- RGB lighting may add value for some users but is unnecessary for buyers focused only on raw performance.
Overview & Design: The TEAMGROUP T-Force Delta RGB DDR5 32GB kit is a desktop memory upgrade built around a 2x16GB layout, 7200MHz speed, and CL34 timings. It is designed for users who want a performance-oriented RAM kit with an RGB look for modern gaming or creator PCs.
Performance & Key Features: Its high frequency, XMP 3.0 readiness, and A-DIE design make it a strong fit for demanding workloads where memory bandwidth matters. The included power management ICs are intended to support stable and efficient power usage, and the kit is aimed at 600 and 700 series chipset systems that can take advantage of fast DDR5 memory.
Drawbacks & Considerations: This is a premium-spec kit, so it is best suited to users with a compatible motherboard and CPU platform. Buyers should also remember that very fast DDR5 can depend heavily on system compatibility, and RGB lighting adds visual appeal rather than direct performance.
Verdict: The T-Force Delta RGB DDR5 32GB 7200MHz CL34 kit makes the most sense for enthusiasts, gamers, and creators building a compatible high-performance desktop. If you want fast DDR5 memory with a polished design and easy profile support, it is a strong option to consider.

Pros
- Fast 6000MHz rated speed with tight CL30-36-36-76 timings
- Ten individually addressable RGB LEDs per module
- Supports AMD EXPO and Intel XMP profiles
- Onboard voltage regulation manageable via CORSAIR iCUE
Cons
- Advertised 6000MHz speed requires manual BIOS overclocking
- Higher 1.77-inch profile may affect compact cooler clearances

Pros
- High 6000MT/s rated speed for a performance-focused DDR5 kit.
- Low CL30 timing is attractive for gamers and PC enthusiasts.
- Works with both Intel XMP 3.0 and AMD EXPO platforms.
- Includes an aluminum heatsink for improved thermal management.
- Backed by a lifetime warranty for long-term ownership confidence.
Cons
- Advertised speeds require compatible motherboard, CPU, and BIOS profile support.
- This is unbuffered UDIMM desktop memory, so it is not intended for laptops or server systems.
- Full performance depends on system configuration, so plug-and-play speeds may run at JEDEC defaults until profiles are enabled.
Overview & Design: The SP Silicon Power Value Gaming DDR5 32GB kit is a desktop memory upgrade made for users who want fast DDR5 performance in a standard 2x16GB UDIMM layout. The aluminum heatsink gives it a practical, heat-conscious design that fits a performance PC build.
Performance & Key Features: Rated at 6000MT/s with CL30 timings and 1.35V operation, this kit is aimed at responsive gaming and demanding multitasking. Support for Intel XMP 3.0 and AMD EXPO makes it easier to run the advertised profile on compatible systems, while the integrated PMIC helps support more stable power delivery.
- 32GB total capacity in a dual-channel 2x16GB kit
- 6000MT/s rated speed with CL30 timing
- XMP 3.0 and AMD EXPO support
- Aluminum heatsink for thermal management
- Lifetime warranty coverage
Drawbacks & Considerations: The main limitation is compatibility, since the advertised speed depends on the motherboard, CPU, and BIOS profile support. As with most high-speed DDR5 kits, plug-and-play behavior may default to JEDEC standards until XMP or EXPO is enabled.
Verdict: This kit makes the most sense for desktop gamers and PC builders who want a fast 32GB DDR5 upgrade with easy profile-based tuning. If your platform supports 6000MT/s DDR5 and you want a balanced mix of speed, cooling, and warranty coverage, it is a strong option to consider.
RAM errors kill systems silently. A single flipped bit can corrupt a database write, crash a render mid-frame, or trigger a MEMORY_MANAGEMENT Blue Screen of Death hours after the actual fault occurred, making software-level diagnosis nearly impossible. MemTest86, the gold-standard standalone memory diagnostic, runs entirely outside the operating system, giving it direct hardware-level access to every addressable byte of installed RAM. This guide covers the complete workflow to test RAM with MemTest86 in 2026, from UEFI configuration and USB creation through result interpretation, DIMM isolation, and failure triage, on platforms ranging from Intel Core Ultra 200 to AMD Ryzen 9000 series machines.
Why RAM Errors Are Harder to Diagnose Than Any Other Hardware Fault
Modern DDR5 platforms running at XMP/EXPO profiles above the JEDEC Memory Standards Specification base frequency (4800 MT/s for DDR5) push DRAM cells well past their conservative rated margins. The result: intermittent, non-deterministic faults that only appear under specific thermal or voltage conditions. A faulty stick may pass POST, load Windows, and run Chrome for six hours before triggering a single-bit error during a memory-intensive workload.
In-OS tools , including Windows Memory Diagnostic , test RAM while the operating system itself occupies a large portion of address space. The OS memory manager marks pages in use as off-limits to diagnostic routines, leaving potentially faulty regions untested. MemTest86 bypasses this entirely: it boots from USB, takes control of the hardware before any OS loader, and hammers all installed physical memory with no exclusions. This is why hardware engineers and RAM manufacturers treat a clean MemTest86 two-pass result as the authoritative pass/fail verdict , not a Windows tool report. For troubleshooting and reliability insights, consult our in-depth set pagefile size windows 11 report.
If you are also chasing platform-level instability, for example comparing memory controller behavior between the AMD Ryzen 5 9600X vs Intel Core Ultra 5 245K, a clean RAM baseline from MemTest86 is a prerequisite before attributing crashes to the CPU or motherboard.
MemTest86 vs MemTest86+: Choosing the Right Tool in 2026
Two separate projects carry nearly identical names. Understanding the difference prevents wasted diagnostic time.
MemTest86 (PassMark)
The commercially maintained fork by PassMark Software. The free tier supports full 13-algorithm testing, UEFI Secure Boot compatibility, DDR5 support, ECC error logging, and HTML/XML report export. The Pro tier ($49 USD) adds network PXE booting, automated scheduling, and multi-system deployment , relevant for IT administrators validating server memory at scale. For consumer desktop diagnosis in 2026, the free tier is complete. Readers comparing setup options can review our technical analysis on check ram die type.
MemTest86+ (Open Source)
The community-maintained open-source fork supporting IA-32, x86-64, and LoongArch64. Version 7.x adds DDR5 support, UEFI booting, and parallel CPU testing. It lacks the polished HTML report output of PassMark’s build but is fully open and auditable. Both tools are valid. This guide focuses on MemTest86 (PassMark) for its UEFI Secure Boot compatibility and cleaner result reporting on modern Z890 and X870E boards.
Pre-Test Configuration: UEFI Settings That Affect Results
Incorrect UEFI configuration produces false positives (errors caused by settings, not hardware) or false negatives (real faults masked by conservative underclocking). Get the UEFI state right before touching MemTest86. For complementary field maintenance guidelines, examine our breakdown of sodimm in desktop pc.
XMP / EXPO Profile State
Test twice: once with XMP/EXPO enabled (your actual running configuration), and once with XMP/EXPO disabled (JEDEC base spec). Errors only at XMP = the profile is too aggressive for your specific DIMM/IMC combination. Errors at both settings = the DIMM itself is defective. This two-state approach immediately separates an overclocking problem from a hardware failure. Enthusiast-grade boards like those compared in our ASUS ROG Maximus Z890 Hero vs MSI MEG Z890 ACE review often expose per-slot signal integrity differences that only appear under XMP stress.
Memory Slots and Population Rules
Most dual-channel platforms require DIMMs in specific slots for proper channel interleaving (typically A2/B2 on Intel, or slots 2 and 4 counting from the CPU on AM5). Populating wrong slots can cause the memory controller to operate in single-channel or with degraded signal integrity, producing errors that disappear when slots are corrected. Confirm slot population matches your motherboard manual before running any test.
Secure Boot
MemTest86 (PassMark) ships with a Microsoft-signed bootloader for UEFI Secure Boot compatibility. No need to disable Secure Boot for the free version. MemTest86+ may require Secure Boot to be temporarily disabled depending on your build version and board firmware. Verify the tool’s documentation for your chosen version.
Fast Boot / CSM
Disable Fast Boot in UEFI. Fast Boot skips USB device initialization stages, causing some systems to fail to recognize the MemTest86 USB drive entirely. CSM (Compatibility Support Module) should be disabled on any UEFI-native DDR5 system, MemTest86 boots natively as a UEFI application and does not need CSM.
Step-by-Step: Creating the USB and Running MemTest86
- Download: Fetch the latest MemTest86 free ISO from passmark.com. As of 2026, v11.x is current. Verify the SHA256 checksum against the published hash on the download page before writing.
- Write to USB: Use Rufus (Windows) or
dd(Linux/macOS) to write the ISO image directly to a USB drive of 1 GB or larger. In Rufus, select the ISO, leave partition scheme as GPT, target system as UEFI (non-CSM), and click Start. The tool formats and writes the EFI partition automatically. - Boot to USB: Insert the drive, power on the system, and press the boot device selection key (commonly F11, F12, or Del depending on board). Select the UEFI entry for the USB drive, not the legacy/BIOS entry. MemTest86 loads a minimal EFI environment and begins auto-detecting RAM geometry.
- Configure the test run: From the MemTest86 main screen, select Config to confirm: all available RAM is detected, CPU count is correct (enable multi-CPU for faster completion), and all 13 tests are enabled. For a diagnostic run, do not skip tests.
- Start and monitor: Press Start Test. The UI displays: current test number and algorithm name, pass progress percentage, total errors detected, and the address range under test. Watch the Errors column. A zero must stay zero.
- Run duration: Complete a minimum of two full passes. On a system with 32 GB DDR5, one pass takes approximately 45 to 90 minutes depending on CPU count and test selection. Two passes = 1.5 to 3 hours. For borderline cases or intermittent faults, run four passes or overnight.
- Export the report: After completion, MemTest86 writes an HTML report (
MemTest86-Report.html) to the USB drive root. This file contains per-test error counts, DIMM geometry, SPD data, and a pass/fail verdict, preserve it for RMA documentation.
Interpreting Results: The Diagnostic Matrix
The error count alone is not sufficient for diagnosis. Which test fails and which addresses fail carry equal diagnostic weight.
| Symptom / Result Pattern | Most Likely Root Cause | Diagnostic Action |
|---|---|---|
| Errors only on Test 3 (Moving Inversions) with XMP enabled, zero at JEDEC | XMP timings too tight for this IMC/DIMM combination | Relax tCL, tRCD, or tRP by 1 to 2 clocks; retest |
| Errors at same physical address across all tests | Hard cell failure on specific DRAM die | DIMM is defective, RMA immediately |
| Errors scattered across address space, both DIMMs, at JEDEC spec | Faulty memory controller (IMC) on CPU, or DIMM slot trace damage | Test one DIMM at a time in each slot; isolate bad slot vs bad CPU |
| Errors disappear when system temperature drops below 35°C ambient | Thermal margining, DRAM or VRM operating near thermal limit | Improve case airflow, verify DRAM temperature with passive sensor |
| Errors only on Test 7 (Random Data) at high pass counts | Marginal cell retention, early-life DRAM degradation | RMA under warranty; do not run production workloads on this kit |
| Zero errors across two full passes at XMP and JEDEC | RAM hardware is healthy | Redirect crash investigation to storage, PSU, or OS/driver layer |
| Single-bit errors, same bit position across multiple addresses | Data line fault, PCB trace, solder joint, or DIMM slot pin | Reseat DIMM, clean slot with compressed air, retest |
DIMM Isolation Protocol: Testing One Stick at a Time
When MemTest86 reports errors with multiple DIMMs installed, the fault source must be isolated, a critical step before initiating an RMA. The isolation protocol is deterministic and sequential.
Single-DIMM Testing Sequence
Remove all DIMMs except one. Install that single DIMM in the primary recommended slot (check your board manual, this is typically slot A2 or the slot labeled “install first”). Run a full two-pass MemTest86. Record the result. Power down, swap to the next DIMM in the same slot. Repeat for every DIMM in the kit. A DIMM that passes alone but fails in combination can indicate an impedance mismatch, insufficient DRAM voltage at the increased load of four populated slots, or a marginal XMP profile that only fails under full memory bus load.
Slot Testing Sequence
After identifying a clean DIMM, test each slot by installing that known-good DIMM into each slot sequentially and running a shortened one-pass test. A slot that generates errors with a known-good DIMM indicates physical slot damage, a broken trace, or a memory controller lane fault, none of which are fixable by the user. A slot-level fault requires motherboard RMA or CPU replacement depending on where the memory controller resides. On AMD AM5 and Intel LGA1851, the IMC is integrated into the CPU die, a confirmed controller fault means CPU replacement. This is a key variable when evaluating platforms for our desktop CPU benchmarks & reviews.
MemTest86 and ECC RAM: Extended Diagnostics
ECC (Error-Correcting Code) RAM corrects single-bit errors in hardware before the CPU ever sees them. This makes ECC systems significantly more resilient but also means MemTest86 may not surface single-bit faults that ECC silently corrects, the error is fixed before the test can log it. For ECC systems, MemTest86 Pro provides ECC error injection and logging modes. On consumer DDR5 ECC platforms (which began appearing in 2024 to 2025 on select AMD EPYC-derivative consumer boards), enable the ECC error logging option in MemTest86 Config. Any logged corrected error (CE) is still a warning, a DIMM generating frequent CEs under MemTest86 stress is degrading and should be replaced proactively.
For high-performance compute builds that also lean on GPU VRAM bandwidth, an area we cover in depth in our graphics card tests & GPU guides, system RAM health directly affects CPU-to-GPU data transfer reliability over PCIe. A RAM fault can manifest as GPU workload corruption rather than a conventional BSOD, making MemTest86 a prerequisite diagnostic step before attributing rendering artifacts to the GPU itself. The same logic applies when evaluating VRAM configurations like the Radeon RX 9060 XT 8GB vs 16GB comparison, confirm system RAM is clean before attributing frame drops or VRAM overflow artifacts to the GPU configuration.
Final Diagnostic Verdict & Maintenance Checklist
MemTest86 produces a binary verdict: zero errors across two passes is a pass; any error is a fail requiring isolation and action. There is no “acceptable” error count. One error in 10 billion memory operations is one corrupted byte that can silently destroy a file, corrupt a database record, or flip a security bit in a running process.
Post-Test Maintenance Checklist
- Save the HTML report from the USB root immediately after testing, it contains SPD data, error addresses, and the pass/fail verdict needed for RMA claims.
- Re-test after any hardware change, new DIMM installation, reseating existing DIMMs, UEFI firmware update, or XMP profile change all warrant a fresh two-pass test.
- Test at operating temperature, run the system under a CPU stress load for 15 minutes before booting MemTest86 to ensure DRAM is at thermal operating state, not cold-start conditions where marginal cells may pass incorrectly.
- Schedule annual verification, DRAM cells degrade over time. A kit that passed MemTest86 at installation may develop marginal cells after 3 to 5 years of continuous operation. Annual testing catches early degradation before it causes data corruption.
- Cross-reference with system event logs, after a clean MemTest86 result, check Windows Event Viewer u2192 System log for WHEA-Logger events (source:
Microsoft-Windows-WHEA-Logger). Hardware-corrected memory errors logged here indicate the IMC is catching faults that MemTest86’s single-run pass did not reproduce under the test duration used. - Verify DIMM slot contact integrity, inspect slot retention clips, check for dust or oxidation on gold DIMM contacts, and reseat DIMMs if the system has been moved or if ambient humidity has been high.
- Isolate before RMA, never RMA an entire dual-channel kit without completing single-DIMM and single-slot isolation. Replacing a working DIMM alongside a faulty one wastes time and may leave the root cause (a damaged slot or faulty IMC) unresolved.
A clean MemTest86 result does not guarantee RAM will never fail, it confirms RAM is currently within functional specification under the test conditions applied. Faulty PSU voltage rails delivering marginal VDDQ can cause real-world errors without triggering MemTest86 failures during a short run. If crashes persist after a clean two-pass result, extend to four passes, test with XMP disabled, and next investigate the PSU 1.1V rail stability and CPU IMC voltage (VDDQ/VDDQ_TX on DDR5 platforms) before concluding the RAM is not the cause.
Memory Error Checks Background
Errors in memory can cause crashes, corrupted files, or failure to boot, so a careful approach matters. Safe handling of electronic equipment, which applies when opening a case, is covered at American National Standards Institute (ANSI).









