

How to Wind a Weed Wacker: Direct Answer
To wind a weed wacker, remove the spool head by twisting counterclockwise, extract any old line, insert one end of new trimmer line into the anchor hole, wind the line tightly around the spool in the direction indicated by the arrow (usually counterclockwise), leave 4 to 6 inches unwound, thread the free end through the exit guide, reattach the spool head by twisting clockwise, and pull both line ends to advance them through the cutting head.
Understanding Your Weed Wacker Spool Type
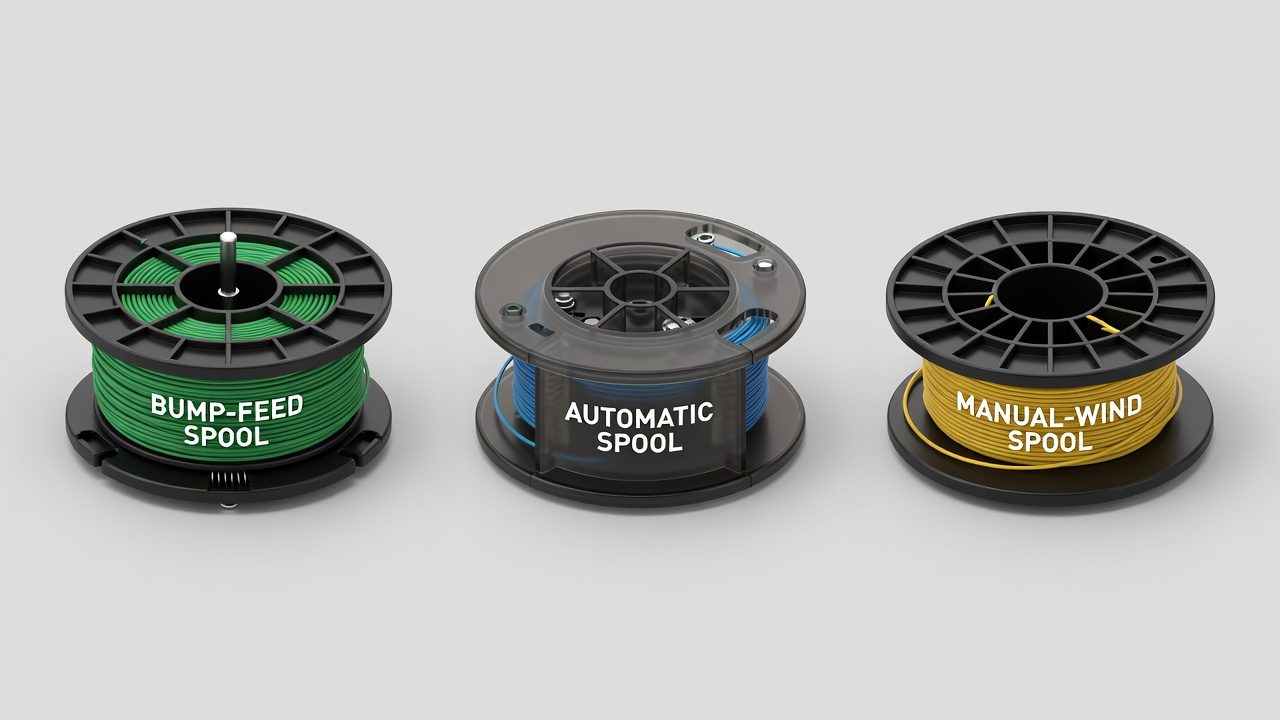
Before you begin winding, identify which type of spool mechanism your weed wacker uses. The three main types, bump feed, automatic, and manual wind, each require slightly different handling, though the core winding technique remains similar.
Bump-feed spools are the most common on residential trimmers. These release a small amount of line each time you tap the spool head against the ground. The line is pre-wound on the spool and advances automatically as you bump.
Automatic spools feed line continuously as you trim, requiring less user intervention. These are convenient but more expensive to replace.
Manual-wind spools require you to manually advance the line by hand between cuts. These are less common but still found on some older or budget models. The winding process is identical to bump-feed spools.
Check your trimmer’s manual or the spool head itself for arrows or labels indicating which type you have. This determines how much line you should load and how tightly you should wind it.
Tools and Materials You’ll Need
Gather these items before starting: To compare alternative configurations, check our hands-on review of z890 vs x870e motherboard.
- Replacement trimmer line in the correct gauge for your weed wacker (typically 0.065, 0.080, 0.095, or 0.115 inches in diameter)
- Your weed wacker with the engine off and cool
- Work gloves (optional but recommended for grip and safety)
- Scissors or line cutter to trim excess line
- Clean cloth to wipe the spool if needed
Trimmer line comes in various weights and materials. Most residential models use 0.065 to 0.095 inch line, while heavier-duty trimmers may use 0.105 to 0.115 inch line. Check your trimmer’s manual or the spool head label for the correct specification. Using the wrong gauge can cause feeding problems or damage the trimmer head.
Removing the Spool Head
The first step is safely detaching the spool from the trimmer head. Users looking for related component recommendations can explore our marshall stanmore iii vs harman kardon onyx studio 8 breakdown.
- Turn off the engine and allow it to cool completely.
- Locate the spool head at the bottom of your trimmer. It’s the round housing that holds the line.
- Turn the spool head counterclockwise by hand or with gloves for better grip. Most spool heads unscrew in this direction, though some models may differ, check your manual if unsure.
- Continue turning until the spool head separates completely from the trimmer shaft. Set it on a clean surface.
- If the head is stuck, wrap a cloth around it for better grip and try again with steady, firm pressure. Do not use a wrench or pliers, as this can crack the plastic housing.
Some models have a button or latch that must be pressed while unscrewing. Consult your trimmer’s manual if the standard counterclockwise method doesn’t work.
Preparing the Spool for New Line
Once the spool head is removed, prepare it for fresh line. Before finalizing equipment decisions, refer to our comprehensive dyson v8 cyclone vs bissell featherweight stick comparison.
- Remove old line by hand or with scissors. Pull out any remaining pieces, including line wound deep in the grooves.
- Inspect the spool for cracks, warping, or deep scoring. If damage is visible, the spool should be replaced rather than rewound.
- Clean the spool with a dry cloth to remove grass, dirt, or debris. This helps new line wind smoothly and prevents tangling.
- Locate the anchor hole, a small slot or hole on the spool where line insertion begins. This is typically marked with an arrow or label on the spool.
A well-maintained spool lasts several rewinding cycles. Most residential users rewind their spools 3 to 5 times before needing replacement. If the anchor hole is cracked or the spool is warped, replacement is the safer choice.
Step-by-Step Winding Instructions
This is the core of the process. Proper winding prevents tangles, ensures even line feed, and maximizes the life of your spool. For broader ecosystem context, read through our operational guide on bissell crosswave hydrosteam vs shark stainforce.
Step 1: Cut Your Trimmer Line
Cut a length of new line appropriate for your spool size. Most residential spools hold 15 to 25 feet of line, but this varies by model. If your trimmer came with a line holder or measuring guide, use it. Otherwise, a common guideline is to cut a length about 1.5 times the spool diameter. You can always trim excess later.
Step 2: Insert the Line into the Anchor Hole
Take one end of your cut line and insert it firmly into the anchor hole on the spool. Push it in until it seats securely, you should feel slight resistance. Some spools have a small notch or hook; position the line so it catches and won’t slip out during winding.
Step 3: Wind the Line Tightly
Begin winding the line around the spool by hand. Follow these guidelines:
- Direction: Wind in the direction indicated by the arrow on the spool. If no arrow is visible, counterclockwise is the standard for most trimmers. Winding against the correct direction causes line feeding problems.
- Tension: Wind the line tightly and evenly, keeping it under moderate tension so wraps don’t overlap or bunch. The line should form neat, parallel layers without gaps.
- Pattern: Wind from one side of the spool to the other in a back-and-forth motion, building even layers. Avoid crossing the line over itself.
- Speed: Wind steadily but not rushed. Hurrying increases the chance of tangled or uneven wraps.
Step 4: Leave Unwound Line
Stop winding when you have approximately 4 to 6 inches of line remaining unwound. This length allows the line to thread through the exit guide without over-spooling. If you wind too much line, the spool becomes overstuffed and line won’t feed properly. If you leave too little, the line may slip back into the spool.
Step 5: Secure the Free End
Some spools have a small notch or hook near the outer edge where you can lodge the free end of line to keep it from unwinding. If your spool has this feature, use it. Otherwise, hold the line in place with your fingers as you reattach the spool head.
Reassembling and Testing Your Weed Wacker
With the line wound, it’s time to reattach the spool and test the feed mechanism.
- Align the spool head with the trimmer shaft. Most spool heads have a center spindle that fits into a corresponding slot on the trimmer.
- Thread the free line end through the exit guide, a small slot on the spool head where trimmer line exits toward the cutting head. Ensure the line passes through cleanly and isn’t pinched.
- Twist the spool head clockwise onto the trimmer shaft until it’s hand-tight. Do not overtighten, as this can crack the housing or strip the threads.
- Pull both line ends sharply to advance the line through the cutting head. You should hear or feel a slight movement as line feeds. Repeat 2 to 3 times if line doesn’t advance on the first pull.
- Trim excess line sticking out of the cutting head. Most residential trimmers cut at approximately 15 to 17 inches, so trim both ends to this length or to the width of your trimmer head, whichever is smaller.
Test your trimmer on a small patch of grass to ensure line feeds and cuts properly before using it for extended periods.
Troubleshooting Common Winding Problems
Line Tangles or Bunches While Winding
This usually results from overlapping wraps or uneven tension. Unwind the line, inspect for crossed or overlapping sections, and rewind more carefully. Maintain consistent, moderate tension throughout and keep wraps parallel without gaps.
Line Won’t Advance Through the Cutting Head
Several issues could cause this. First, verify the line is threaded through the exit guide. Second, check that the line isn’t pinched between the spool and head. Third, pull the line ends more forcefully, sometimes a firm tug is needed to advance stubborn line. If problems persist, the spool head may be damaged or incompatible with your trimmer model.
Line Breaks Immediately After Starting
Broken line usually indicates the line is wound too tightly, the spool is overstuffed, or the exit guide is damaged. Try rewinding with slightly less tension. If line continues breaking, inspect the exit guide and cutting head for rough edges or debris that could nick the line.
Uneven or Sparse Line Feed
This results from uneven winding. Sections that are too loose won’t feed properly. Unwind and rewind, paying attention to consistent tension and even wrap placement. Building gradual layers without gaps ensures smooth feeding.
Brand-Specific Considerations
While the general process is universal, some brands have minor variations. Ryobi and DeWalt bump-feed spools typically wind counterclockwise and hold 15 to 20 feet of line. Stihl and Echo trimmers sometimes use slightly different spool designs with internal guides. Makita and Worx automatic spools have specific line-loading indicators. Always consult your trimmer’s manual for brand-specific instructions, particularly for automatic or specialty spools.
When to Replace Rather Than Rewind
Rewinding a spool is cost-effective and environmentally friendly, but replacement is necessary in these cases:
- The spool housing is cracked or warped
- The anchor hole is damaged or no longer holds line securely
- The exit guide is rough, cracked, or missing
- The spool has been rewound more than 5 to 6 times and shows significant wear
- Line consistently breaks or feeds unevenly despite proper winding
Replacement spool heads are inexpensive (typically $10 to 25) and readily available online or at hardware stores. Having a spare pre-wound spool on hand minimizes downtime.
Buyer FAQs: How To Wind A Weed Wacker Solved
What thickness of trimmer line do I need?
The correct line gauge depends on your trimmer model and cutting needs. Most residential electric and gas trimmers use 0.065 to 0.095 inch line. Heavier-duty gas trimmers may require 0.105 to 0.115 inch line for thicker vegetation. Check your trimmer’s manual, the spool head label, or the retailer’s product page for your specific model. Using the wrong gauge can cause feeding problems, line breakage, or trimmer head damage.
How often should I rewind my spool?
This depends on trimming frequency and your yard size. Casual homeowners who trim monthly might rewind every 2 to 3 months. More frequent users may need to rewind every 2 to 4 weeks. You’ll know it’s time when line runs out or feeding becomes erratic. Rewind as needed rather than following a fixed schedule.
Can I use any brand of trimmer line in my weed wacker?
Most quality trimmer lines are universally compatible as long as the gauge matches your trimmer’s specifications. Brands like Stihl, Echo, Ryobi, DeWalt, and generic hardware-store lines all work interchangeably in the correct diameter. However, line quality varies, premium brands tend to be more durable and break less frequently. Cheap or low-quality line may snap more often, offsetting savings from a lower price. Choose reputable brands within your required gauge.
What should I do if my line keeps breaking immediately after I start trimming?
Immediate line breakage suggests the line is wound too tightly, the spool is overstuffed, or the cutting head or exit guide has a sharp edge or burr. First, try rewinding with slightly less tension. If breakage continues, inspect the cutting head and exit guide for damage, sharp edges, or debris. Clean any grass or dirt from the cutting head. If the exit guide is cracked or rough, replacement may be necessary.

Pros
- Rapid Replace head listed for simpler string reloading
- Digital ignition listed for easier starting
- LowVib anti-vibration system listed to reduce fatigue
- Air purge listed to aid starting
Cons
- Listed weight is 12.2 pounds
- Starting and speed claims are manufacturer-stated only

Pros
- Versatile attachment system covers multiple outdoor maintenance tasks with one machine.
- Strong gas engine is better suited to demanding cutting jobs than many lightweight trimmers.
- Extended reach helps handle high limbs and hard-to-access areas from the ground.
- Quick-Start feature adds convenience for a gas-powered tool.
Cons
- As a 2-stroke gas tool, it requires fuel mixing and regular maintenance.
- Gas-powered operation is typically louder and less convenient than battery-powered alternatives.
- The multi-tool format may be more complex than a single-purpose trimmer for users with only basic yard needs.
Overview: The PROYAMA 42.7cc 5-in-1 multi-functional trimming tool combines a hedge trimmer, pole saw, string trimmer, brush cutter, and extension rod into one gas-powered yard system. It is built for users who want one machine to cover several outdoor maintenance tasks.
Performance: Its 2 HP, 2-cycle 42.7 cc engine is positioned for more demanding cutting jobs, while the pole saw offers an adjustable working range from 8.2 to 11.4 ft and a 10-inch cutting length. The Quick-Start system and ergonomic handle are practical additions for routine use.
Considerations: Because it is gas-powered, this tool will require fuel mixing and ongoing maintenance, and it is likely less convenient and louder than battery alternatives. The multi-attachment setup is useful, but it also adds complexity when switching between tasks.
Verdict: This PROYAMA model is best suited to homeowners who need reach, power, and versatility in a single tool. It is a strong fit for mixed yard work, but less ideal for buyers who prefer lightweight, low-maintenance equipment.

Pros
- Includes the battery and charger, so the kit is ready for setup out of the box.
- Attachment changes are designed to be quick and simple, which saves time during multi-step yard work.
- Comfort-focused design aims to reduce arm fatigue and vibration during extended use.
- Versatile enough to cover several common homeowner landscaping tasks in one system.
Cons
- Only one 40V 4Ah battery is included, so longer jobs may require recharge time or an extra battery.
- The 8-inch pole saw and 10-inch brush cutter are better suited to light-to-moderate tasks than heavy-duty clearing.
- The attachment-based design adds more parts to store and manage than a single-purpose tool.
Overview: The Wild Badger Power 40V 4-in-1 Multi-Tool Kit combines a string trimmer/edger, pole saw, hedge trimmer, and brush cutter into one cordless system. It is built for homeowners who want a flexible yard tool that can handle several common maintenance jobs without switching between multiple machines.
Performance and features: The included 40V 4Ah battery gives the tool cordless freedom, while the brushless motor design is aimed at efficient operation. The 15-inch trimmer/edger, 16-inch hedge trimmer, 8-inch pole saw, and 10-inch brush cutter provide useful coverage for routine trimming, shaping, and light brush work. Quick attachment swaps make it easy to move from one task to another.
Drawbacks and considerations: This is a multi-tool kit, so it has more parts to keep track of than a dedicated trimmer. The single included battery may also be limiting for larger properties or longer sessions. Based on the listed specs, the saw and cutter sizes are practical for moderate yard work rather than heavy commercial clearing.
Verdict: This kit is a strong fit for homeowners who want one cordless platform to handle edging, trimming, hedge care, and light cutting. If you value versatility, comfort, and easy setup more than maximum-duty power, it offers a practical all-in-one solution.

Pros
- Six tool functions on one 26cc two-stroke power head
- Tool-free quick-connect system for switching attachments
- Cutting head rotates 180 degrees for tight corners
- Spill-proof fuel tank, according to the manufacturer
- EPA-certified, per manufacturer statement
Cons
- Listed at 36 pounds, which may tire you on long jobs
- Requires mixing 25:1 fuel-to-gasoline before every use
Winding Trimmer Line Carefully
Wind the line in the direction marked on the spool, with the trimmer disconnected from its power source. Anyone interested in wider outdoor power equipment safety can consult American National Standards Institute (ANSI).









