

Quick Answer: Choosing the Best Which Way Does A Mower Blade Go On
On a typical rotary walk-behind or riding mower, the sharpened cutting edges face the grass and the raised sails, or lift wings, face the underside of the deck. Stamped wording such as “this side up,” part numbers, or a flatter mounting face usually sit toward the deck. Rotation arrows show which way the blade is designed to spin, not which…

Pros
- Large-size design named in product title
- Sharpening and balancing functions listed
- Listed as a new upgraded version

Pros
- Adjustable 15-to-45-degree range in title
- Sharpening and balancing functions listed
Pros
- Includes replacement gaskets and a 98079-55846 spark plug
- Matches Honda HRR216 and HRS216 lawn mower models
- Designed around the 16100-Z8B-901 carburetor specification
Cons
- Restricted to select Honda GCV160 mower applications
- Installation requires basic mechanical tools and skills
The usual rotary-blade rule
A conventional rotary mower blade is a horizontal bar that spins under a housing called the mower deck. One face is meant to work the turf. The other face is meant to work with the deck. For most walk-behind and riding rotary machines, the grass-facing side is the side that presents the sharpened leading edges to the lawn. The deck-facing side is the side that presents the bent corners, often called blade sails or lift wings, toward the underside of the housing.
Those two features do different jobs. The cutting edges shear the grass as the blade rotates. The sails scoop air and clippings upward so the deck can discharge, bag, or recut them. If the sails point at the turf instead of the deck, lift collapses and the unsharpened or trailing surfaces may meet the grass first.
This is a general rule for ordinary two-end rotary blades, not a law for every cutting machine. Reel or cylinder mowers do not use this face-up and face-down logic. Some aftermarket profiles look nearly symmetrical. Worn, painted-over, or unmarked blades need extra checks. Multi-blade decks may also use left-hand and right-hand parts that are not interchangeable even when both blades have sails that point toward the deck. When the owner’s manual or the blade maker’s notes conflict with a generic rule, follow those instructions.
How to identify the grass side versus the deck side
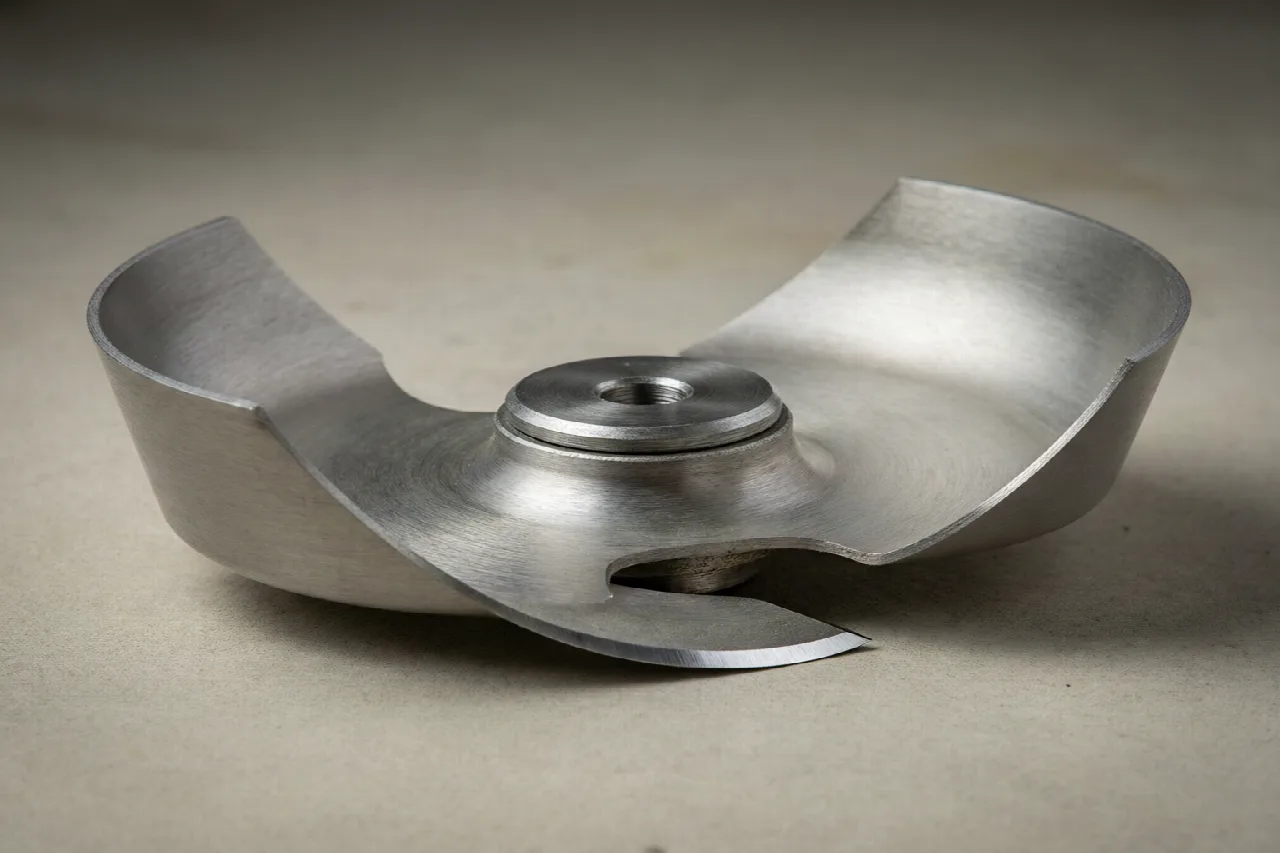
Hold the blade so you can see both faces and both ends. On a standard rotary mower blade, each working end has a sharpened leading edge. That edge is the thin, ground bevel that should sweep through the grass. Behind or above that edge, the metal usually turns upward into a sail. Those upturned corners are the lift wings. They should point toward the deck once the mower is sitting on its wheels.
The middle of the blade is the mounting area. It has a hole that fits the spindle, a blade adapter, or a driver. That area is usually designed to sit fully flush against the mating part. If one face of the hub is flatter or clearly machined to contact the adapter, that contact face generally goes toward the spindle hardware, which is on the deck side of the assembly. A blade that rocks, sits on a corner of the sail, or leaves a gap at the hub is not seated and is not ready to tighten.
Before the blade bolt or nut is snug, look at the installed blade from the side. The sails should rise toward the deck, not droop toward the grass. The sharpened edges should be the ones that will lead into the turf when the spindle turns the designed way. If the blade looks like a shallow bowl opening toward the lawn, it is almost certainly upside down. If it looks like a shallow bowl opening toward the deck, orientation is usually correct for a conventional high-lift or standard-lift blade.
Paint wear can help when the old blade was installed correctly. The grass side often shows more scuffing, staining, and edge wear. The deck side may still show readable stamps. Do not treat wear alone as proof if the previous cut was poor. The last installer may have flipped the blade already.
Cutting edges, sails, and stamped markings
Three cues work together: the cutting edges, the sails, and any stamped markings. Use all three. One missing cue is common. Two conflicting cues are a reason to stop and compare the blade with the parts diagram or the maker’s notes.
Where the cutting edges sit
On a standard two-end rotary blade, there is a sharpened leading edge at each tip. As the blade spins, those edges should arrive at the grass first. The opposite long edge of each tip is usually blunt, thicker, or formed into the sail. If you install the blade so the dull back of the tip meets the grass, the mower will tear more than it cuts. Some recycling-style blades add extra teeth or secondary edges, but they still have intended leading edges. Extra grind marks do not mean both faces are equally correct. Readers comparing setup options can review our technical analysis on marshall stanmore iii vs harman kardon onyx studio 8.
What the sails or lift wings do
A blade sail is the upturned wing at the tip. Its job is to move air and clippings toward the deck. High-lift blades have more pronounced wings. Low-lift blades have smaller bends and are often used where debris throw or dust must stay lower, such as on sandy ground or some bagging setups. In either case, the bend still has a designed direction. The open face of the sail should work the airspace under the deck, not plow the lawn. If you cannot tell which way the metal is supposed to cup, compare the new blade with a known-good blade of the same type rather than guessing from memory.
What stamps usually tell you
Many OEM and aftermarket blades carry a part number, a brand mark, or wording such as “this side up” or “this side towards deck.” When those marks are present and readable, they commonly sit on the deck-facing side so you can see them while the blade is in your hands and, on some decks, after it is mounted. That placement is frequent, not guaranteed. Stamps can be on a different face, struck lightly, or worn off. Treat markings as confirmation of what the shape already shows. Do not assume every blade uses the same phrase or the same stamp location. For complementary field maintenance guidelines, examine our breakdown of dyson v8 cyclone vs bissell featherweight stick.
If edges appear on more than one surface, or if both faces look ground, rely on sail direction and the mounting face first. A blade can be resharpened on the wrong bevel. Sharpening does not rewrite the designed orientation. A cracked, bent, or badly thinned blade should be replaced rather than interpreted.
What rotation arrows actually mean
A rotation arrow shows the direction the blade is designed to turn when it is installed and viewed in its working position. It does not, by itself, tell you which face points at the grass. You can mount a blade upside down and still “follow” an arrow that you can see, and the cutting edges will still be wrong. To evaluate matched hardware tolerances, consult our detailed overview of bissell crosswave hydrosteam vs shark stainforce.
On a single-blade walk-behind mower, use the arrow after the face is correct. Seat the blade with sails toward the deck, then confirm that the sharpened leading edges will travel in the same direction the spindle turns. Most small rotary decks drive the blade in one fixed direction. If the arrow on the blade fights the spindle rotation, you may have a directional blade on the wrong machine, a left-hand blade on a right-hand spindle, or the blade flipped so the arrow is being read from the wrong face.
Multi-blade decks add another layer. Neighboring spindles often turn toward a shared discharge or mulching zone. The outer blades may be mirrored so each leading edge leads correctly and each sail throws clippings the intended way. Those blades can look almost identical until you compare sail twist, arrow direction, or remaining stamps. Installing a right-hand blade on a left-hand spindle can leave the sails pointing at the deck and still cut poorly, because the wrong edge leads and the airflow fights the deck. Match each blade to its spindle. Do not assume clockwise or counterclockwise is universal across brands.
If blades were piled together after removal, do not swap them by length alone. Compare arrows, sail direction, center-hole details, and any position marks. When those cues disagree, the machine’s blade diagram is the tie-breaker.
Safety steps before you touch the blade
A rotary blade is sharp enough to cut through a glove and heavy enough to store energy in belts, springs, and the deck. Accidental starting is the other main hazard. Do not reach under a deck until the blade has fully stopped and the machine cannot restart.
- Wait until all motion has stopped. Do not use a hand, foot, or stick to halt a spinning blade.
- On a gasoline mower, disconnect the spark-plug lead and keep it away from the plug so the engine cannot fire. The blade-stop control is not a substitute for isolating ignition.
- On a battery mower, remove the battery or otherwise isolate starting power the way the machine is designed to be disabled. On many riding mowers, remove the key and isolate the battery according to the machine’s service instructions.
- Work on a stable, level surface. Chock the wheels. If you tilt a walk-behind mower, follow the manual for which side may go up so fuel and oil do not spill into the air filter or carburetor.
- Wear cut-resistant gloves and eye protection. A blade edge and trapped grit both cut.
- Keep children, bystanders, and pets away. Do not leave a partially serviced mower where someone could pull a cord or turn a key.
Exact disable steps differ among gas, corded-electric, battery, and rider designs. A corded mower must be unplugged. Some riders have multiple power sources or stored energy in the deck-lift system. The machine manual governs lockout order, fuel handling, and whether the deck should be removed rather than tipped. If the blade is jammed against a stump, wrapped in wire, or the spindle hardware will not turn normally, stop and use a qualified technician. Do not defeat safety interlocks to “inch” the blade into a better position.
How to install the blade in the correct orientation
Once the machine is isolated and stable, installation is a seating problem as much as an orientation problem. A correctly faced blade that is not flush on the spindle can vibrate, scuff the deck, or stress the blade bolt.
- Confirm the replacement matches the mower’s blade type, length, and center hole. A star center, round hole, or splined opening must fit the spindle or adapter without being forced or filed.
- Inspect the old blade, the new blade, the adapter, and the hardware. Look for a bent air vane, a cracked hub, a mushroomed bolt, a missing washer or stiffener, and debris packed into the driver.
- Clean the mating faces. Grass and rust between the blade and the adapter can tilt the blade even when the sails point the right way.
- Place the blade so the sails point toward the deck and the sharpened leading edges will meet the grass when the spindle turns its designed direction. Readable “this side up” or part-number stamps, when present, usually face the deck.
- Align any drive dogs, keys, or star points so the blade drops fully onto the driver. The hub should sit flat. If it only catches on one ear of a star center, stop and realign.
- Reinstall washers, blade adapters, and stiffeners in the order they came off if that order is known. Some decks use a mulching baffle or a directional adapter that only fits one way. Do not invent a new stack if the old stack was complete and the cut was normal.
- Start the blade bolt or nut by hand to avoid cross-threading. Tighten firmly so the blade cannot rock. Use the torque and hardware guidance in the mower or blade instructions when those documents are available. There is no single universal tightness number for every deck.
- After tightening, check again: sails toward the deck, hub flush, no gap, no twist, and no contact between a sail and the deck shell.
Replace hardware instead of reusing it when the bolt is stretched, the threads are damaged, the washer is dished, or the manual calls for a one-time fastener. A blade that needs impact tools or cheater bars to seat is not aligned. Forcing it can crack the hub or damage the spindle.
What usually happens if the blade is flipped
A backward rotary blade typically lifts poorly. Clippings stay on the lawn in clumps, fail to reach the chute or bag, or recut unevenly under the deck. The cut often looks ragged because the intended leading edge is no longer leading. You may also see the blade sitting oddly on the adapter, with a sail closer to the turf than to the housing.
Not every flipped blade vibrates. Vibration is more likely when the blade is also not flush, the center hole is damaged, or a directional blade is on the wrong spindle. A flipped blade can still present an unsharpened edge to the grass and can stress hardware if only part of the hub contacts the driver. Those are reasons to correct the install before the mower is started, not reasons to start it as a test.
Do not fire the engine to “see if it cuts.” A static visual check is enough to catch most orientation mistakes: sails toward the deck, cutting edges leading, hub fully seated. If orientation looks wrong, isolate power again if needed, loosen the fastener, and remount the blade. If the blade will not sit flush no matter which face you try, the problem may be the adapter, a bent blade, or the wrong center hole rather than a simple flip.
Mulching, high-lift, Gator-style, and other profiles
Specialty blades change how air and clippings move, but they still have a designed deck side and grass side. A mulching blade often has extra curves, shorter sails, or additional cutting surfaces so clippings stay under the deck longer. Those extra features can make the blade look symmetrical. Orientation still follows the same logic: intended leading edges toward the grass, designed lift or curl toward the deck, mounting face fully seated.
High-lift blades use larger sails to pull clippings up for bagging or side discharge. Low-lift blades use smaller sails. The size of the wing changes airflow, not the rule that the wing works the space under the deck. Toothed or recycling-style blades may show a serrated or notched edge. Those teeth are not a reason to install the blade either way. They still have a factory leading direction. If the profile is unfamiliar, compare it with the parts illustration and with the blade that came off, provided that old blade was cutting normally.
A blade with more than one cutting surface can still be installed backward. Extra edges do not cancel the sails. If you cannot identify a deck face after comparing shape, stamps, and the old part, replace the blade with one that has clear orientation cues rather than guessing.
Single-blade walk-behinds versus multi-blade decks
On many single-blade walk-behind mowers, the main install question is face-up versus face-down, plus making sure the leading edges match spindle rotation. There is one blade, one spindle, and usually one adapter. Length and center-hole match are still required, but left-versus-right is rarely an issue.
Riding mowers and wide walk-behinds with two or three blades are different. Blades may be position-specific. The left, right, and center spindles can use different part numbers, mirrored sails, or different arrow directions even when overall length looks the same. A blade that is correct in the center may be wrong on an outer spindle. Swapping outer blades left to right can put both discharge paths in conflict with the chute.
Label spindles when you remove blades. Photograph the deck underside before anything comes off if that helps you keep positions straight. If blades are already mixed, compare remaining stamps, sail twist, and rotation arrows, then check the machine’s blade diagram. Do not assume every rider uses mirrored outer blades, and do not assume a “universal” aftermarket set is interchangeable across every spindle on your deck unless the maker says those positions share a part.
When markings are missing, worn, or the blade is aftermarket
No “this side up” text does not mean orientation is optional. Start with sail bend, leading-edge location, and the way the hub is meant to sit. Then compare the new blade with the blade that came off. Match sail direction, cutting-edge location, center-hole shape, and overall outline. If the old blade was already backward, do not copy it. Use shape logic plus the mower manual or the blade maker’s install notes.
Aftermarket stamps may differ from the original even when the blade is intended for the same deck. Different wording does not automatically mean a different face. Copy the functional features: sails toward the deck, leading edges toward the grass, hub flush on the same style of adapter. If the aftermarket blade’s center hole, thickness, or sail pattern will not seat the way the original did, stop. Forcing a near-fit is not an orientation trick.
Replace rather than guess when the blade is bent, cracked, missing large chips, worn thin at the tips, or so featureless that you cannot confirm a deck side. A damaged blade can be balanced poorly even if you eventually get the face right. Replacement is the safer path whenever orientation cannot be confirmed with shape and documentation.
Reel mowers and other machines this rule does not cover
This orientation rule is for rotary decks: a horizontal spinning blade under a housing. A reel or cylinder mower uses a helical reel that shears grass against a bedknife. There is no equivalent “grass face versus deck face” decision of the kind described here. Reel assembly, timing, and bedknife setting are equipment-specific and should follow the reel manufacturer’s procedure.
Other machines that should not borrow this article’s install sequence include sickle-bar mowers, flail mowers, string trimmers used as mowers, and robotic mowers with proprietary disc packs. If the cutting part is not a conventional rotary bar on a spindle under a stamped or fabricated deck, stop and use the instructions for that machine. Applying walk-behind rotary advice to a reel can damage the bedknife and will not answer which way a cylinder “goes on.”
Troubleshooting after a blade change
If the mower cuts poorly right after a blade change, shut the machine down and isolate starting power again before any re-inspection. Do not keep making test passes to interpret the cut. Recheck the obvious orientation points first: sails toward the deck, leading edges leading, correct blade on the correct spindle, and a hub that cannot rock.
If the blade scrapes the deck or the adapter will not seat, look for a reversed adapter, a missing or extra washer, debris on the mating faces, a sail hitting a baffle, or a blade that is simply the wrong profile for that housing. A star center that is only partly engaged can tilt the blade into the deck shell. If vibration appears once the blade is up to speed, orientation may still be correct. An out-of-balance blade, a bent tip, a damaged center hole, loose hardware, or a worn spindle can shake the machine even when the sails point the right way. Vibration is a reason to stop and inspect, not a reason to keep running until the noise “settles.”
Work through a cautious checklist:
- Power isolated, blade fully stopped, deck stable.
- Sails toward the deck and cutting edges toward the grass.
- Position-specific blades returned to their own spindles.
- Adapter, washer, and stiffener in a complete, seated stack.
- No grit between the blade and the driver.
- No bend, crack, or elongated center hole.
- Hardware that tightens normally and holds the blade flush.
If the fastener will not tighten normally, the blade still rocks, or the spindle wobbles with the blade removed, stop using the mower and have the deck inspected. Those symptoms point past orientation into damaged parts. A correctly oriented blade will not cure a bent spindle or promise a perfect cut on an uneven lawn, but it will restore the lift and leading-edge geometry the deck was designed to use.
Technical Standards and Compliance
Mechanical safety standards, operational tolerances, and protective gear guidelines align with benchmark specifications established by the American National Standards Institute (ANSI).









