Direct Answer: How to Clean a Lawn Mower Carburetor
To clean a lawn mower carburetor, disconnect the spark plug wires and fuel lines, then unbolt the carburetor from the engine. Disassemble the carburetor carefully, labeling each component. Soak removable parts in carburetor cleaner for 15-30 minutes, use a soft brush to remove deposits, and clear all jets and passages with compressed air. Reassemble in reverse order, ensuring gaskets and seals are properly seated, then reinstall and test the engine.
Why Your Lawn Mower Carburetor Needs Cleaning
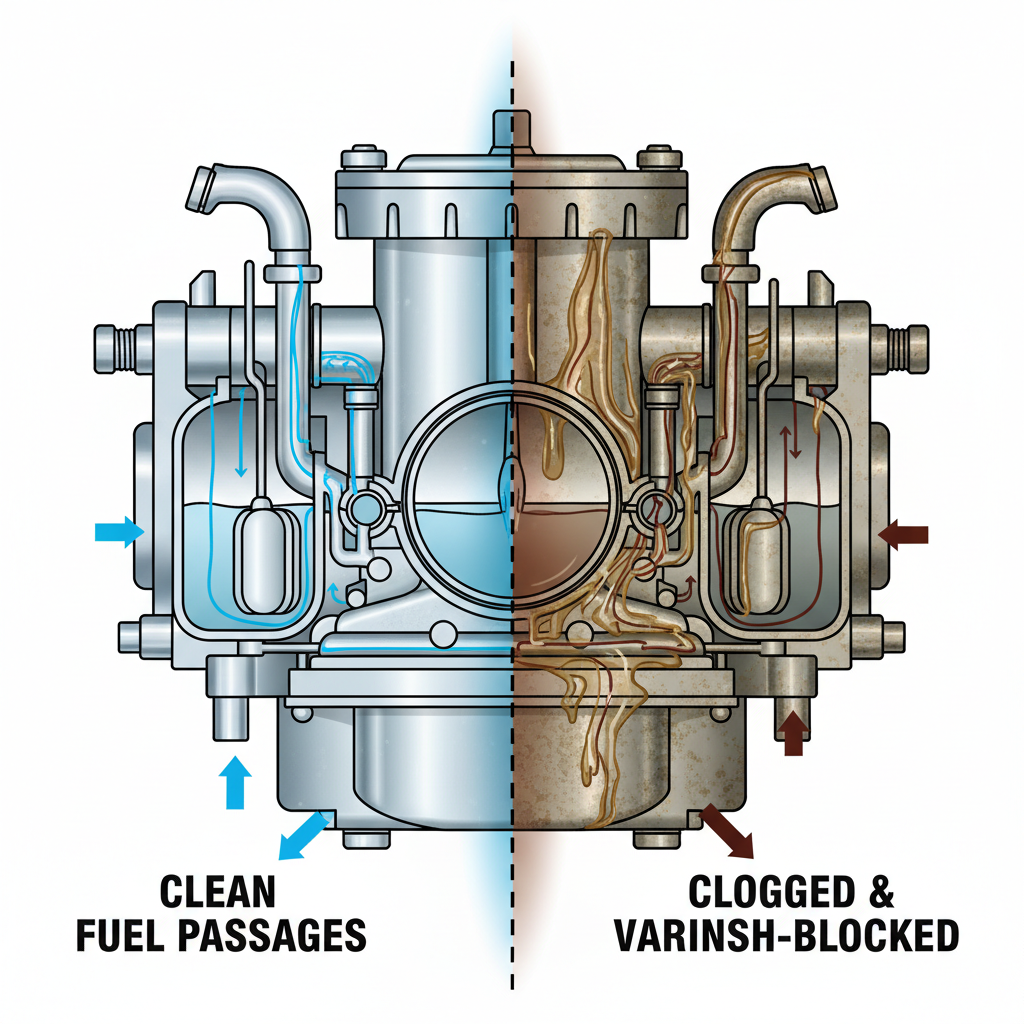
A carburetor regulates the fuel-to-air mixture for combustion. Over time, fuel residue, dirt, and varnish accumulate inside the carburetor, restricting fuel flow and clogging small passages called jets. This buildup occurs naturally when lawn mowers sit unused during off-season months, when old fuel oxidizes, or when debris enters the fuel system.
Signs your carburetor needs cleaning include:
- Difficulty starting the engine, especially after storage
- Rough or uneven idle
- Loss of power during operation
- Engine stalling under load
- Black smoke from the exhaust
- Fuel leaking from the carburetor
Safety Precautions Before You Start
Always prioritize safety when working on small engines:
- Disconnect spark plug wires: Remove both spark plug wires to prevent accidental engine ignition while you work.
- Allow the engine to cool: Wait at least 30 minutes after operation so hot fuel and metal components don’t cause burns.
- Work in a well-ventilated area: Carburetor cleaner produces strong fumes; use it outdoors or in a garage with the door open.
- Wear safety glasses: Protect your eyes from carburetor cleaner spray and compressed air.
- Use gloves: Carburetor cleaner can irritate skin; wear nitrile or latex gloves.
- Keep a fire extinguisher nearby: Carburetor cleaner is flammable.
- Drain the fuel tank: If possible, run the engine until the tank is nearly empty before disconnecting fuel lines to minimize spillage.
Tools and Materials You’ll Need
Basic Tools:
- Socket set or wrench set (varies by mower model)
- Screwdrivers (flathead and Phillips)
- Pliers and needle-nose pliers
- Small containers for organizing small parts
- Cloth or paper towels
- Gasket scraper or plastic putty knife (do not use metal)
Cleaning Supplies:
- Carburetor cleaner (aerosol or bulk liquid)
- Compressed air source (air compressor or canned air)
- Soft-bristled brush (old toothbrush works)
- Small basin for soaking parts
- Clean rags
Optional but Helpful:
- Digital camera or smartphone for photographing disassembly steps
- Carburetor gasket and seal kit (often inexpensive and recommended for reassembly)
- Small parts organizer tray
How to Remove the Carburetor from Your Lawn Mower
Step 1: Disconnect the Fuel Lines
Locate the fuel line connections on the carburetor. Use pliers to carefully loosen the hose clamps, then gently wiggle and slide the fuel hoses off the carburetor fittings. Have a cloth ready to catch any remaining fuel. If fuel lines are cracked or brittle, replace them now.
Step 2: Disconnect the Throttle and Choke Cables
Take a photo of how the cables attach to the carburetor before disconnecting them. Loosen the cable attachment screws or clips, then carefully slide the cables away from the carburetor.
Step 3: Unbolt the Carburetor
Most lawn mower carburetors attach to the engine with 1-4 bolts. Use your socket set to remove these bolts. Note the location and size of each bolt as you remove them.
Step 4: Remove the Carburetor
Carefully lift the carburetor away from the intake manifold. There may be a rubber gasket between the carburetor and engine; set it aside. Do not lose the intake manifold studs or gasket.
Step-by-Step Carburetor Disassembly and Cleaning
Step 1: Photograph the Carburetor Assembly
Before disassembling, take clear photos from multiple angles. This becomes your reassembly reference.
Step 2: Remove the Float Bowl
The float bowl is typically held on by 2-4 bolts at the carburetor’s base. Carefully remove these bolts and gently pull the bowl away. The float and needle valve will be attached; handle them delicately. Empty any remaining fuel into a container.
Step 3: Remove Internal Components
Use needle-nose pliers to carefully remove the float pin, float, needle valve, and seat. Place each component in your parts organizer. The jet (a small brass tube with precise holes) may unscrew with a small screwdriver; if so, remove it and place it in a safe location.
Step 4: Clean Components by Soaking
Place all removable metal parts (not rubber seals or gaskets) into a small basin filled with carburetor cleaner. Soak for 15-30 minutes. For severely clogged parts, 1-2 hours may be necessary. Carburetor cleaner dissolves varnish and fuel residue without damaging metal.
Step 5: Brush Away Remaining Deposits
After soaking, use a soft-bristled brush (an old toothbrush works well) to gently scrub away loosened deposits. Do not use wire brushes, which can damage soft metal components and jet orifices.
Step 6: Blow Out Passages with Compressed Air
Using compressed air or an air compressor, blow carburetor cleaner and loosened debris out of all jets, passages, and the carburetor body. Start at the fuel inlet and work systematically through each passage. Wear safety glasses as carburetor cleaner will spray out.
Step 7: Final Rinse and Drying
Give all parts a final spray with carburetor cleaner to remove any remaining residue, then use compressed air to dry them completely. Any moisture left in the carburetor can cause problems after reassembly.
Reassembly and Reinstallation
Step 1: Inspect Gaskets and Seals
Before reassembling, inspect rubber gaskets and seals for cracks, hardness, or deterioration. If they look degraded, replace them now using a gasket kit (these typically cost $10-20 and are specific to your mower model).
Step 2: Reassemble the Float Bowl
Begin reassembling in reverse order. Install the needle valve and seat first, then carefully position the float and float pin. Ensure the float moves freely and the needle valve engages smoothly. This is critical for proper fuel level control.
Step 3: Install the Jet
If you removed the jet, carefully reinstall it by hand first, then gently tighten with a screwdriver. Do not overtighten; just snug enough to seal.
Step 4: Reinstall the Float Bowl
Position a new gasket (or the cleaned original if in good condition) on the carburetor body. Align the float bowl and reinstall all bolts. Tighten evenly in a crisscross pattern to ensure the gasket seats uniformly. Do not overtighten bolts; this can crack the bowl.
Step 5: Reinstall the Carburetor on the Mower
Position a new intake manifold gasket (if the original is damaged) on the engine studs. Carefully align the carburetor and hand-start all bolts. Tighten bolts evenly and check that the carburetor sits flush against the manifold.
Step 6: Reconnect Cables and Fuel Lines
Reattach the throttle and choke cables using your photos as a reference. Reconnect fuel lines, ensuring hose clamps are snug but not over-tightened, which can damage the hoses.
Step 7: Test the Mower
Reconnect the spark plug wires, ensure the fuel valve is open, and attempt to start the engine. The mower may require a few pulls to restart after sitting disassembled. Listen for smooth idling and normal engine operation.
Troubleshooting: When Cleaning Isn’t Enough
Mower Won’t Start After Cleaning
Check that all connections are secure, fuel lines are properly attached, and the spark plug wires are fully seated. Prime the carburetor by turning the fuel valve on and off a few times to fill the fuel passages. Try starting again with multiple pulls.
Engine Runs Rough or Surges
This often indicates incomplete reassembly or a gasket leak. Verify all bolts are tight and no fuel is leaking. If the problem persists, remove the carburetor again and check that all passages are clear.
Fuel Leaking from the Carburetor
This usually means the float level is incorrect or the needle valve isn’t seating properly. Remove the float bowl and verify the float moves freely and the needle valve is fully sealed when the float is up.
When to Replace Instead of Clean
If the carburetor has internal corrosion (orange or white crusty deposits inside passages), cracks in the casting, or if cleaning doesn’t restore performance, replacement is more cost-effective than continued troubleshooting. Replacement carburetors for most lawn mowers cost $30-80 and include new gaskets.
Carburetor Cleaning for Different Lawn Mower Types
Push Mowers
Push mower carburetors are typically single-stage designs with simpler construction than riding mower units. The removal and cleaning process is identical, but push mowers usually have smaller carburetors with fewer jets, making disassembly slightly faster.
Riding Mowers
Riding mower carburetors may have more complex governor systems and larger fuel bowls. The basic cleaning procedure remains the same, but you may encounter additional linkages or fuel shutoff solenoids. Photograph these carefully before disconnection.
Two-Cycle Engine Mowers
Some commercial mowers use two-cycle engines, which have slightly different carburetor designs optimized for fuel-oil mixture. The cleaning process is identical, but ensure you understand the fuel system before reconnecting, as improper fuel mixture will damage the engine.
Preventive Maintenance to Avoid Future Buildup
Seasonal Fuel Stabilizer
Before storing your mower for winter or extended periods, add fuel stabilizer to the gas tank according to product instructions. This prevents fuel oxidation and varnish formation in the carburetor. Run the engine for 5-10 minutes to circulate the stabilized fuel through the carburetor.
Proper Fuel Storage
Use fresh gasoline with minimal ethanol content if possible. Ethanol-blend fuels (E10 or higher) attract moisture and degrade faster than pure gasoline. Store fuel in sealed, opaque containers away from heat and sunlight.
Regular Use
Carburetors are least likely to clog when the mower runs regularly. Try to operate your mower at least once monthly during off-season months to keep fuel circulating through the carburetor.
Fuel Filter Maintenance
If your mower has an inline fuel filter (a small cylinder in the fuel line), replace it annually or when it appears discolored. A clogged filter prevents fresh fuel from reaching the carburetor.
Frequently Asked Questions
Q: How long does carburetor cleaning take?
A: The entire process typically takes 1-3 hours, depending on carburetor complexity and how badly it’s clogged. Removal and reassembly usually take 30-45 minutes, while soaking and detailed cleaning take an additional 1-2 hours.
Q: Can I clean the carburetor without removing it from the mower?
A: Partial cleaning is possible by spraying carburetor cleaner into air intake or fuel lines, but complete disassembly is far more effective. Soaking internal components removes stubborn varnish that spraying cannot.
Q: What’s the difference between carburetor cleaner and gasoline?
A: Carburetor cleaner is formulated specifically to dissolve varnish and fuel residue without damaging metal or rubber components. Gasoline is less effective for cleaning and leaves residue behind.
Q: Should I replace the gasket every time I clean the carburetor?
A: Not necessarily, but if the gasket appears cracked, hardened, or compressed, replacement is recommended. Gasket kits are inexpensive ($10-20) and prevent fuel leaks after reassembly. Many mechanics replace gaskets every other cleaning for reliability.