Direct Answer: How to Load String in a Weed Wacker
To put string in a weed wacker, remove the spool by twisting the cutting head counterclockwise, then wind new trimmer line onto the spool following the directional arrows until 6–8 inches remain free. Insert the free end into the anchor slot, reattach the spool to the head, and feed the line through the exit holes. The exact process varies depending on whether your trimmer uses a bump-feed system (which advances line automatically) or a manual-advance system (which requires manual feeding).
Understanding Your Weed Wacker’s Spool System
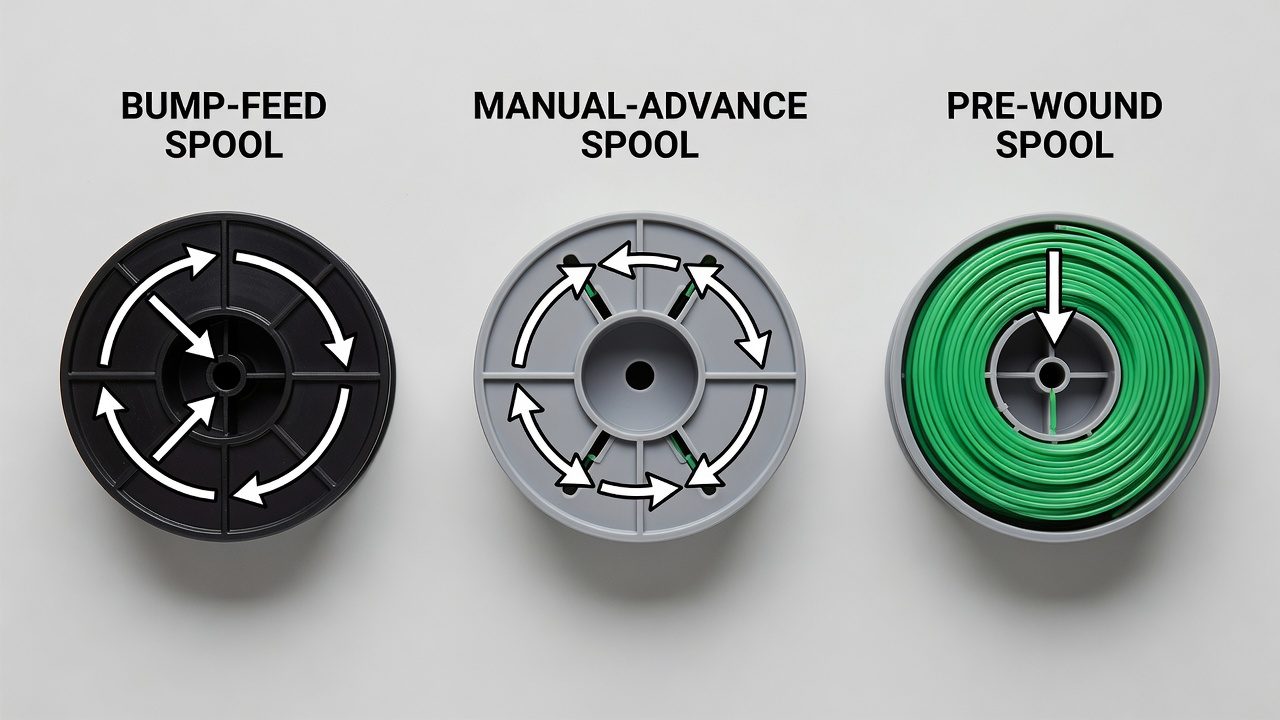
Before you begin loading string, identify which spool system your weed wacker uses. This determines the loading procedure and affects how the trimmer line advances during use.
Bump-feed systems are the most common type found on consumer-grade trimmers. These spools automatically advance a small amount of line each time you tap the trimmer head on the ground. The spool is typically simpler, with just one anchor point, and requires less precision when winding. Bump-feed spools come pre-configured with directional arrows to guide your winding.
Manual-advance systems require you to pull line out manually when you need to extend it. These spools often have two anchor slots (one for each line segment) and require more careful winding to ensure both sides feed evenly. Manual systems are common on commercial-grade and professional trimmers.
Pre-wound spools are available for many models and eliminate the winding step entirely—they simply click or screw into place. If your trimmer supports them, this is the fastest method, though you’ll pay slightly more per replacement.
Check your trimmer’s manual or look at the spool itself; most have molded arrows indicating the winding direction and system type. If you’ve lost the manual, the manufacturer’s website usually provides downloadable guides specific to your model number.
Tools and Materials You’ll Need
Gather these items before starting:
- Trimmer line (also called trimmer cord or weed-whacker string): Available in various gauges (thickness), typically 0.065 to 0.110 inches. Check your manual for the correct size; using the wrong gauge can damage the spool or cause feeding problems.
- Replacement spool (optional): Some users prefer buying spare spools already wound to avoid the winding step on future changes.
- Needle-nose pliers or a screwdriver: Helpful for removing stubborn spools or accessing tight anchor slots, though most spools unscrew by hand.
- Work surface: A flat table or workbench prevents the spool from rolling away while you’re winding.
- Safety glasses (optional but recommended): Protects your eyes if the spool suddenly releases tension.
Purchase trimmer line at hardware stores, home centers, or online retailers. Buy a little extra; it’s inexpensive and you’ll need it for future replacements. Most residential users go through one spool every 2–4 weeks of regular mowing season.
How to Remove and Access the Spool
Safety first: unplug your trimmer (for corded models) or remove the battery (for battery-powered models). Gas-powered trimmers should have the engine off and be allowed to cool.
Step 1: Locate the spool cap. The spool is housed under a plastic cap at the bottom of the trimmer head. This cap is usually held on by a single bolt, tab, or clip.
Step 2: Remove the spool cap. Most caps unscrew counterclockwise by hand. If it’s stuck, use a cloth for grip or gently tap it with a rubber mallet. Some models have a tab you push or pull to release the cap—check your manual if hand-turning doesn’t work.
Step 3: Remove old string and debris. Pull out any remaining old line and wipe away grass clippings and dirt inside the spool housing. This prevents tangles and ensures smooth feeding.
Step 4: Remove the spool itself. The spool sits on a post and typically twists off counterclockwise. Turn gently but firmly; if it’s very stuck, place the trimmer on a work surface and use gentle leverage with pliers on opposite sides of the spool rim.
Some models have the spool permanently attached; in these cases, you’ll wind string directly onto the installed spool rather than removing it. Check your manual if you’re unsure.
Step-by-Step: Winding String onto the Spool
Step 1: Measure your line. Cut approximately 15–20 feet of trimmer line. This is enough for most residential spools. If you’re unsure, wind until you can’t fit more without packing the spool too tightly.
Step 2: Find the anchor slot. Examine the spool closely. You’ll see a notch or small hole labeled as the anchor point—this is where you’ll secure the free end of your line. Some spools have one anchor slot (bump-feed); others have two (manual-advance with dual line).
Step 3: Insert the line into the anchor slot. Push about 2 inches of line into the anchor slot. It should fit snugly but not require force. This end will stay anchored while you wind the rest of the line.
Step 4: Wind the line tightly. Begin winding the line around the spool in the direction indicated by arrows molded into the plastic. Wind tightly and evenly, ensuring each wrap sits flat against the previous one without overlapping or bunching. Keep slight tension on the line as you wind—not so tight that you strain, but tight enough to prevent loose coils.
Step 5: Stop winding 6–8 inches before the spool is full. Leave this space so the spool can rotate freely inside the head. If you wind too much line, the spool will jam when you reinstall it.
Step 6: For dual-line spools, repeat on the second side. If your spool has two line segments (manual-advance systems), wind the second length of line in the same direction starting from the second anchor slot. Aim for similar line lengths on both sides so the trimmer balances and feeds evenly.
Common winding mistake: Winding in the wrong direction is the #1 cause of line feeding problems. Always follow the arrows on the spool, not your instinct. Arrows point in the direction your line should wrap.
Reinstalling the Spool and Threading the Line
Step 1: Reattach the spool to the trimmer head. Align the spool post with the center shaft in the trimmer head and screw the spool on clockwise. Turn firmly until snug but don’t over-tighten, which can crack the spool or strip the threads.
Step 2: Replace the spool cap. Screw the plastic cap back on counterclockwise until it seats firmly. Again, snug is better than hand-straining force.
Step 3: Feed the line through the exit holes. Most trimmer heads have two small holes on opposite sides of the cap where line exits. Pull the free ends of your line and feed them through these holes until equal lengths (typically 4–6 inches) stick out on each side. The line should be taut but not under extreme tension.
Step 4: Trim the line to length. Once fed through, trim each side to the same length. Most users cut them so about 3–4 inches extends past the exit hole. The exact length depends on your trimmer’s design and the cutting diameter you prefer. Start conservative; you can always extend the line later with the bump-feed feature (if your model has it) or by manually pulling more line through.
Step 5: Test-rotate the spool. Before powering on, manually rotate the spool by hand a few times to ensure it spins freely without binding. If it catches or feels tight, the line may be wound too tightly or jammed in the housing.
Common Variations by Weed Wacker Type
Corded Electric Trimmers: These lightweight models almost always use bump-feed spools with simple one-line designs. They’re the easiest to reload and the process described above applies directly.
Battery-Powered Trimmers: Identical to corded models in spool design. Battery trimmers are typically consumer-grade and use straightforward bump-feed systems.
Gas-Powered Trimmers: Professional and semi-professional gas trimmers often use manual-advance spools with dual-line capability. These require more precision when winding and may need careful tuning to feed evenly. Gas trimmer spools also tend to be more robust and can handle thicker line gauges.
Bump-feed vs. Manual-advance recap: Bump-feed is simpler and more forgiving; you’ll rarely need to adjust line length once loaded. Manual-advance requires occasional intervention to pull out more line but gives you complete control over cutting diameter and is preferred by professionals who need precision.
Pre-wound spools: If your model supports them, these eliminate winding entirely. You simply remove the old spool, install the new one (usually by twisting on or clicking in), and feed the line through the exit holes. They cost $8–15 compared to $2–4 for bulk line but save 10–15 minutes of labor.
Troubleshooting Common Loading Issues
Line won’t stay wound or keeps unraveling: You likely wound in the wrong direction or didn’t wind tightly enough. Remove the spool, check the directional arrows again, and rewind more firmly. Make sure the line is under slight tension as you wrap each coil.
Spool won’t fit back into the trimmer head: This usually means you wound too much line. Remove the spool and unwind 2–3 feet, then try again. The spool should slide into the housing with minimal resistance.
Line won’t feed through the exit holes: Check that you haven’t bent the line or created a kink while winding. If the line is damaged, cut it off above the damage and pull more line through. If the exit holes are plugged with debris, use a toothpick or small wire to clear them.
Line feeds unevenly or one side runs out faster: On dual-line systems, this indicates unequal lengths or one side is wound tighter than the other. Remove the spool, unwind, and rewind with equal tension on both segments.
Line tangles or bunches inside the spool housing: This happens when the line overlaps during winding. Rewind more carefully, ensuring each wrap sits flat and doesn’t cross over the previous wrap. Also verify you’re winding in the correct direction per the molded arrows.
Spool cap or spool won’t unscrew: Apply penetrating oil (like WD-40) and let it sit for 15 minutes, then try again. Use a rubber mallet to gently tap the cap while turning. Avoid pliers on the spool threads as they can strip the plastic.
Maintenance Tips After Loading New String
How often to replace line: Most residential users replace their trimmer line every 2–4 weeks during mowing season. Commercial users or those with large properties may need to replace weekly. You’ll know it’s time when the line becomes noticeably shorter (from wear and breakage) or starts breaking frequently during use.
Extend line life: Avoid hitting rocks, concrete, or metal objects while trimming. These cause nicks and weak points that lead to breakage. Also trim at moderate speed; aggressive cutting accelerates wear.
Storage: Store your trimmer in a cool, dry place. Extreme heat can warp the spool, and moisture can rust the metal components. Before storing for the off-season, consider emptying the spool entirely to relieve tension on the spring mechanism (if your model has one), which extends the spool’s life.
Monitor line length during use: For bump-feed systems, the line shortens automatically as you trim. If it gets too short, tap the trimmer head on the ground to advance more line. For manual systems, pull the line out manually when needed. Don’t wait until the line is completely gone before reloading; it’s easier to top up a partial spool than rewind from scratch.
Check spool condition: If the spool cracks, warps, or develops rough spots, replacement spools are inexpensive ($5–10) and are worth the investment. A damaged spool can cause feeding problems and may eventually break during use.
Frequently Asked Questions
Q: Can I use any trimmer line in my weed wacker?
A: No. Always use the gauge (thickness) and material specified in your trimmer’s manual. Common gauges are 0.065, 0.080, 0.095, and 0.110 inches. Using the wrong gauge can cause the spool to jam, the line to feed incorrectly, or even damage the trimmer head. The manual usually states the correct gauge on the front cover or in the parts diagram.
Q: How tight should I wind the line onto the spool?
A: Tight enough that the coils sit flat and don’t shift, but not so tight that you struggle to turn the spool by hand. A good test: after winding, you should be able to manually rotate the spool with moderate finger pressure. If it’s very hard to turn, unwind slightly. If it’s loose, rewind more firmly.
Q: My trimmer came with a pre-wound spool. Can I reuse it by rewinding?
A: Yes, absolutely. Pre-wound spools are identical to regular spools once the original line is removed. Unwind the old line and follow the same winding procedure. The spool itself lasts for years as long as it’s not cracked or warped.
Q: Why does my line keep breaking while I’m trimming?
A: Breakage usually results from hitting hard objects (rocks, metal, concrete), using old or damaged line, or winding the line too tightly (which makes it brittle). Try using slightly lighter tension when winding, avoid hard objects, and replace the line every 2–4 weeks. If breakage continues, your line gauge may be too thin for your trimmer’s power; check the manual and consider upgrading to a thicker gauge.