Quick Answer: To put string on a weed wacker, access the spool head by twisting or pressing release tabs, remove the empty spool, measure and cut new trimmer line (typically 10-20 feet depending on your model), thread it into the anchor holes following directional markings, wind it tightly in the correct direction, and reinstall the spool head until it clicks into place. Consult your manual for model-specific instructions, as processes vary significantly between single-line and dual-line systems.
Understanding Your Weed Wacker’s String System
Before you begin replacing trimmer line, it’s essential to understand which type of spool system your weed wacker uses. The process differs substantially between models, and using the wrong technique can result in feeding failures or damaged equipment.
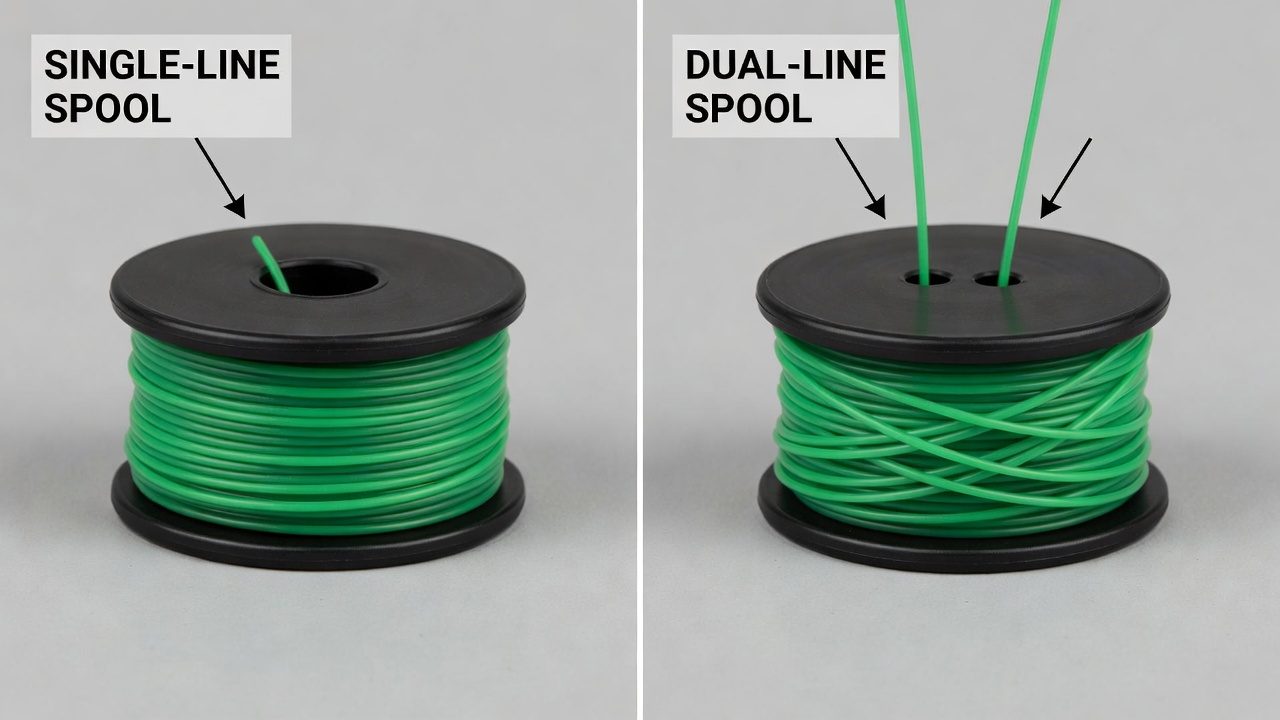
Single-Line vs. Dual-Line Heads
Most consumer weed wackers use one of two configurations:
- Single-line heads: Feature one string that spins around the spool. These are simpler to load and common on lightweight, residential models. They work well for light trimming but offer less cutting power than dual-line systems.
- Dual-line heads: Wind two strings on the same spool for double the cutting width and power. These dominate the consumer market because they cover grass faster and handle thicker weeds more effectively.
Dual-line systems typically require more string (15-20 feet total) compared to single-line systems (10-15 feet), so check your manual to determine the correct amount for your model.
Automatic Feed vs. Manual Feed Systems
Your weed wacker also uses one of two feeding mechanisms:
- Bump-feed (automatic): When the spinning head bumps the ground, a small mechanism automatically advances fresh trimmer line. This requires precise string winding and correct tension; too loose, and it won’t feed; too tight, and it may jam.
- Manual feed: You manually advance the line by pressing a button or turning a knob. This gives you more control but requires you to manage line length during use.
Understanding your system type is critical because it determines how tightly you should wind the string and how long each segment should be.
What You Need Before Starting
Gather these materials and tools before removing your old string:
- Replacement trimmer line: Purchase the correct diameter for your model. Common sizes are 0.065 inches, 0.080 inches, and 0.095 inches. Check your manual or the spool head label for the correct specification. Using the wrong diameter can damage the feed mechanism or result in poor cutting performance.
- Measuring tape: To cut the correct length of string.
- Scissors or diagonal cutters: A sharp tool to cleanly cut the trimmer line. A clean cut helps the string feed smoothly without fraying.
- Your weed wacker’s manual: Essential for model-specific winding direction, anchor hole configuration, and proper thread routing. If you’ve lost yours, most manufacturers provide PDFs online via their websites.
- Safety glasses (optional but recommended): Protects your eyes if the spinning spool suddenly releases tension.
Before you begin, ensure your weed wacker is powered off and unplugged (if electric) or the fuel tank is empty (if gas-powered). Never work on a trimmer that could accidentally start.
How to Access and Remove the Spool
The method for opening your spool head depends on your model, but most follow a standard pattern:
Step 1: Locate the Spool Head Release Mechanism
Look at the round trimmer head at the bottom of your weed wacker. You’ll typically see one of these:
- Twist-off cap: Rotate the entire spool head counterclockwise by hand or with a wrench. This is the most common design on residential models.
- Push-tab release: Press one or two tabs inward while lifting the cap away. Some models feature tabs on opposite sides.
- Bolt or screw: Rare on modern models but found on some professional-grade trimmers. Use the appropriate wrench or screwdriver.
Step 2: Remove the Old Spool
Once the cap is open, lift out the spool carefully. Note the orientation and any washers or springs—you’ll need to reinstall these exactly as they were. Examine the anchor holes (usually two slots where the old string was threaded) to understand the threading pattern for your new string.
Step 3: Clear Old String Debris
Remove any remaining bits of old trimmer line from inside the head and the spool. Debris can prevent new string from feeding smoothly. Use your fingers or a small brush to clean the interior cavity.
Step-by-Step: Threading and Winding the String
Measuring and Cutting the Trimmer Line
The correct length is critical for both feed performance and safety. Too short, and your line won’t reach the exit holes; too long, and it may jam or tangle inside the head.
- Standard lengths: Most dual-line heads use 15-20 feet total (7.5-10 feet per line). Single-line heads typically use 10-15 feet. Your manual will specify the exact measurement for your model.
- How to measure: Unroll the trimmer line and lay it out. Use a measuring tape to cut two pieces of equal length for dual-line systems. Make a clean, straight cut with scissors or diagonal cutters.
- Pro tip: Cut slightly longer than specified the first time you reload. You can always trim it after testing; you can’t add it back if it’s too short.
Understanding the Winding Direction
This is where most people make mistakes. Your spool has directional markings (usually arrows) showing which way to wind the string. Winding in the wrong direction prevents the automatic bump-feed mechanism from working and can cause the string to tangle.
- Look for arrows: Most spools have small arrows molded into the plastic indicating the correct rotation direction. If your spool doesn’t have visible markings, check your manual or search your model number online.
- Common configuration: Most dual-line spools wind one string clockwise and the other counterclockwise from the center, creating balanced tension. Single-line spools typically wind in a single direction.
- When in doubt: Consult your manual. Winding direction is model-specific and critical for proper function.
Threading the String into Anchor Holes
For dual-line heads:
- Locate the two anchor holes or slots on the spool. These are typically positioned 180 degrees apart.
- Insert one end of your first string segment into the first anchor hole. Push it in firmly until it clicks or seats fully. The string should not slip out easily.
- Begin winding: Hold the spool in one hand and guide the string with the other, rotating the spool in the direction indicated by the arrow. Keep tension on the string as you wind—it should be snug but not so tight that it deforms the spool.
- Wind the string neatly in concentric layers, avoiding overlaps or gaps. Continue until you’ve wound most of the string, leaving 4-6 inches free.
- Secure the loose end in the anchor hole by wrapping it around the anchoring post or inserting it into the retention slot (design varies by model).
- Repeat steps 1-5 for the second string on the opposite anchor hole, winding in the opposite direction.
Winding tension matters: String wound too loosely won’t feed reliably; too tightly, and it may break or jam the mechanism. Aim for moderate tension—you should be able to press the wound string slightly with your finger, but it shouldn’t compress easily.
Reinstalling the Spool and Feeding the String
Step 1: Position the String in Exit Holes
Before reinstalling the spool in the trimmer head, position the two loose string ends into the exit holes on the spool or cap. These holes guide the string toward the cutting head. Pull each string segment so 8-12 inches extend beyond the exit hole—this becomes the active cutting length.
Step 2: Reinstall the Spool
Place the loaded spool back into the trimmer head cavity, ensuring it sits evenly. Reinstall any washers or springs you removed earlier in their original positions. Replace the cap by either:
- Twisting it clockwise until snug (do not over-tighten)
- Pressing tabs and pushing down until it clicks
- Tightening any bolts or screws to manufacturer specifications
Step 3: Trim the String to Cutting Length
Hold your trimmer at a slight angle and carefully trim each string segment to the appropriate cutting length. For most residential models, this is 4-6 inches per line. Some trimmers have a built-in guide notch on the head to show the correct length; use it as a reference. Once trimmed, the strings should be equal length on both sides for balanced cutting.
Step 4: Test the Feed Mechanism (Bump-Feed Models)
For automatic bump-feed systems, test by lightly bumping the trimmer head against the ground a few times. The mechanism should advance fresh string. If nothing happens, recheck your winding direction and tension. If the string advances too much or gets stuck, the tension may be incorrect.
Common Mistakes and Troubleshooting
String Won’t Feed Automatically
If your bump-feed system isn’t advancing line:
- Check winding direction: Reopen the spool and verify you wound in the correct direction per your manual. This is the most common cause of feed failure.
- Verify string tension: If wound too loosely, the feed mechanism won’t engage. Remove the spool and rewind with moderate tension.
- Inspect the feed mechanism: Look inside the head for broken tabs or springs that advance the string. If damaged, the head may need replacement.
String Winds in the Wrong Direction
If you wound the string opposite to the arrow markings:
- Unwind and restart: Carefully unwind the string, cutting away the wound portion if necessary, and rewind following the correct direction.
- Prevent future errors: Mark your manual with a photo or note showing your model’s winding direction for next time.
String is Bunching or Knotting
This typically indicates overlapped or uneven winding:
- Remove the spool and rewind, keeping each layer flat and even with no gaps or overlaps.
- Ensure the string remains under tension as you wind—don’t allow slack sections.
- If bunching continues after rewinding, trim the cutting ends shorter and test again.
String is Too Short or Too Long
If trimmed cutting length is insufficient:
- Too short: Reload the spool with a longer string segment. You may need to purchase additional trimmer line.
- Too long: Trim the cutting ends to the manufacturer’s recommended length. Excess string causes drag and reduces cutting efficiency.
Tips for Different Weed Wacker Models
Cordless vs. Gas-Powered Models
The core process is identical regardless of power source. However:
- Cordless: These models feature more compact heads, so spool removal may feel tighter. Work slowly and don’t force the cap off.
- Gas-powered: Ensure the fuel tank is completely empty before working on the trimmer head to prevent spills or leaks.
Bump-Feed vs. Manual Feed Systems
Both use the same loading process, but:
- Bump-feed: Requires precise winding direction and tension. Test immediately after loading to verify the feed mechanism works.
- Manual feed: More forgiving. You can load the string with slightly less precision and advance it by pressing a button during use. However, winding direction still matters for balanced cutting.
Fixed Spool vs. Rotating Spool Designs
Most consumer trimmers use fixed spools (the spool stays in place while the head rotates around it). Some professional models feature rotating spools where the entire spool assembly spins. For rotating designs:
- Follow the same threading and winding steps.
- Ensure the spool spins freely after reinstalling the cap.
- Verify that the string feeds smoothly without binding.
Maintenance and Prevention Tips
To extend the life of your trimmer line and reduce how often you need to reload:
- Store in a cool, dry place: Trimmer line becomes brittle if exposed to heat or UV light. Store unused spools in a dark cabinet.
- Replace line annually: Even if you haven’t used all the string, replace it yearly if stored outdoors or in direct sunlight.
- Clear obstacles before trimming: Rocks, sticks, and debris damage string and cause breakage. Walk the area first to remove hazards.
- Trim at the correct height: Keep grass height at 2-3 inches. Cutting too short causes the string to hit soil and wear faster.
- Use the correct line diameter: Thicker line (0.095 inches) lasts longer but uses more power; thinner line (0.065 inches) is gentler on the motor but wears out faster.
Frequently Asked Questions
What size trimmer line do I need for my weed wacker?
Check your owner’s manual or look for a specification label on the spool head itself. Common sizes are 0.065 inches (for lightweight models), 0.080 inches (standard for most residential trimmers), and 0.095 inches (for heavy-duty gas models). Using the wrong size can damage the feed mechanism or reduce cutting performance. When in doubt, contact the manufacturer with your model number.
Can I use universal trimmer line on any weed wacker?
Not always. While some universal lines fit multiple head types, it’s safest to use the specific diameter and type recommended by your trimmer’s manufacturer. Universal line may feed poorly or break frequently if it’s not perfectly suited to your head’s feed mechanism. Check your manual before switching brands.
How often should I replace my trimmer line?
Depending on usage, you’ll likely need fresh string every 3-6 months during active trimming season. If your line breaks mid-use, reload immediately. If you store your trimmer for winter, inspect the line before spring; if it looks brittle or discolored, replace it. Over time, sun exposure and heat degrade trimmer line even if unused.
Why does my string keep breaking or bunching up?
Breakage and bunching usually indicate one of three issues: the string diameter is wrong for your head, the line is wound in the incorrect direction, or it’s wound too loosely or too tightly. Start by verifying the correct line diameter in your manual. Then remove the spool and rewind, checking the directional arrows and maintaining moderate tension throughout. If problems persist, the feed mechanism itself may be damaged and require professional repair.
Final Thoughts
Replacing trimmer line is one of the easiest weed wacker maintenance tasks you can perform, but it requires attention to detail. The most common mistakes—winding in the wrong direction, using incorrect string diameter, or applying the wrong tension—are all preventable with careful attention to your manual and the steps outlined above. Once you’ve loaded your first spool, the process becomes second nature. Keep your manual handy for future reference, and don’t hesitate to contact your trimmer’s manufacturer if you encounter issues specific to your model.