

Direct Answer: Sharpening Frequency
Sharpen your lawn mower blades every 20-50 hours of mowing, or roughly every 1-2 months during the growing season for typical residential use. The exact interval depends on your mowing conditions, grass type, and how frequently you mow. If you notice your mower tearing grass instead of cleanly cutting it, that’s a sign your blades need immediate sharpening, don’t wait for the scheduled interval.
Why Blade Sharpness Matters
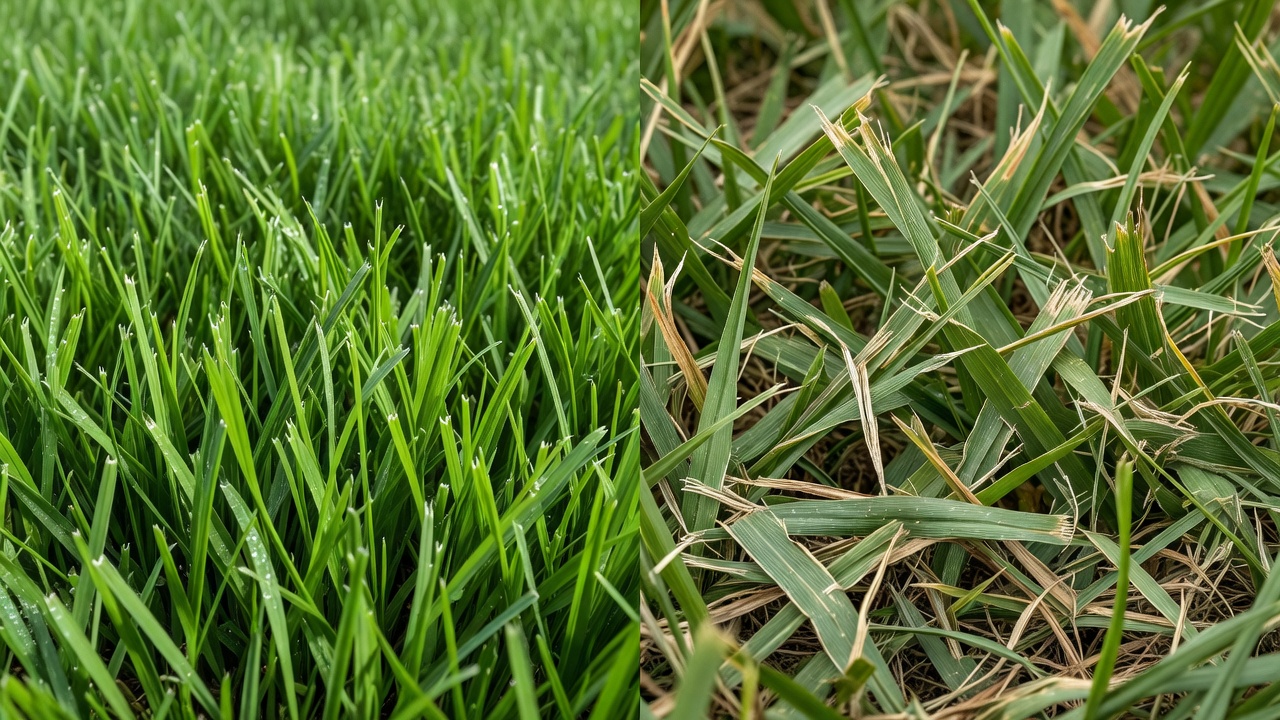
Dull lawn mower blades don’t just cut poorly, they damage your grass and stress your equipment. When blades are sharp, they cleanly slice grass stems, allowing the plant to heal quickly and maintain its appearance. Dull blades, by contrast, tear and bruise grass tips, creating ragged edges that expose the plant to disease, browning, and pest damage.
Beyond lawn health, dull blades force your mower’s engine to work harder, consuming more fuel and putting unnecessary strain on the motor. Over time, this increases wear on engine components and can shorten your mower’s lifespan. Regular sharpening is one of the simplest maintenance tasks you can perform to extend equipment life and keep your lawn looking healthy.
Standard Sharpening Schedule: 20-50 Hours of Use
The 20-50 hour range is the industry standard for blade maintenance on residential lawn mowers. This translates roughly as follows:
- Mowing once per week: Sharpen every 5-10 weeks (1-2.5 months)
- Mowing twice per week: Sharpen every 2.5-5 weeks (roughly monthly)
- Mowing 2-3 times weekly: Sharpen every 2-3 weeks during peak season
Most homeowners fall into the “once weekly” category during the growing season, meaning a monthly or bi-monthly sharpening schedule works well. However, this baseline assumes average conditions. Your actual frequency may vary based on several factors.
Factors That Affect Sharpening Frequency
Several conditions can accelerate blade wear and require more frequent sharpening:
- Grass Type and Density: Thick, dense turf dulls blades faster than thin grass. Cool-season grasses that grow vigorously also wear blades more quickly than slower-growing varieties.
- Moisture and Wet Grass: Mowing wet or damp grass creates more friction and accelerates blade dulling. If you often mow after rain or in humid conditions, sharpen blades 20-30% more frequently.
- Overgrown or Tall Grass: Letting grass grow too tall between mowings forces blades to work harder. This is particularly stressful on the cutting edge and dulls blades faster.
- Soil and Debris: Mowing over areas with sand, dirt, or gravel can dull or nick blades quickly. Hitting rocks or debris is especially damaging and may require immediate sharpening.
- Blade Quality: Lower-quality blades made from softer steel dull faster than premium blades. However, all blades eventually dull regardless of initial quality.
- Mower Type: Push mowers and reel mowers have different wear patterns. Rotary mower blades typically need sharpening every 20-50 hours, while reel mower blades may last longer between sharpenings.
How to Tell When Blades Need Sharpening
Don’t rely solely on the calendar, visual and tactile inspection is the most reliable way to determine blade condition. Check your blades regularly, especially during heavy mowing season. Users looking for related component recommendations can explore our z890 vs x870e motherboard breakdown.
Visual Signs of Dull Blades
- Torn Grass Tips: The most obvious sign is ragged, torn grass tips instead of clean cuts. The grass looks brown or discolored at the edges within a few hours or days of mowing.
- Uneven Cutting: Dull blades may miss some grass while cutting others unevenly, creating a patchy appearance across your lawn.
- Visible Damage: Look for nicks, bends, or worn edges along the blade’s cutting surface. Light nicks may be sharpenable; deep gouges typically require blade replacement.
- Discoloration: Excessive heat buildup from friction can cause the blade to turn blue or purple, indicating metal fatigue and dulling.
How to Inspect Blades Safely
Always disconnect the spark plug wire before inspecting or sharpening blades. This prevents accidental engine startup:
- Tip the mower on its side (fuel cap facing up to prevent oil leakage).
- Visually examine the blade edge from multiple angles, looking for wear, nicks, or asymmetry.
- Gently run your finger or thumb along the edge at a shallow angle, a sharp blade should feel sharp and smooth; a dull blade will feel blunt or rough.
- Check blade balance by suspending it on a nail through its center hole. A balanced blade hangs level; an unbalanced blade tips to one side (indicating uneven sharpening or damage).
Dull vs. Damaged Blades
Dull blades have a flat or rounded cutting edge. They can almost always be sharpened back to working condition with a file or grinder. Damaged blades have cracks, large chips, or bends. These cannot be safely repaired and require replacement. Before finalizing equipment decisions, refer to our comprehensive marshall stanmore iii vs harman kardon onyx studio 8 comparison.
Step-by-Step Blade Sharpening Process
Many homeowners sharpen their own blades to save money and reduce downtime. Here’s how to do it safely and effectively:
Tools You’ll Need
- Metal file (10-12 inch flat or mill file) or angle grinder with metal wheel
- Wrench or socket set (to remove the blade)
- Work gloves and eye protection
- Marker or paint pen (to mark the blade)
- Shop towel or brush
- Spark plug wire removed (safety first)
Sharpening Steps
- Remove the Blade: Disconnect the spark plug wire. Tip the mower and mark the blade’s top side with a marker (so you reinstall it the same way). Remove the bolt holding the blade to the spindle using a wrench.
- Clean the Blade: Wipe away grass, dirt, and debris with a brush or towel. A clean blade is easier to work with and shows the cutting edge clearly.
- Examine the Blade Angle: Most rotary mower blades have a slightly angled cutting edge (not perfectly horizontal). Maintain this angle while sharpening, typically 30-40 degrees.
- Sharpen Evenly on Both Sides: Using a file or grinder, sharpen the blade’s leading edge (the side that cuts). Remove the same amount of metal from both ends of the blade to maintain balance. Make 5-10 passes on each end, then check your progress.
- Maintain Balance: Use a blade balancer or the nail-suspension method to check balance after sharpening. An unbalanced blade causes vibration, reduces cutting quality, and can damage the mower. Remove slightly more metal from the heavier side if needed.
- Avoid Over-Sharpening: Remove only enough metal to restore a clean cutting edge. Excessive sharpening weakens the blade and shortens its lifespan. Aim for a cutting edge similar to a butter knife, sharp but slightly blunt, not razor-sharp.
- Reinstall the Blade: Slide the blade back onto the spindle with the marked top side facing up. Tighten the bolt securely (consult your mower’s manual for the correct torque specification).
- Test: Reconnect the spark plug and test the mower on a small area of grass. The cut should be clean and even.
Professional Sharpening Option
If you’re uncomfortable sharpening blades yourself, many lawn mower repair shops, hardware stores, and small engine dealers offer professional sharpening services. Costs typically range from $10-$25 per blade and take only a few days. Professional sharpening ensures optimal balance and angle, though regular DIY maintenance works fine for most homeowners. For broader ecosystem context, read through our operational guide on dyson v8 cyclone vs bissell featherweight stick.
When to Replace Blades Instead of Sharpening
Not all dull blades can be restored through sharpening. Replace your blades if they show any of these conditions:
- Deep Cracks or Fractures: Cracks indicate metal fatigue and weakness. Sharpening won’t fix this, and a cracked blade may fail during operation.
- Large Chips or Missing Sections: If a blade has lost a significant piece of the cutting edge, it cannot be safely repaired.
- Severe Bending or Warping: A bent blade cannot be straightened safely and won’t cut properly even if sharpened.
- Corrosion or Rust: Heavy rust or corrosion compromises the blade’s integrity. Light surface rust can be cleaned, but deep pitting requires replacement.
- Previous Damage from Impact: If a blade has struck a rock or hard object and developed a permanent deformation, replacement is the safer option.
- Excessive Wear Thinning: Over many sharpening cycles, blades gradually become thinner and weaker. If a blade feels noticeably thin or fragile, it’s time to replace it.
Blade replacement typically costs $15-$40 per blade depending on mower size and blade quality. If you’re unsure whether to sharpen or replace, err on the side of replacement, a damaged blade that fails during mowing is a safety hazard. For troubleshooting and reliability insights, consult our in-depth bissell crosswave hydrosteam vs shark stainforce report.
Seasonal Maintenance Tips
Integrate blade sharpening into your broader lawn care routine for best results:
Spring Start-Up
Before the first mow of the season, inspect and sharpen blades even if they were sharpened at the end of last season. Winter storage can cause minor corrosion, and a fresh sharpening ensures optimal performance as grass begins growing vigorously.
Mid-Season Check
During peak mowing season (summer for most regions), inspect blades every 2-3 weeks. Mark your calendar or set a phone reminder. This prevents blades from becoming too dull and helps you catch damage early.
End-of-Season Care
After the last mow of the season, clean the blades thoroughly and sharpen them before storing the mower. This prevents rust and ensures the mower is ready to go when spring arrives. Store blades in a dry location, ideally with a light coat of oil to prevent corrosion.
Winter Storage
If you store your mower indoors over winter, keep blades dry and protected from moisture. Humidity can cause surface rust that’s harder to remove than prevents. Consider a blade guard or storage cover.
Everything You Need to Know: How Often Should You Sharpen Lawn Mower Blades FAQ
How long do lawn mower blades typically last?
A well-maintained lawn mower blade lasts 2-3 seasons (or 100+ hours of mowing) before replacement is necessary. With regular sharpening, a blade can be maintained indefinitely until it becomes too thin or sustains irreparable damage. Most homeowners replace blades every 1-2 seasons depending on mowing frequency and conditions.
Can you sharpen blades with a regular file, or do you need a grinder?
A regular metal file works fine for sharpening lawn mower blades and is actually safer for beginners than a grinder. A 10-12 inch mill file or flat file is ideal. Hand filing takes longer (15-30 minutes per blade) but gives you better control. An angle grinder is faster (5-10 minutes) but requires more experience to maintain proper blade balance and angle. Either method works; choose based on your comfort level and available tools.
What’s the difference between sharpening and balancing?
Sharpening restores the blade’s cutting edge by removing dull metal. Balancing ensures equal weight on both sides of the blade. Both are equally important. An unbalanced blade causes vibration even if sharp, leading to poor cuts and engine stress. Always check balance after sharpening by suspending the blade on a nail through its center hole. If it tips to one side, remove slightly more metal from the heavier end.
How do I know if I’ve sharpened too much?
You’ve over-sharpened if the blade edge becomes razor-sharp or if you’ve removed more than about 1/8 inch of metal from the cutting edge. A properly sharpened blade should feel sharp but not dangerously so, similar to a butter knife. If the blade looks noticeably thinner than before sharpening, you’ve removed too much metal. Over-sharpening weakens the blade and shortens its lifespan. With practice, you’ll develop a feel for the right amount of sharpening.
Sharpening Frequency Guidelines
Most homeowners sharpen blades at least each season, with more frequent work needed when mowing gravel or rocky ground. Hitting stones or roots dulls the edge quickly and calls for earlier attention. For general safety reminders when handling blades, consult American National Standards Institute (ANSI).









