Direct Answer: How to Sharpen Lawn Mower Blades
Sharpening lawn mower blades involves disconnecting power, safely removing the blades, sharpening the cutting edge at a 30-45° angle using a file or grinder, balancing the blades, and reinstalling them. The process typically takes 20-30 minutes per pair of blades and restores cutting performance for 20-40 hours of mowing. Proper blade balance is critical—unbalanced blades cause dangerous vibration and engine damage over time.
Safety Precautions Before You Start
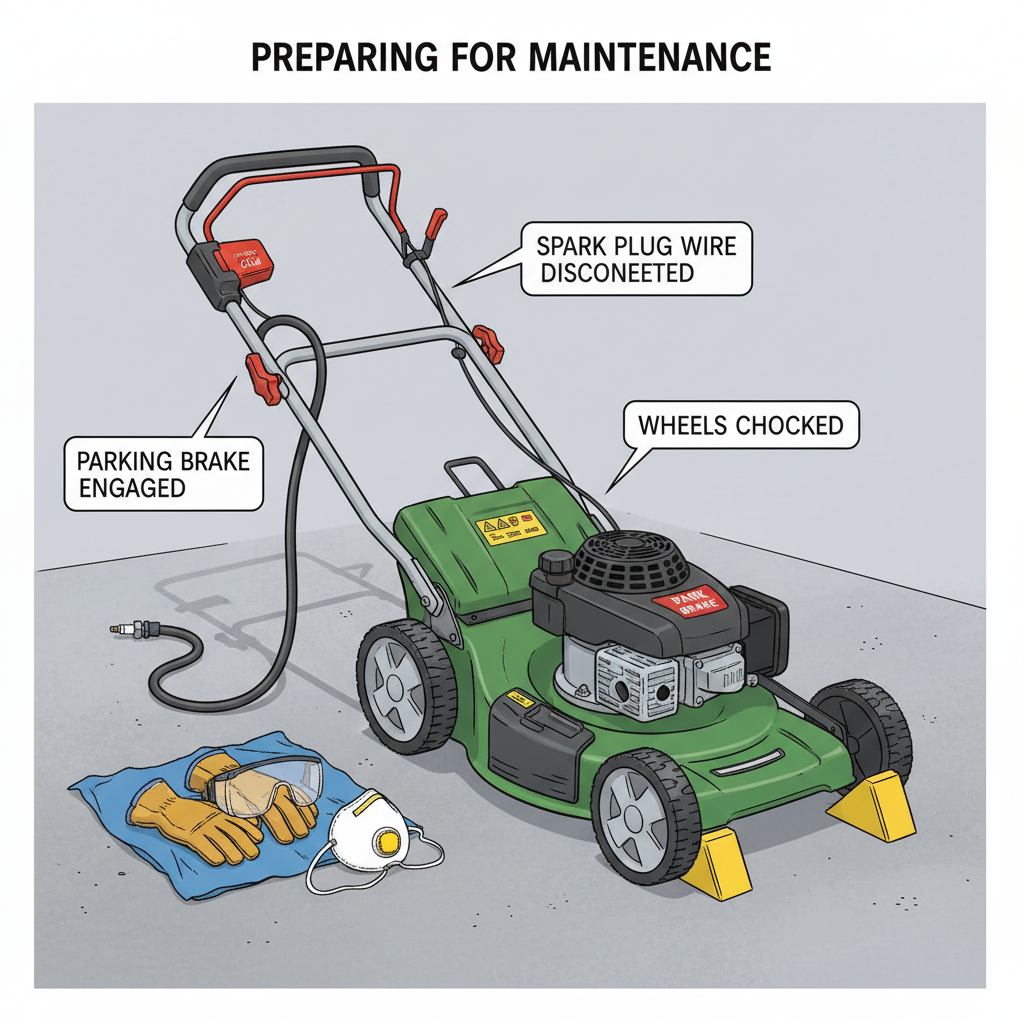
Before touching any blade, safety must be your first priority. Lawn mower blades rotate at high speeds and can cause serious injury if the mower accidentally starts.
- Disconnect power completely: Remove the spark plug wire (gas mowers) or disconnect the battery (electric mowers). This prevents accidental engine startup.
- Wear protective equipment: Use cut-resistant gloves, safety glasses, and a dust mask if using a power grinder.
- Secure the mower: Place the mower on a flat, level surface. Engage the parking brake and chock the wheels if needed.
- Work in good lighting: Use a well-lit workspace to see blade edges clearly and avoid mistakes.
- Never reach under the deck: Always tip the mower on its side or use a deck lift to access blades safely. If tipping, keep the carburetor side up to prevent oil leakage.
Tools and Materials You’ll Need
You don’t need expensive equipment to sharpen blades. Here’s what to gather:
| Tool | Purpose | Notes |
|---|---|---|
| Socket wrench or impact driver | Blade removal and reinstallation | Size depends on your mower (typically 3/8″ to 1/2″) |
| Metal file (10-12 inch mill file) | Manual sharpening | Best for occasional maintenance; requires elbow grease |
| Angle grinder with metal wheel | Power sharpening | Faster but requires more skill; risk of over-sharpening |
| Blade balancer | Check blade balance after sharpening | $15-30; essential for safety |
| Marker or paint pen | Mark blade rotation direction and balance point | Prevents reinstallation errors |
| Eye protection and gloves | Personal safety | Non-negotiable |
How to Identify Dull Blades
Knowing when to sharpen saves time and prevents damage. Dull blades don’t cut cleanly—they tear grass, making lawns susceptible to disease.
- Visual inspection: Look at the blade’s cutting edge. Sharp blades have a thin, reflective edge. Dull blades appear rounded, chipped, or have a thick, flat edge.
- Paper test: Hold a piece of paper horizontally and slowly guide the blade edge across it. A sharp blade cuts cleanly; a dull blade bends or tears the paper.
- Cutting quality: If grass looks shredded or torn rather than cleanly cut, blades are dull. Torn grass tips turn brown and invite fungal infections.
- Sharpening frequency: Most residential blades need sharpening every 20-40 hours of mowing (typically 2-4 times per season). This varies based on grass type, mowing height, and debris encountered.
Step-by-Step Blade Sharpening Process
Step 1: Mark the Blade Rotation Direction
Before removal, mark which side of the blade faces down using a marker or paint pen. This prevents reinstallation errors—blades must spin in the correct direction or cutting performance suffers.
Step 2: Remove the Blades
Safely access and remove the blades:
- Tip the mower on its side (carburetor up) or use a deck lift if available.
- Take a photo of the blade position for reference.
- Use your socket wrench or impact driver to remove the center bolt. Most bolts are reverse-threaded on one side, so turn carefully and note the direction.
- Carefully lift the blade free. Watch for washers and shims—keep them in order for reinstallation.
Step 3: Identify the Cutting Edge and Dullness Level
Rotary blades have two cutting edges (one at each end). Examine both edges to determine sharpening depth needed. Severely dulled, cracked, or bent blades should be replaced, not sharpened.
Step 4: Sharpen at the Correct Angle
Using a metal file (manual method):
- Secure the blade in a vise with the cutting edge facing up.
- Position the file at a 30-45° angle to the blade surface, matching the original bevel angle.
- File in one direction only (away from your body), using smooth, even strokes.
- Make 10-15 strokes on each cutting edge. Check progress frequently—you want to remove the dull edge, not grind away metal.
- Maintain consistent pressure; pressing too hard creates a rounded edge that dulls quickly.
Using an angle grinder (power method):
- Secure the blade firmly in a vise.
- Hold the grinder at 30-45° to the blade, parallel to the cutting edge.
- Use short bursts (2-3 seconds) rather than continuous grinding to avoid overheating the metal.
- Let the tool do the work—don’t force it against the blade.
- Grind both cutting edges equally to maintain balance.
- Cool the blade in water between passes to prevent tempering (softening) the metal.
Key principle: Remove as little metal as possible. You’re removing the dull edge, not reshaping the blade. Excessive sharpening reduces blade lifespan and can affect balance.
Step 5: Check Blade Balance
This is the critical safety step. An unbalanced blade causes dangerous vibration that damages the engine and mower deck over time.
- Using a blade balancer: Hang the blade on the balancer’s cone. A properly balanced blade remains level; one side dropping indicates that side is heavier.
- DIY balance check: Hang the blade on a nail through its center hole. Observe for 30 seconds. A balanced blade stays level; if one end drops, that side needs metal removed.
- Rebalancing: If unbalanced, remove a small amount of metal from the heavier side using your file or grinder. Retest until balanced.
Step 6: Reinstall the Blades
- Place the blade on the spindle, ensuring it’s oriented correctly (marked side down).
- Add washers and shims in the same order they came off.
- Insert and tighten the bolt. Check your mower’s manual for torque specs (typically 35-90 ft-lbs depending on mower size).
- Don’t over-tighten, which can strip threads or damage the spindle.
- Reconnect the spark plug wire or battery.
- Test the mower on a level surface before mowing to ensure smooth operation.
Why Blade Balance Is Critical
Unbalanced blades create vibration that wears bearings, damages the engine, and shortens mower lifespan. Over time, this vibration can cause:
- Bent spindle shafts (expensive repair)
- Damaged deck welds
- Premature engine bearing failure
- Cracked blade (sudden failure mid-mow)
A blade balanced during sharpening performs smoothly and extends the mower’s life significantly. If you can’t balance a blade properly, professional blade service is worth the cost.
Rotary vs. Reel Blade Sharpening
Most residential mowers use rotary blades (which we’ve covered). Reel mowers (push or towed) use multiple curved blades that shear grass against a stationary bar.
- Rotary blades: Sharpen at 30-45° angle; balance is essential; can be sharpened 3-5 times before replacement.
- Reel blades: Sharpen at a steeper 45-60° angle to match the reel’s curve; balance is less critical but alignment matters; professional sharpening is often preferred due to complexity.
When to Call a Professional
DIY sharpening works well for routine maintenance, but some situations warrant professional service:
- Severe damage: Deep cracks, large chips, or significant bending indicate blade replacement is needed. A professional can advise whether the blade is salvageable.
- Reel blades: These require specialized balancing and alignment equipment for optimal results.
- Multiple blade sets: If your mower has 3+ blades (like zero-turn mowers), professional sharpening ensures consistent balance across all blades.
- Doubt about technique: If you’re uncertain about angle, balance, or reinstallation, a professional sharpening ($20-50 per blade) prevents costly mistakes.
- Frequency: If you’re sharpening more than 4 times per season, consider professional service or blade replacement.
Tips for Maintaining Sharp Blades Longer
- Clear the lawn before mowing: Remove sticks, rocks, and debris that dull blades quickly.
- Mow at recommended height: Cutting too short stresses blades and forces them through more impact.
- Don’t overload the mower: Mowing wet grass or too-tall grass dulls blades faster.
- Store blades properly: Keep them dry and protected from rust when not in use.
- Sharpen before seasonal storage: Sharp blades are easier to maintain in spring.
Frequently Asked Questions
How many times can you sharpen a lawn mower blade before replacing it?
Most rotary blades can be safely sharpened 3-5 times before replacement becomes necessary. Each sharpening removes a small amount of metal, reducing blade thickness and structural integrity. Once a blade becomes too thin (check your mower’s manual for specifications) or develops damage that can’t be ground out, replacement is the safer option. Professional blade services typically replace blades that have reached their limit rather than risking continued sharpening.
What’s the difference between using a file versus an angle grinder?
A metal file requires more effort but gives you precise control and slower material removal—ideal for routine maintenance where you only need to remove the dull edge. An angle grinder is faster and works better for severely dulled blades, but it generates heat that can affect the blade’s hardness if you’re not careful, and it’s easier to over-sharpen. For most homeowners doing routine maintenance, a file is safer and sufficient. Reserve the grinder for faster jobs or severely dulled blades.
Can you sharpen blades without removing them from the mower?
Technically possible but not recommended. Sharpening in place risks damaging the deck, carburetor, or engine with file or grinder debris. It’s also difficult to access the blade fully, reach both cutting edges, and check balance without removal. Removing blades takes just 10 minutes and gives you proper access, safer working conditions, and the ability to balance them correctly. The small time investment pays off in safety and results.
What angle should you sharpen lawn mower blades at?
The standard angle for rotary blades is 30-45°, which matches the original factory bevel. Check your blade’s existing angle with a protractor or compare to reference photos online. Most manufacturers recommend 35-40° as the sweet spot—sharp enough to cut cleanly but durable enough to last. Angles steeper than 45° dull more quickly; angles shallower than 30° don’t cut well. When in doubt, match the existing blade bevel angle.