

Direct Answer: How to Change a Lawn Mower Blade
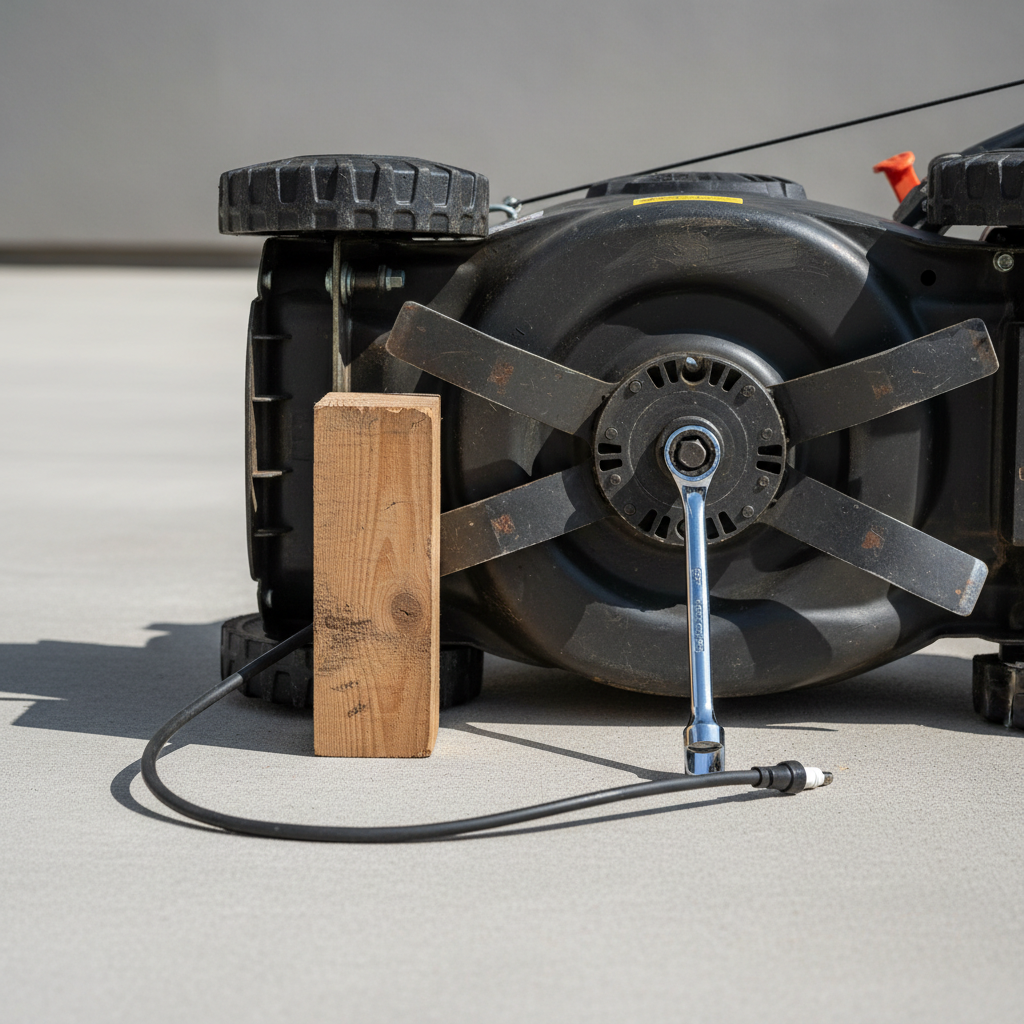
To change a lawn mower blade safely, first disconnect the power source: for gas mowers, remove the spark plug wire and secure it away from the plug; for electric mowers, remove the battery or unplug the unit. Work on a flat surface and tilt the mower with the air filter and carburetor (or battery) side facing up to prevent oil or fuel leaks. Secure the blade with a block of wood, use a wrench or socket to remove the center bolt, take off the old blade, and install the new one with the correct orientation, stamped air-lift fins facing up toward the deck and the cutting edge facing the direction of rotation. Tighten the center bolt to the manufacturer’s torque specification (typically 30 to 70 ft-lb), reconnect the power source, and perform a brief test run.
Why Blade Condition Matters: Replace vs Sharpen
Before changing your blade, it’s important to determine whether it needs replacement or just sharpening. A dull blade tears grass rather than cutting it cleanly, leading to brown tips and increased susceptibility to disease. However, if the blade shows any of the following signs, replacement is necessary:

Pros
- Rigid metal construction delivers durable performance for repeated blade maintenance tasks
- Easy-turn handle makes clamping and releasing quick and user-friendly
- Wide model compatibility covers numerous popular MTD-related lawn mowers
- Improves safety by locking blades securely to prevent spinning during nut removal
Cons
- Limited to mower decks measuring no larger than 42 inches
- Compatibility focuses on listed models from specific brands which may not cover all mowers
- Manual clamp requires physical effort without any powered assistance
The KINTLE 490-850-0005 Universal Mower Blade Removal Tool is a specialized clamp built to hold lawn mower blades securely during removal and replacement. With its rigid metal construction and easy-turn clamp handle, it creates a durable first impression as a practical accessory for walk-behind and riding mowers. This universal style tool is crafted for users seeking safer blade work on compatible equipment.
Performance centers on clamping to the mower deck to stop the blade from spinning, which enables easier and safer loosening of the blade nut. It works with single and twin blade models on decks up to 42 inches and supports extensive compatibility lists for Troy-Bilt, Yard Man, MTD, and Yard Machines models such as 11A-B13M729, 13A326JC058, and many others. As a replacement for 339079 and 490-850-0005, it focuses on reliable holding power for routine maintenance.
Considerations include its restriction to decks of 42 inches or less and primary verification for the specified model ranges, so owners of other brands should confirm fit. Being a basic manual clamp, it lacks extras or powered features and depends on user strength for operation.
In verdict, the KINTLE 490-850-0005 offers solid value for owners of compatible walk-behind and riding lawn mowers who need a dependable way to handle blade changes more safely and efficiently. It suits regular yard care where blade security is essential.

Pros
- High-strength premium steel build that is strong and reliable for repeated use
- Anti-corrosion black zinc plated finish for lasting outdoor durability
- Broad fitment across Husqvarna AYP Craftsman Poulan and similar brands via OEM numbers
- Includes full set of 4 bolts plus 4 cupped washers for convenient multi-blade coverage
- Straightforward installation process designed for quick blade hardware swaps
Cons
- Fitment is limited to mowers requiring the exact 532193003 size and OEM equivalents so verification is essential
- No additional tools or detailed torque specs included which may require separate equipment for proper securing
- 4-pack quantity may exceed needs for single-blade or limited-repair scenarios
The CHENACC Husqvarna Tractor Blade Bolt with Cupped Washer is a reliable replacement hardware kit designed specifically for attaching blades on riding lawn mowers and zero-turn models. Built from premium quality steel and finished with anti-corrosion black zinc plating, it presents as a sturdy and practical solution for restoring missing or failed original fasteners. Immediate impressions highlight the solid construction and complete inclusion of 4 bolts plus 4 washers matching the 1-1/4" X 7/16"-20 specification.
In performance this kit excels as a direct OEM substitute for part numbers including 532193003 14457 174365 193003 and related variants. The high-strength steel resists breaking or deforming under mower vibration and load while the cupped washers help maintain secure blade positioning. Compatibility extends across Husqvarna AYP Poulan Poulan PRO Craftsman Roper Sears and more making it a versatile option for common residential and light commercial machines. Easy installation further supports real-world value by allowing quick swaps without complex procedures.
Drawbacks and considerations center on the need for careful fitment checks since the kit targets only specific sizes and OEM numbers. Users must confirm their mower model requires exactly these dimensions to avoid improper mounting. The 4-pack format also means some owners may receive more units than immediately necessary for a single repair.
Overall the CHENACC 532193003 blade bolt kit delivers strong value for owners of compatible Husqvarna and Craftsman-style mowers who need durable high-strength hardware. It is best suited for DIY users performing routine blade maintenance or replacements on riding and zero-turn equipment seeking a straightforward long-lasting solution grounded in quality steel and precise sizing.

Pros
- Robust metal body that resists bending and corrosion under normal use
- Simple easy-turn button mechanism for fast setup and blade locking
- Broad fit for many walk-behind and riding mowers up to 42 inches
- Cost-effective substitute for several OEM blade removal tools
Cons
- Restricted to mowers with decks no larger than 42 inches
- Best matched to specifically listed brands and model numbers rather than every universal mower
- No extra accessories provided for full blade sharpening or balancing tasks
The SporGain Universal Lawn Mower Blade Removal Tool is a compact clamp-style accessory built for safe blade service on walk-behind and riding mowers. Its primary metal construction with an easy-turn button creates a solid first impression of toughness, while the non-deforming and non-rusting claims point to outdoor durability that homeowners can trust.
In real use the tool clamps the blade securely so the spindle bolt can be loosened without the blade spinning. The sturdy build and easy-turn button make the process straightforward for decks up to 42 inches, and it serves as a direct swap for Cub Cadet 490-850-0005 plus listed Troy-Bilt Bolens and Yard Man models, delivering consistent performance across popular residential machines.
Considerations include the 42-inch size limit and the fact that best results appear with the specifically named model numbers rather than every mower on the market. Users seeking a full maintenance kit may also note the absence of extra blades or balancing tools.
Overall this is a practical choice for DIY owners of compatible walk-behind or riding mowers who need a reliable non-rusting clamp for seasonal blade changes. Those matching the listed models will gain the most value from its simple secure design.

Pros
- Compatible with Greenworks 16-inch mower models 25322 and 25242.
- Forged from a single piece of steel for added durability.
- Designed specifically as a replacement part, which helps preserve the mower's intended cutting performance.
- Compact and lightweight for easier handling during replacement.
Cons
- Compatibility is limited to specific Greenworks 16-inch corded mower models, so buyers need to verify fit first.
- No installation hardware or accessories are listed with the blade.
- The actual blade length is 15.75 inches, which may be confusing for shoppers expecting a full 16-inch measurement.
Overview: The Greenworks replacement lawn mower blade is a model-specific part made for 16-inch corded Greenworks mowers, including models 25322 and 25242. Its one-piece steel construction gives it a solid, straightforward design that is meant for dependable everyday use.
Performance: With an actual blade length of 15.75 inches, this replacement is engineered to fit the intended mower platform closely and support clean, even cutting. For owners looking to restore mowing performance after a blade becomes dull or damaged, it offers a practical replacement option.
Drawbacks and considerations: The main limitation is compatibility, since it is only intended for select Greenworks 16-inch corded mowers. Buyers should also note that no extra hardware or accessories are listed, so installation may require reusing existing parts.
Verdict: This blade makes the most sense for Greenworks owners who need a direct replacement for compatible 16-inch mower models. If you confirm fit before buying, it should be a useful choice for maintaining cut quality and mower performance.

Pros
- Heavy-duty zinc alloy build for long-term use.
- Universal fit for many common blade shapes.
- Simple design is easy to use after sharpening.
- Compact size is convenient for storage and transport.
Cons
- It is a single-purpose tool and does not sharpen blades.
- Compatibility is broad, but the product data does not list exact mower model support.
- No instructions or extra accessories are mentioned in the manufacturer listing.
Overview and design. The Silcpall Lawn Mower Blade Balancer is a compact universal tool made from zinc alloy. Its round, simple shape is designed to hold mower blades at the center for quick balance checks after sharpening.
Performance and key features. In use, the balancer is meant to help you spot uneven blades before they cause vibration, poor cut quality, or extra wear on the mower. The universal design is intended to work with most common blade shapes, including round and square styles.
Drawbacks and considerations. This is a single-purpose accessory, so it will not sharpen blades or provide model-specific mounting guidance. Compatibility is broad, but users should still confirm their blade sits securely on the center slot before relying on it.
Verdict. For homeowners, DIY users, and anyone who sharpens mower blades at home, this is a practical maintenance tool that can make blade balancing faster and more consistent. It is best suited to buyers who want a simple, durable balancer rather than a multi-function kit.
- Cuts or cracks: These weaken the blade and can cause it to break during operation.
- Bends or warps: A bent blade causes vibration that can damage the mower’s engine and drive components.
- Excessive nicks or wear: If the blade is worn thin or has deep nicks, it may not be safe to sharpen.
- Imbalance: If the blade cannot be properly balanced after sharpening, it should be replaced.
As a general guideline, sharpen your blade after every 20 to 25 hours of use or at least once per mowing season. Replace it when it can no longer be sharpened safely or when damage is present.
Tools, Parts, and Safety Gear You Need
Gather the following before starting:
- Replacement blade: Ensure it matches your mower model’s specifications for length, width, and mounting hole configuration.
- Wrench or socket set: Typically a 15/16-inch or 1-inch socket, but check your mower’s manual.
- Block of wood: A 2×4 piece works well to jam against the blade and deck to prevent rotation.
- Heavy gloves: To protect your hands from sharp blade edges.
- Safety glasses: To shield your eyes from debris.
- Blade balancer (optional): Recommended if you’re reusing a sharpened blade to ensure smooth operation.
- Torque wrench (optional but recommended): To tighten the center bolt to the exact specification.
Preparing the Mower Safely: Gas vs Electric, Push vs Riding
Gas Mowers
For gas-powered mowers, the critical first step is to disconnect the spark plug wire and secure it away from the spark plug. This prevents the engine from accidentally starting while you work under the deck. If your mower has a fuel shut-off valve, turn it to the off position as well.
Electric Mowers
For corded electric mowers, unplug the power cord from the outlet. For battery-powered mowers, remove the battery and set it aside in a safe location. This eliminates any risk of accidental activation.
Tilt Direction
When you need to tilt the mower to access the blade, always tilt it with the air filter and carburetor (or battery compartment) facing up. Tilting it the opposite way can cause oil to drain into the air filter or fuel to leak from the carburetor, potentially causing starting problems or damage. For troubleshooting and reliability insights, consult our in-depth z890 vs x870e motherboard report.
Push vs Riding Mowers
Push mowers are typically easier to access, simply tilt them back onto their rear wheels or side (with the correct orientation as noted above). Riding mowers may require lowering the mower deck to its lowest position, then tilting the entire machine or using a jack to lift the front. Some riding mower designs allow blade access from underneath without tilting the entire machine. Always refer to your owner’s manual for model-specific instructions.
Step-by-Step: Removing the Old Blade
- Secure the blade: Jam a block of wood between the blade and the inner wall of the mower deck. This prevents the blade from spinning when you apply torque to the center bolt.
- Loosen the center bolt: Using your wrench or socket, turn the center bolt counterclockwise to loosen it. If the bolt is rusted or seized, you may need to use penetrating oil and allow it to soak for 15 to 20 minutes before attempting removal.
- Remove the bolt and hardware: Once loosened, fully unscrew the center bolt. Note the order of any washers or spacers, these are important for correct reassembly.
- Detach the old blade: Slide the blade off the crankshaft or spindle assembly. Take note of how it was positioned, including which side faced up and the direction of the cutting edges.
Installing the New Blade Correctly: Orientation and Torque
Correct blade orientation is critical for proper cutting and safety. Readers comparing setup options can review our technical analysis on marshall stanmore iii vs harman kardon onyx studio 8.
- Check blade orientation: Most lawn mower blades have stamped air-lift fins or curved wings on one side. These must face up toward the mower deck when installed. The side with the cutting edge must face the direction of blade rotation (typically clockwise when viewed from below).
- Align with the drive adapter: Position the new blade onto the crankshaft or spindle, ensuring it seats properly on the drive adapter. The mounting hole should fit snugly without wobble.
- Reinstall hardware: Replace any washers or spacers in their original order, then thread the center bolt back in by hand to avoid cross-threading.
- Tighten to specification: Using a torque wrench, tighten the center bolt to the manufacturer’s recommended torque. For most walk-behind mowers, this is between 30 and 70 ft-lb, but always verify with your owner’s manual. Over-tightening can strip threads or damage the crankshaft, while under-tightening can allow the blade to come loose during operation.
Important: If you sharpened an old blade rather than installing a new one, use a blade balancer to check for balance before installation. An unbalanced blade causes vibration that can damage the mower’s engine bearings and other components.
Final Safety Checks and Test Run
- Verify blade security: After tightening, try to wiggle the blade. It should be firmly seated with no play.
- Check for obstructions: Ensure no tools, hardware, or debris are left under the deck.
- Reconnect power: For gas mowers, reattach the spark plug wire. For electric mowers, reinstall the battery or plug in the power cord.
- Lower the mower: Return the mower to its normal operating position.
- Test run: Start the mower on a safe, clear surface and let it run for 30 to 60 seconds. Listen for unusual vibrations or noises, which could indicate an improperly installed or unbalanced blade.
If the mower vibrates excessively after blade installation, stop the engine immediately and recheck the blade orientation, balance, and bolt torque. For complementary field maintenance guidelines, examine our breakdown of dyson v8 cyclone vs bissell featherweight stick.
Common Questions on How To Change A Blade On A Lawn Mower Answered
Can I change a lawn mower blade without removing the deck?
Yes, on most push mowers you can change the blade by simply tilting the mower back or to the side (with the air filter up). For riding mowers, some models allow blade access without deck removal by lowering the deck to its lowest position and tilting the machine, but others may require partial or full deck removal. Consult your owner’s manual for your specific model.
What happens if I install the blade upside down?
Installing a blade upside down, with the air-lift fins facing down, will result in poor cutting performance, as the blade won’t create the necessary airflow to lift grass for an even cut. It can also cause excessive vibration and may damage the mower over time. Always ensure the stamped wings face up toward the deck.
How do I know which direction the cutting edge should face?
The cutting edge should face the direction the blade rotates during operation. For most walk-behind mowers, this is clockwise when viewed from below. Look for arrows or markings on the blade itself, or check your owner’s manual. The non-cutting (dull) edge faces the opposite direction.
Should I use a blade adapter or spacer when installing a new blade?
Some mower models use a blade adapter, spacer, or specific washer configuration between the blade and the crankshaft. If your mower had these components, reinstall them in the same order and orientation as they were removed. If you’re unsure, compare the old blade assembly to the new one before installation, or consult your owner’s manual.
Technical Standards and Compliance
Mechanical safety standards, operational tolerances, and protective gear guidelines align with benchmark specifications established by the American National Standards Institute (ANSI).









