

Mechanical safety standards, operational tolerances, and protective gear guidelines align with benchmark specifications established by the American National Standards Institute (ANSI).
Quick Answer: How to Check Your Lawn Mower Starter
To check a lawn mower starter, begin with visual inspection of the battery terminals (electric models) or pull cord (manual models) for corrosion or damage. Listen for diagnostic sounds when attempting to start: rapid clicking suggests a dead battery, while silence or a single click indicates possible starter failure. Test battery voltage with a multimeter on electric models, inspect the recoil mechanism on pull-cord starters, and test the starter solenoid before concluding the starter motor itself has failed.

Pros
- Large-size design named in product title
- Sharpening and balancing functions listed
- Listed as a new upgraded version

Pros
- Adjustable 15-to-45-degree range in title
- Sharpening and balancing functions listed
Pros
- Includes replacement gaskets and a 98079-55846 spark plug
- Matches Honda HRR216 and HRS216 lawn mower models
- Designed around the 16100-Z8B-901 carburetor specification
Cons
- Restricted to select Honda GCV160 mower applications
- Installation requires basic mechanical tools and skills
Understanding Lawn Mower Starter Types
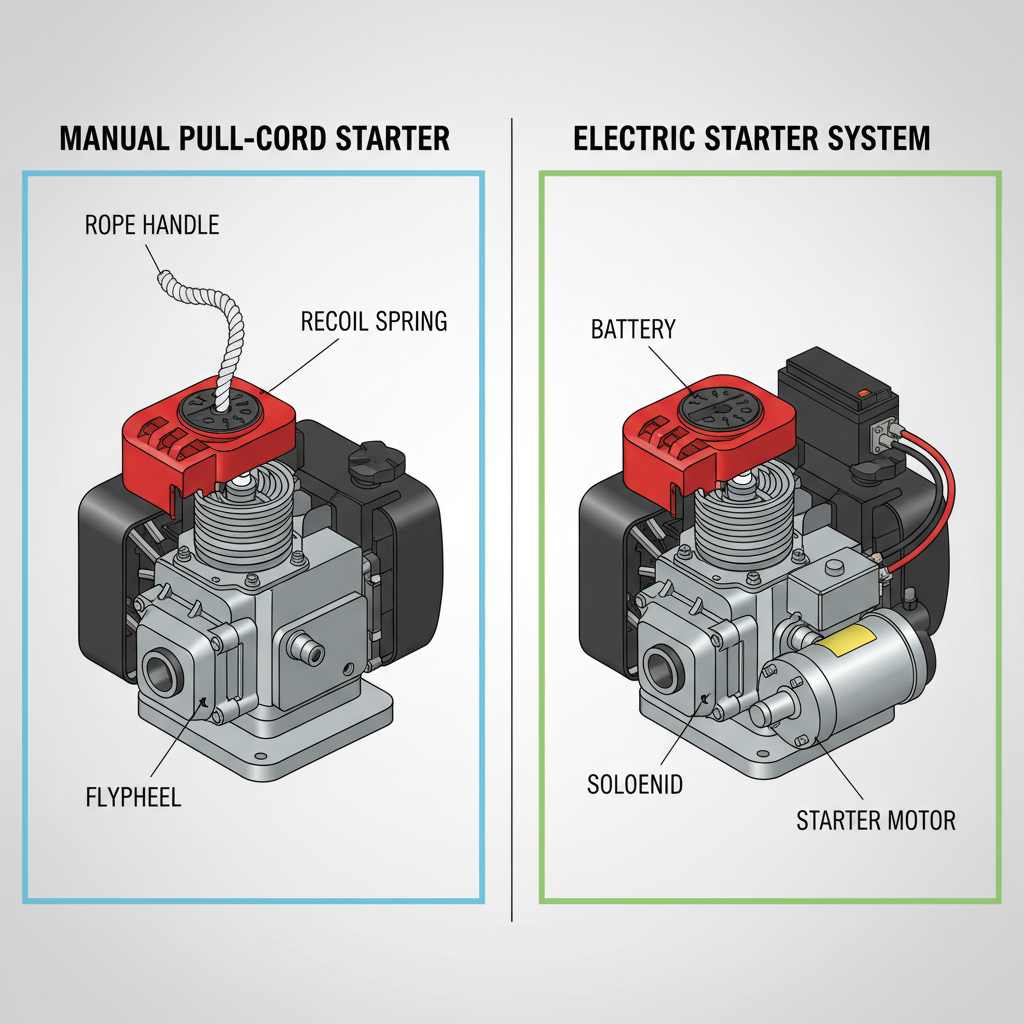
Lawn mowers use two primary starting systems, and identifying which one you have is the first step in effective troubleshooting. The diagnostic approach differs significantly between them.
Pull-Cord Starters
Pull-cord starters rely on manual rope engagement to rotate the engine’s crankshaft. When you pull the cord, it winds around a pulley connected to a recoil spring mechanism. The sudden tension created by the rope’s pull spins the engine, ideally fast enough to ignite the fuel-air mixture. This system has been standard on consumer mowers for decades and requires no battery or electrical components.
Electric Starters
Electric starters use a battery-powered motor to turn the engine. When you press the ignition button or turn a key, electrical current flows through a solenoid (an electromagnetic switch) that engages a starter motor. The motor’s pinion gear meshes with the engine’s ring gear, rotating it until combustion begins. This system is more convenient but adds complexity and depends on battery health.
Initial Checks Before Testing the Starter
Many “starter problems” are actually caused by issues elsewhere in the ignition system. Before assuming the starter has failed, eliminate these common culprits:
Battery Condition (Electric Starters Only)
A weak or dead battery is the most frequent cause of starting failure on electric-start mowers. Battery voltage naturally declines over winter storage or after months of inactivity. Check: For broader ecosystem context, read through our operational guide on z890 vs x870e motherboard.
- Battery terminals: Look for white, blue, or green corrosion on the battery posts. Clean terminals with a wire brush and baking soda solution if corrosion is present.
- Battery age: Lawn mower batteries typically last 3–5 years. If yours is older, replacement may be necessary regardless of apparent condition.
- Loose connections: Ensure battery cables are firmly attached to both the positive and negative terminals.
Fuel System
Stale fuel or an empty tank will prevent the engine from starting even if the starter functions perfectly. Verify fuel is present and less than 6 months old. Old fuel can gum up the carburetor, blocking fuel flow to the engine.
Spark Plug
A fouled or gapped spark plug will prevent ignition. Remove the spark plug wire and inspect the plug. If it’s black and wet (carbon-fouled) or heavily corroded, replace it. A gapped spark plug (gap typically 0.028, 0.035 inches) is another common cause of no-start conditions. For troubleshooting and reliability insights, consult our in-depth marshall stanmore iii vs harman kardon onyx studio 8 report.
Air Filter
A severely clogged air filter restricts airflow to the engine, making starting difficult. If the filter is visibly packed with dirt, clean or replace it before testing the starter.
Diagnosing Electric Starters: What Sounds Tell You
The sounds your mower makes during a failed start attempt provide reliable diagnostic clues about what’s wrong with the starter system. Readers comparing setup options can review our technical analysis on dyson v8 cyclone vs bissell featherweight stick.
Rapid Clicking (Click-Click-Click-Click)
This is the most common symptom of a weak or dead battery. The solenoid repeatedly engages and disengages because there isn’t enough electrical power to hold it in the “on” position long enough for the starter motor to turn over the engine. Each click represents the solenoid cycling.
Next step: Test battery voltage (see section below). If voltage is below 12V, the battery needs charging or replacement. For complementary field maintenance guidelines, examine our breakdown of bissell crosswave hydrosteam vs shark stainforce.
Single Click or Silence
If you hear a single loud click when turning the key—or nothing at all—the solenoid may not be engaging. This indicates either a broken electrical connection, a faulty solenoid, or a seized starter motor.
Next step: Check battery voltage first. If voltage is above 12V, test the solenoid and starter motor.
Grinding or Whirring Without Engine Turnover
A grinding noise (metal-on-metal) usually means the starter motor is spinning but the pinion gear isn’t meshing with the engine’s ring gear. This can indicate a worn starter motor or a mechanical problem with the engine itself (like a seized crankshaft).
A whirring sound without any resistance suggests the pinion gear is not engaging at all, often due to a faulty solenoid or broken starter motor.
Next step: The starter motor likely needs professional inspection or replacement.
Testing Battery Voltage on Electric Starters
A multimeter is the standard tool for testing battery voltage. If you don’t own one, they cost $15–$30 and are useful for many household electrical tasks.
Step-by-Step Battery Testing
- Set the multimeter to DC voltage mode. Look for a “V~” or “DCV” setting on the dial.
- Turn off the mower. Safety first—all testing should be done with the engine off.
- Place the red probe on the positive battery terminal (marked with a “+” or red cover).
- Place the black probe on the negative terminal (marked with a “–” or black cover).
- Read the voltage display. A healthy battery shows 12.6V or higher when at rest.
Interpreting Results
| Voltage Reading | Battery Condition | Action |
|---|---|---|
| 12.6V or higher | Good | Battery is healthy; problem is elsewhere in the starter system. |
| 12.0–12.5V | Weak | Battery charge is low. Charge the battery and retest. |
| Below 12V | Dead or severely discharged | Charge the battery immediately, or replace if it won’t hold a charge. |
Testing the Starter Solenoid
If battery voltage is above 12V but the mower still won’t start, the solenoid may be faulty. The solenoid is a small cylindrical component (usually mounted on or near the starter motor) that acts as an electrical switch for the starter motor.
Visual Inspection
Locate the starter solenoid on your mower (consult your manual for exact location). Look for:
- Corrosion or white buildup on electrical terminals
- Loose or disconnected wires
- Signs of heat damage (discolored plastic or melted connectors)
Clean any corroded terminals with a wire brush and electrical contact cleaner.
Electrical Testing
Testing a solenoid requires a multimeter set to resistance mode (ohms). Disconnect the solenoid’s electrical connectors, then place the multimeter probes across the solenoid coil terminals. A functioning solenoid typically reads between 4–8 ohms of resistance. An open circuit (infinite resistance) or a short circuit (near-zero resistance) indicates solenoid failure.
Note: Solenoid testing is more technical than battery voltage testing. If you’re uncomfortable with electrical testing, have a professional diagnose the solenoid.
Testing the Starter Motor
If battery voltage is adequate, the solenoid tests okay, and the mower still won’t start, the starter motor itself may be faulty.
Manual Bypass Test (Advanced)
Some experienced users perform a “bypass” test by directly applying battery voltage to the starter motor using jumper cables to bypass the solenoid. This is an advanced diagnostic and carries electrical risks. If you’re not confident in your electrical skills, skip this step and proceed to professional service.
When to Replace the Starter Motor
If all other components test okay but the mower refuses to start, or if the starter makes grinding or whirring sounds without turning the engine over, the starter motor is likely worn out or damaged internally. Starter motors cannot be easily repaired; replacement is the typical solution.
Diagnosing Pull-Cord Starters
Pull-cord starters are mechanically simpler than electric starters but still require proper inspection. Unlike electric starters, pull-cord failures are usually obvious and fixable without special tools.
Inspect the Pull Cord
Examine the rope carefully:
- Fraying or splits: If the rope is visibly damaged, it will slip on the pulley and won’t transfer power to the engine. The cord must be replaced.
- Knots or tangles: A knotted rope won’t unwind properly and reduces pulling force. Untie any knots and ensure the rope feeds smoothly through the handle.
- Length: If the rope is too short, you may not have enough mechanical advantage to spin the engine. Rope typically extends 30–36 inches when fully pulled.
Check the Recoil Mechanism
After each pull, the rope should retract smoothly back into the handle via a spring-loaded recoil. If the rope stays extended or retracts slowly, the recoil spring may be broken or the mechanism may be jammed.
- Pull the cord slowly and listen for a smooth mechanical click as the spring engages.
- If the rope doesn’t retract on its own, the spring is likely broken.
- If the rope retracts but snaps back suddenly with excessive force, the spring may be over-tensioned or damaged.
Test Manual Pulling Technique
Sometimes a mower won’t start because the pull cord isn’t being used correctly, not because the starter is faulty. Proper technique includes:
- Priming the engine: Many small engines require 3–5 quick, gentle “primer” pulls before a full-force start attempt.
- Full-force, continuous pulls: Once primed, pull the cord quickly and forcefully in one smooth motion, then release immediately. Hesitating mid-pull reduces engine spin speed.
- Multiple attempts: It may take 5–10 pulls to start a cold engine, especially in cool weather.
Inspect for Internal Mechanical Resistance
If the cord pulls but feels unusually stiff, or if the engine won’t turn over even with full pulling force, something inside the engine may be seized. This could indicate:
- An oil-starved or rusted piston
- A bent connecting rod
- Water in the oil from improper storage
These are internal engine problems, not starter issues, and require professional service.
Frequently Asked Questions About How To Check Lawn Mower Starter
Can I jump-start a lawn mower like a car?
Yes, if you have external jumper cables and a car battery available. Connect the positive cable to the mower battery’s positive terminal, then to the car’s positive terminal. Connect the negative cable to the car’s negative terminal, then to an unpainted metal surface on the mower frame (not the negative terminal directly, to avoid sparks). Wait a minute, then attempt to start the mower. Once started, let the mower run for a few minutes to recharge its battery, then disconnect the cables in reverse order. However, jump-starting only works if the mower battery is discharged but functional; a dead battery that won’t charge won’t benefit from jump-starting.
How long do lawn mower starters typically last?
A well-maintained electric starter motor on a residential lawn mower typically lasts 8–15 years, depending on frequency of use and storage conditions. Pull-cord starters last longer mechanically but the rope requires replacement every 5–10 years due to fraying. Battery life on electric starters averages 3–5 years. Regular seasonal maintenance (cleaning, proper fuel, charging) extends starter lifespan significantly.
Is it cheaper to repair or replace a faulty starter?
For most consumer mowers, replacing the entire starter assembly is more cost-effective than repair. A replacement starter motor assembly for a typical residential mower costs $40–$150, while professional diagnosis and repair labor can exceed $100 per hour. If the starter is more than 5 years old and failing, replacement is usually the better option. For newer starters or pull-cord systems, targeted repair (like rope replacement) may be worthwhile.
What should I do if my mower starter won’t engage even after testing the battery?
If battery voltage is above 12V but the starter doesn’t engage, the problem is likely a faulty solenoid or a broken electrical connection. Check all battery cable connections and clean any corroded terminals. Inspect the solenoid wiring for loose connectors or damaged insulation. If visual inspection reveals no obvious issues, test the solenoid with a multimeter (if you’re comfortable with electrical testing) or take the mower to a professional for diagnosis. Do not attempt to force the starter or bypass electrical components without expertise, as this risks personal injury.
When to Seek Professional Help
Troubleshooting a lawn mower starter yourself is feasible for basic tasks like battery testing and visual inspection. However, professional service is appropriate when:
- You lack a multimeter or are uncomfortable using electrical testing tools
- Battery voltage tests okay but the starter still doesn’t engage
- You hear grinding or metallic sounds indicating internal starter damage
- The engine spins but won’t fire, suggesting the problem is beyond the starter
- You’ve replaced the battery and cleaned terminals but the mower still won’t start
- Pulling a pull-cord mower feels abnormally stiff or the rope won’t move the engine at all
A small engine repair shop can diagnose and replace a faulty starter in 30 minutes to an hour, typically costing $80–$250 in labor plus parts. Many shops offer free diagnostic evaluation, so getting a professional opinion before attempting repairs is reasonable if you’re unsure.
Maintenance Tips to Prevent Starter Problems
Regular maintenance extends starter lifespan and reduces the likelihood of mid-season failure:
- Charge the battery monthly during off-season storage. Use a trickle charger to maintain voltage without overcharging.
- Clean battery terminals annually. Corrosion builds up over time and reduces electrical conductivity.
- Inspect the pull cord before each season. Replace it if you notice fraying or shortening.
- Use fresh fuel. Fuel older than 6 months can gum up the carburetor and make starting difficult.
- Winterize properly. Drain fuel or add fuel stabilizer before long storage to prevent fuel system problems that can damage the starter through repeated failed start attempts.
- Keep the engine clean. Dirt and debris around the starter can cause corrosion and electrical faults.









