How Do I Sharpen a Chainsaw Chain? The Direct Answer
To sharpen a chainsaw chain, you secure the saw bar in a vise, identify the correct cutter angle for your chain type, and use a round file of the proper diameter to file each cutter tooth with consistent strokes. After all cutters are filed, you lower the depth gauges (rakers) with a flat file so the chain cuts smoothly instead of grabbing. With the right tools and careful attention to angles, you can restore a dull chain to factory-like cutting performance in about 15 to 30 minutes.
Understanding Chainsaw Chain Sharpening
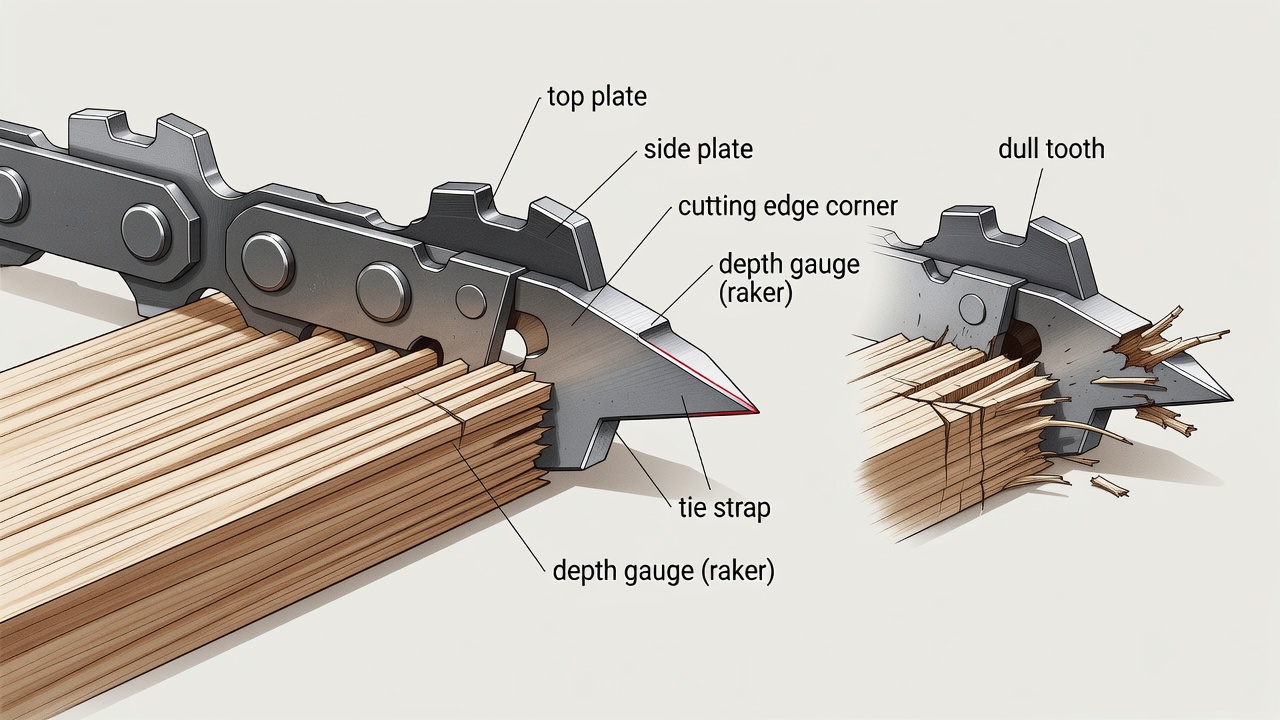
Before you pick up a file, it helps to understand what makes a chainsaw chain cut and why sharpening matters. A chainsaw chain is essentially a series of small cutting teeth arranged in a loop around the guide bar. Each tooth is shaped like a miniature chisel, and as the chain spins at high speed, these teeth slice through wood fibers. When the teeth become dull, they no longer slice; they tear. The result is slower cutting, more effort required, and increased wear on the saw itself.
Why Is a Sharp Chainsaw Chain Important?
Sharpening is not just about performance; it is also about safety and cost. A sharp chain produces fine, uniform wood chips and pulls itself through the cut with minimal pressure. A dull chain produces sawdust rather than chips, forces you to push hard against the saw, and increases the risk of kickback—a sudden, violent upward motion of the bar that can cause serious injury. Additionally, running a dull chain puts extra strain on the engine and drive components, which can shorten the life of your chainsaw. Sharpening regularly also extends the life of the chain itself, since filing removes only a small amount of metal each time rather than requiring aggressive reshaping after heavy neglect.
What Are the Main Parts of a Chainsaw Cutter Tooth?
Each cutter tooth on a chainsaw chain has several key parts you need to know before sharpening:
- Cutter (tooth): The L-shaped metal part that actually slices the wood. It has a top plate and a side plate that meet at a cutting corner.
- Cutting edge: The sharp corner formed where the top plate and side plate meet. This is the part you file.
- Depth gauge (raker): The small, rounded protrusion in front of each cutter. It controls how deep the cutter bites into the wood. If it is too high, the chain cuts roughly; if too low, the chain may chatter or bind.
- Tie strap: The connecting link that holds the cutters together and supports the chain on the bar.
- Drive link: The part that rides in the bar groove and is pulled by the sprocket.
What Are the Signs a Chainsaw Chain Needs Sharpening?
You do not need to guess when your chain is dull. Watch for these clear signs:
- The saw produces fine sawdust instead of chunky, square wood chips.
- You have to apply noticeable downward pressure to make the saw cut.
- The saw tends to pull to one side or cuts crooked.
- The cutting surface looks shiny or rounded at the edge rather than sharp.
- The saw vibrates more than usual or the engine bogs down in the cut.
- The chain has touched dirt, rocks, or metal at any point—even once, this can instantly dull it.
As a general rule, most occasional users need to sharpen the chain after every 2 to 3 hours of cutting, or whenever they notice the chips turning to dust.
Tools and Preparation for Sharpening
Sharpening a chainsaw chain correctly depends more on using the right tools and a consistent technique than on physical strength. Here is what you need and how to set up safely.
What Tools Do I Need to Sharpen a Chainsaw Chain?
You can sharpen a chain with simple hand tools; you do not need expensive equipment for occasional use. Here is the essential kit:
| Tool | Purpose | Notes |
|---|---|---|
| Round sharpening file | Files the cutter’s cutting edge | Diameter must match the chain pitch; commonly 4.0 mm, 4.8 mm, or 5.5 mm |
| File guide (angle guide) | Holds the file at the correct angle | Usually marked for 25°, 30°, and 35° angles; some are combination tools |
| Depth gauge tool | Ensures consistent raker height | A flat file with a depth gauge attachment is easiest for beginners |
| Bar vise or clamp | Secures the saw while you file | Mounts to a workbench; a sturdy C-clamp works in a pinch |
| Flat file | Lowers the depth gauges | Used with the depth gauge tool after sharpening cutters |
| Protective gloves | Protects hands from sharp edges | Wear them while filing and handling the chain |
If you are unsure which file diameter you need, check the side of the chain or the owners manual; the chain pitch (usually stamped on the bar or chain) determines the file size. Using a file that is too large or too small will not cut the correct profile and can ruin the chain.
How Do I Secure the Chainsaw for Sharpening?
Stability is critical. A chain that moves while you file will produce inconsistent angles and a poorly sharpened edge. Secure the saw as follows:
- Remove the chain from the saw (optional but recommended for beginners) or leave it on the bar with the chain brake engaged.
- Clamp the bar in a bar vise mounted to a sturdy workbench. If you do not have a bar vise, clamp the bar with a C-clamp near the power head, using scrap wood as padding to avoid damaging the bar.
- Ensure the saw is switched off, the spark plug lead is disconnected (for gas models), and the chain is not under tension from the clutch side.
- Position the saw so the cutters you are filing are facing you and the bar is horizontal or slightly angled for comfortable access.
If you removed the chain, you can clamp it in a bench vise with a chain holding tool, which keeps the links evenly spaced while you file.
What Safety Precautions Should I Take?
Even though you are not running the saw, sharpening has its own hazards:
- Always disconnect the spark plug wire before working on a gas chainsaw so the engine cannot accidentally start.
- Wear heavy work gloves; newly sharpened cutters are extremely sharp and can slice skin easily.
- Protect your eyes with safety glasses in case a file slips or metal filings fly.
- Never file toward your body, and keep your free hand clear of the cutter path.
- Work in a well-lit area and avoid distractions; consistency is the key to a good edge, and a lapse in attention can ruin the chain or injure you.
Step-by-Step Sharpening Process
Now that everything is set up, here is the full process from determining your filing angle to finishing the last cutter. Work methodically and count your strokes to keep each tooth even.
How Do I Determine the Correct Filing Angle for My Chain?
Most chainsaw chains are designed to be filed at a horizontal angle of 30° to 35° relative to the bar, with a vertical tilt of 0° to 10° depending on the manufacturer. The most common standard is 30° for general-purpose chains. Low-profile chains often use 25° or 30°, while some specialty cutting chains use up to 35°.
The safest way to confirm the correct angle is to check the side plate of the chain or the owners manual; many chains have the recommended angle printed or stamped on the cutter. If you cannot find it, 30° is the safe default for the vast majority of chains sold for home and farm use. A file guide marked with angle slots removes the guesswork: simply place the guide on top of the tooth, align the file with the slot, and file.
What Is the Proper Technique for Filing Each Cutter?
Follow these steps for each cutter tooth:
- Identify the direction of the first cutter: cutters alternate, with one facing left and the next facing right. Work through all cutters facing one direction first, then the other.
- Place the round file into the file guide and set the guide on top of the cutter, with the file resting against the cutting edge’s top plate.
- Position the file so it contacts the top plate and the side plate at the same time. The file should sit roughly level, with only a small upward tilt (about 0° to 10°) toward the nose of the bar.
- Push the file forward in a smooth, steady stroke, applying light, even pressure on the forward stroke only. Lift the file on the return stroke so you do not dull the edge.
- Use the same number of strokes for every cutter—typically 2 to 4 strokes for a mildly dull chain, more for a very dull one. Check the cutting edge frequently; you are done when a thin sliver of metal rolls off the edge as you file and the edge feels sharp.
- Move to the next cutter in the same direction and repeat, then switch to the opposite-facing cutters.
Two mistakes ruin more chains than anything else: filing at an inconsistent angle and filing one side differently from the other. If the chain cuts crooked after sharpening, it almost always means one side of the chain has more metal removed than the other.
How Do I Adjust the Depth Gauges (Rakers)?
The depth gauge controls how aggressively the cutter bites into the wood. Every time you file the top plate, the cutter gets slightly shorter, and the depth gauge does not change—so over time the gauge becomes relatively too high, causing the chain to grab, vibrate, and cut roughly. Lowering the depth gauge restores the correct relationship.
- Place the depth gauge tool over the cutter so the slot sits on top of the raker.
- Using the flat file, file the raker in smooth strokes until it is level with the top of the tool. File only from the inside of the bar side and work in one direction to avoid rounding the gauge.
- Do not file the raker lower than the tool allows; most manufacturers specify a maximum depth gauge height of about 0.025 inches (0.65 mm) below the top plate, but the exact figure varies by chain. The depth gauge tool prevents you from removing too much.
- Repeat for every cutter, then lightly round the front corner of each raker with the flat file to maintain the correct shape.
Depth gauges should only need adjustment after every few sharpening sessions, not every time, because you only lower them to compensate for the cumulative metal removed from the cutters.
Finishing and Maintenance Tips
Once all cutters are filed and the depth gauges are set, a few final checks and habits will keep your chain cutting at its best.
How Do I Check If the Chain Is Sharpened Correctly?
After sharpening, run through this quick checklist:
- Visual check: All cutting edges should look uniform, with no shiny spots or burrs on the edge.
- Stroke consistency: All cutters should have a similar amount of metal removed; compare the length of the top plates on both sides.
- Test cut: Reinstall the chain, tension it properly, and make a test cut in a piece of scrap wood. A sharp chain should produce square, chunky chips and pull itself into the cut with light pressure.
- Straightness: The cut should track straight. If it curves, the side with the longer top plate is cutting more; file that side a little more or correct the angle.
How Often Should I Sharpen My Chainsaw Chain?
There is no universal interval because cutting conditions vary widely. Use these guidelines:
- Sharpen whenever the saw produces dust instead of chips, requires pushing, or starts cutting crooked.
- For occasional weekend use on clean wood, expect to sharpen every 2 to 3 hours of cutting time.
- Cutting dirty, sandy, or previously treated wood can dull a chain in minutes; sharpen immediately after any contact with dirt or rock.
- Frozen or very dry wood dulls chains faster than green wood.
Keeping a sharp chain is safer and faster than working with a dull one. A 5-minute touch-up at the first sign of dullness beats a 30-minute session after heavy neglect.
When Should I Consider a Professional Sharpening Service?
Manual filing works well for maintenance, but there are times to hand the job to a professional:
- If the chain has hit dirt or rocks and the cutters are badly damaged, chipped, or have uneven teeth, a professional can grind the chain back to an even profile.
- If you have filed the cutters so many times that the depth gauges are at or beyond their minimum and the chain no longer cuts well, the chain may need replacement rather than sharpening.
- If the cutter edges are heavily rounded or the chain has stretched unevenly, a professional grinding service (or a new chain) is often more economical than trying to hand-file a severely damaged chain.
Professional sharpening services typically use a grinding wheel that restores the factory angle quickly and precisely. They are a reasonable option when you lack the right file size or when the chain is in poor condition.
Extra Tips for Long-Lasting Chains
- Maintain proper chain tension: a loose chain can derail, and an over-tight chain wears the bar and chain rapidly. Adjust until the chain fits snugly against the bar but can still be pulled around by hand with slight resistance.
- Keep the bar groove clean and lubricated. A dry bar and chain generate heat and accelerate dulling.
- Rotate the bar periodically so wear is distributed evenly across the rails.
- Store the chain dry and lightly oiled to prevent rust, which dulls cutters faster than normal use.
Frequently Asked Questions
What size round file do I need for my chainsaw chain?
The file diameter must match the chain’s pitch. Common sizes are 4.0 mm for small low-profile chains, 4.8 mm for standard 3/8-inch pitch homeowner chains, and 5.5 mm for larger professional chains. Check the stamp on the chain drive link or the saw’s manual to confirm the pitch, then choose the matching file. Using the wrong size will not produce a properly shaped cutting edge.
Can I sharpen a chainsaw chain while it is still on the saw?
Yes, most people sharpen with the chain on the bar. Secure the bar in a vise, engage the chain brake, and file the cutters as they face you. After sharpening the accessible cutters, loosen the chain tension and rotate the chain around the bar to expose the remaining cutters. A few users prefer removing the chain and clamping it in a dedicated chain vise for easier access and a more stable setup.
How many strokes should I file on each cutter?
There is no single number, but consistency matters more than the count. For a mildly dull chain, 2 to 4 firm strokes per cutter are usually enough. Stop as soon as the cutting edge is sharp and a thin burr forms. Count your strokes for the first cutter and match it for all the others so every tooth removes the same amount of metal and the cut stays straight.
What is the difference between filing and grinding a chainsaw chain?
Filing uses a hand-held round file to manually restore the cutting edge. It is inexpensive, portable, and ideal for routine maintenance, but it requires a steady hand and consistent angles. Grinding uses a powered bench grinder with a spinning stone to machine the cutters to the exact factory profile. It is faster, more precise, and better for badly damaged chains, but requires the saw to be taken to a shop or owning a grinder, which is a larger investment.