

Quick Answer: How to Sharpen a Push Lawn Mower Blade
Disconnect the spark plug wire, tip the mower onto its side (air filter facing up), and unbolt the blade. Sharpen the cutting edge at the existing bevel angle, typically 45 degrees, using a mill bastard file, angle grinder, or bench grinder. Balance the blade on a nail or blade balancer cone, then reinstall and torque the center bolt to your manufacturer’s specification (commonly 35 to 50 ft-lbs). The full process takes 20 to 40 minutes and requires no special mechanical training.

Pros
- Powerful 1/3 HP motor with 1750 RPM enables quick and effective sharpening
- Compatible with blades from all brands and a range of sizes
- Includes built-in safety kill switch and one 8-inch sharpening stone
- Easy to use design supports blade reuse and longer service life
- Compact heavy duty build suits both large and small blade work
Cons
- Limited to single direction action without multi-directional options
- Kit provides only one 8-inch sharpening stone requiring future replacements
- Basic economy setup includes no extra accessories beyond the grinder and stone
The Oregon 88-025 Economy Lawn Mower Blade Sharpener and Grinder is a compact heavy duty tool built for sharpening lawn mower blades across various sizes. Its sturdy design and adjustable features create a solid first impression for anyone focused on practical blade maintenance.
Performance relies on the 1/3 horsepower motor at 1750 RPM with single direction action that makes quick work of blades from all manufacturers. Standout elements include the built-in safety kill switch and the included 8 inch sharpening stone, which together enable simple operation to reuse and extend the life of grass cutter blades.
Considerations include the single direction grinding that may limit flexibility for certain techniques, plus the kit containing just one sharpening stone so replacements become necessary with ongoing use. The economy focus keeps things straightforward without extra complex options.
This product suits homeowners and small lawn care operators who need a reliable way to keep blades sharp and avoid frequent new purchases. It provides clear value through its power and ease for everyday maintenance routines.

Pros
- Sized specifically for 7/32" (5.5mm) sharpening applications.
- Versatile enough for chainsaws, lawn mowers, and other cutting tools.
- 8 included bits add value for frequent maintenance or replacements.
- Designed for fast installation and efficient sharpening workflow.
Cons
- Only suits tools that use 7/32" (5.5mm) sharpening bits, so compatibility is limited.
- The listing does not provide detailed specs such as grit level or dimensions.
- It is an accessory set, not a complete sharpening machine.
Overview: The Sharp Pebble 8-Piece Chainsaw & Lawnmower Sharpener Bit Set is a compact accessory pack built around 7/32" (5.5mm) diamond sharpening stones. It is aimed at routine blade maintenance for users who want a straightforward sharpening option.
Performance: Based on the product details, the bits are designed for compatible chainsaw blades, lawn mower blades, and other garden tools. The in-place sharpening approach can help reduce downtime because the chain does not need to be removed for every maintenance session.
Considerations: The main limitation is compatibility. This set is focused on 7/32" (5.5mm) applications, so it will not suit every blade or sharpening system. The listing also does not provide extra details such as grit level or tool dimensions.
Verdict: For homeowners, DIY users, and maintenance professionals who already need a 7/32" sharpening accessory, this 8-piece pack offers a practical way to keep cutting tools serviced without overcomplicating the process.

Pros
- Accurate balancing reduces blade wobble and engine wear effectively
- Works with nearly all standard lawnmower blade shapes for true universality
- Durable zinc die-cast construction ensures long-term rust resistance
- Intuitive design makes it easy for beginners and DIY users to operate
- Supports better cutting efficiency after blade sharpening sessions
Cons
- Lacks advanced precision indicators so users must rely on visual leveling judgment
- May not fit highly specialized or non-standard irregular blade designs perfectly
- Basic single-tool package includes no carrying case or extra accessories
The SporGain Lawn Mower Blade Balancer is a compact universal tool built from premium zinc die-cast metal for balancing lawnmower blades after sharpening. Its solid rust-resistant construction gives an immediate impression of durability suited for garage storage or occasional outdoor exposure, making it a practical accessory for standard lawn care routines.
In performance, the tool excels at simple balance checks by letting users place nearly any round, square, or common blade shape on it to detect imbalances. This process helps reduce wobble, vibration, and engine strain while verifying bent blades, leading to smoother cuts and longer mower life based on its core design features. The intuitive layout supports quick adjustments without specialized skills.
Drawbacks include the absence of built-in precision markers, which means results depend on careful visual assessment, and potential fit issues with highly custom blades outside standard shapes. It also comes as a basic 1pk unit without extras like storage options.
Overall, this SporGain balancer delivers strong value for DIY homeowners and lawn maintenance enthusiasts who regularly sharpen blades and want an affordable, reliable way to maintain cutting performance. It is ideal for those seeking universal compatibility and lasting metal quality without needing professional-grade equipment.

Pros
- Heavy-duty zinc alloy build for long-term use.
- Universal fit for many common blade shapes.
- Simple design is easy to use after sharpening.
- Compact size is convenient for storage and transport.
Cons
- It is a single-purpose tool and does not sharpen blades.
- Compatibility is broad, but the product data does not list exact mower model support.
- No instructions or extra accessories are mentioned in the manufacturer listing.
Overview and design. The Silcpall Lawn Mower Blade Balancer is a compact universal tool made from zinc alloy. Its round, simple shape is designed to hold mower blades at the center for quick balance checks after sharpening.
Performance and key features. In use, the balancer is meant to help you spot uneven blades before they cause vibration, poor cut quality, or extra wear on the mower. The universal design is intended to work with most common blade shapes, including round and square styles.
Drawbacks and considerations. This is a single-purpose accessory, so it will not sharpen blades or provide model-specific mounting guidance. Compatibility is broad, but users should still confirm their blade sits securely on the center slot before relying on it.
Verdict. For homeowners, DIY users, and anyone who sharpens mower blades at home, this is a practical maintenance tool that can make blade balancing faster and more consistent. It is best suited to buyers who want a simple, durable balancer rather than a multi-function kit.
Rotary vs. Reel Push Mower: Which Type Do You Have?
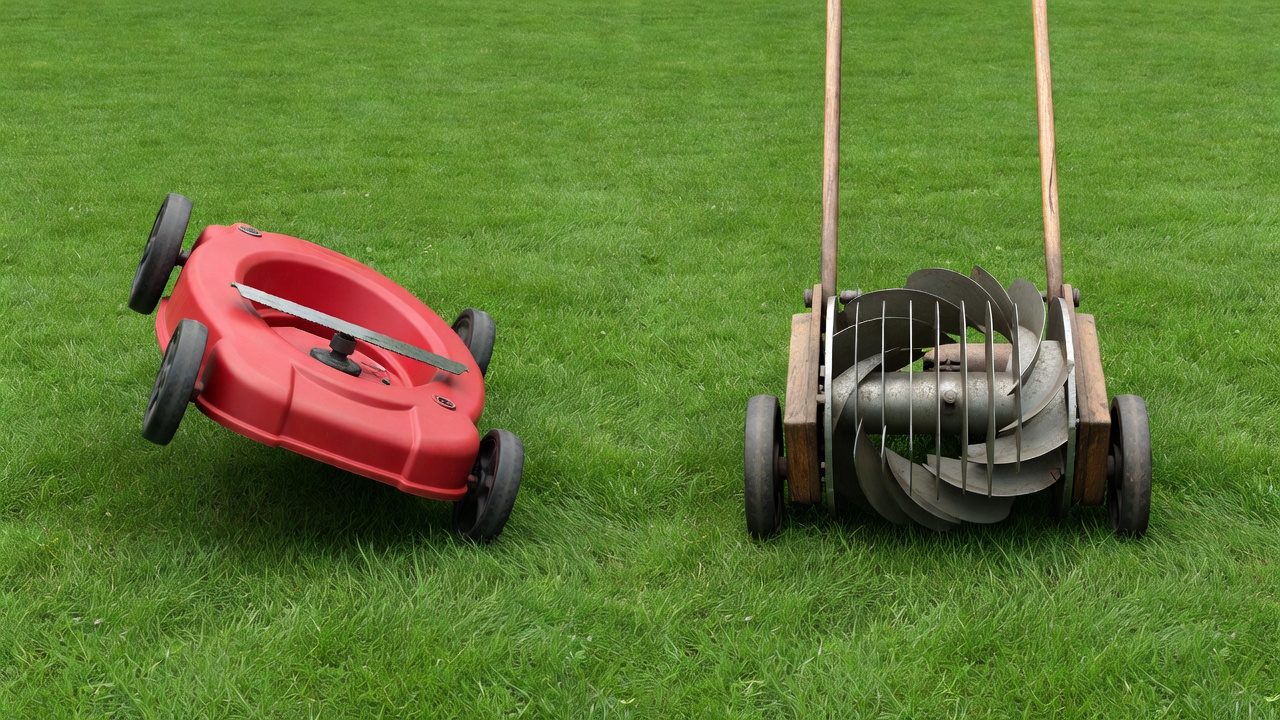
This guide covers rotary push mowers only. A rotary mower has a single horizontal blade that spins at high speed beneath a deck, it is the dominant style sold today. A reel mower uses a cylinder of helical blades that shear grass against a fixed bed knife; reel blades require a completely different process called lap grinding and are not covered here. If your mower has a round barrel of blades at the front, stop and search for reel mower sharpening instructions instead.
To confirm you have a rotary mower: lift the deck and look underneath. One flat, straight blade mounted on a central bolt means rotary.
When Should You Sharpen, or Replace, a Push Mower Blade?
Signs Your Blade Needs Sharpening
- Torn or ragged grass tips: A sharp blade cuts cleanly; a dull blade shreds. Torn tips turn brown within a day or two and increase the turf’s vulnerability to fungal disease, as noted by university cooperative extension turfgrass programs.
- Uneven or streaky cut: Patches of grass left standing at different heights.
- Mower works harder than usual: Engine bogs down or vibrates more than normal.
Sharpening Frequency
Sharpen the blade every 20 to 25 hours of mowing or at least once per season, whichever comes first. Husqvarna and other major manufacturers state this interval in their owner’s manuals. If you mow a typical suburban lawn weekly, once per season is a reasonable minimum; if you mow frequently or on abrasive, sandy soil, sharpen more often.
When to Replace Instead of Sharpen
Replace the blade, do not sharpen, when you find any of the following:
- Deep nicks or gouges that would require removing excessive metal to eliminate
- A visible bend or warp in the blade body (lay it on a flat surface to check)
- Cracks anywhere on the blade
- The blade is worn thin from repeated sharpenings
A bent or cracked blade is a safety hazard at operating RPM. When in doubt, a new OEM replacement blade costs $10, $25 and is not worth skipping. Users looking for related component recommendations can explore our z890 vs x870e motherboard breakdown.
Safety Preparation Before You Start
Blade work involves a hardened steel edge and a stored-energy engine. Take every step below before touching the blade.
- Disconnect the spark plug wire: Pull the rubber boot off the spark plug and tuck it away from the plug. This is the single most important safety step, it prevents the engine from firing if the blade is accidentally rotated. Never skip it.
- Drain or stabilize fuel: If you tip the mower with a full tank, fuel can leak into the air filter or carburetor. Either run the tank nearly dry before your sharpening session or use a fluid transfer pump to remove fuel first.
- Wear cut-resistant gloves: Even a dull mower blade can cause a serious laceration. Level A4 or higher cut-resistant gloves are recommended.
- Wear eye protection: Mandatory if using an angle grinder or bench grinder, metal sparks are unavoidable.
- Work on a stable surface: A concrete driveway or solid workbench prevents the mower from tipping during blade removal.
How to Remove the Blade from a Push Mower
Follow these steps in order. Before finalizing equipment decisions, refer to our comprehensive marshall stanmore iii vs harman kardon onyx studio 8 comparison.
- Disconnect the spark plug wire. Pull the boot firmly off the plug. Do this first, every time, without exception.
- Empty or reduce fuel. Run the engine until it stalls, or pump out fuel with a hand siphon.
- Tip the mower onto its side, air filter side up. Tipping with the air filter down allows oil to flood the filter and carburetor, which can damage the engine and cause a smoke-filled restart. Carburetor side (air filter side) must face upward.
- Mark blade orientation before removal. Use a paint marker or chalk to mark which face is down. Reinstalling the blade upside down is a common mistake that ruins the cut.
- Block the blade to prevent rotation. Wedge a short piece of 2×4 lumber between the blade tip and the inside of the mower deck. This gives you leverage to break the center bolt free without the blade spinning.
- Remove the center bolt. In most rotary mowers the bolt is standard right-hand thread, turn counter-clockwise to loosen. However, some older or brand-specific mowers use a left-hand (reverse) thread bolt that tightens counter-clockwise. Check your owner’s manual if the bolt refuses to move in either direction before applying excessive force. Use a socket wrench with the correct size (commonly 5/8 in. or 15/16 in.).
- Remove the blade, blade adapter, and any washers. Note the order and orientation of every component so reinstallation is straightforward.
How to Sharpen a Push Mower Blade: Three Methods Compared
All three methods follow the same principle: remove metal only from the beveled cutting edge, maintain the existing bevel angle (follow the factory grind, typically around 45 degrees), and work evenly across the full length of each cutting edge. Do not sharpen the flat back face of the blade.
Target sharpness: butter-knife sharp, not razor sharp. An edge ground to razor sharpness dulls faster on contact with soil, rocks, and debris. A firm, clean-cutting edge that would not shave arm hair is the correct goal. For broader ecosystem context, read through our operational guide on dyson v8 cyclone vs bissell featherweight stick.
Method 1: Mill Bastard File (Best for Beginners)
Tools needed: 10-inch mill bastard file, work gloves, bench vise (recommended).
- Clamp the blade in a bench vise with the beveled edge facing you, or hold it firmly on a workbench.
- Place the file flat against the existing bevel angle. Push the file forward along the edge in smooth, even strokes, file on the push stroke, lift on the return.
- Work from one end of the cutting edge to the other, applying consistent pressure. Count strokes per section to keep material removal even across the blade length.
- Repeat on the opposite cutting edge with the same number of strokes.
- Check progress by looking for a consistent bright line along the cutting edge.
Pros: No power tools required, maximum control, safest for beginners, inexpensive.
Cons: Slowest method; not practical for deep nicks. For troubleshooting and reliability insights, consult our in-depth bissell crosswave hydrosteam vs shark stainforce report.
Method 2: Angle Grinder (Fastest; Suits Moderate Nicks)
Tools needed: 4 to 4.5-inch angle grinder with a metal grinding disc, eye protection, hearing protection, cut-resistant gloves, bench vise.
- Secure the blade in a bench vise.
- Hold the grinder at the existing bevel angle, match the factory grind visually.
- Use smooth, sweeping passes from heel to tip along the cutting edge. Keep the grinder moving; dwelling in one spot removes too much metal and can overheat the steel, causing it to lose temper (turn blue or purple). If the blade discolors, stop and let it cool.
- Apply light, consistent pressure. Let the disc do the work.
- Repeat on the opposite cutting edge, matching the number of passes.
Pros: Fast, handles significant nicks, widely available tool.
Cons: Requires a steady hand and practice; risk of over-grinding or overheating if technique is poor.
Method 3: Bench Grinder (Good Middle Ground)
Tools needed: Bench grinder with a medium-grit aluminum oxide wheel, eye protection, gloves.
- Turn on the grinder and allow it to reach full speed before touching the blade to the wheel.
- Present the cutting edge to the wheel at the existing bevel angle. Use the tool rest to support the blade and maintain a consistent angle.
- Move the blade steadily across the wheel face from end to end, applying light pressure.
- Dip the blade in water frequently to prevent overheating. Stop if the steel discolors.
- Repeat on the opposite cutting edge with even passes.
Pros: Precise bevel control with the tool rest, consistent results, easier to maintain angle than with a hand-held grinder.
Cons: Requires owning or borrowing a bench grinder.
| Method | Skill Level | Speed | Best For | Key Risk |
|---|---|---|---|---|
| Mill bastard file | Beginner | Slow | Light dullness, no power tools | Uneven strokes |
| Angle grinder | Intermediate | Fast | Moderate nicks, speed priority | Overheating, over-grinding |
| Bench grinder | Beginner-Intermediate | Medium | Consistent bevel, home workshop | Overheating without water dips |
How to Balance a Mower Blade After Sharpening
Balancing is not optional. An unbalanced blade creates vibration that stresses the spindle bearings, engine crankshaft, and deck mounts, leading to premature wear and costly repairs. Always balance after sharpening.
The Nail-in-Wall Test
- Drive a nail or screw horizontally into a wall stud or a wooden post so that a few inches protrude.
- Hang the blade horizontally by its center hole on the nail.
- Release the blade gently and observe which end, if any, dips down.
- The heavy end dips. Remove small amounts of metal from the cutting edge of the heavy end using your chosen sharpening tool.
- Repeat the test until the blade rests level, neither end drops.
Blade Balancer Cone Tool
A purpose-made blade balancer (a cone-shaped tool that seats in the blade’s center hole on a stable base) works on the same principle but is more precise and more convenient than the nail test. They cost under $10 at any hardware store and are worth owning if you sharpen your own blade each season.
A blade that is balanced to within acceptable tolerance will show no consistent dip in either direction during the nail or cone test.
How to Reinstall the Blade and Return the Mower to Service
- Confirm blade orientation. Most blades are stamped THIS SIDE DOWN or have a similar marking. The cutting edges must face the direction of blade rotation when viewed from below. Installing the blade upside down is the most common reinstallation error, it creates a mower that pushes grass rather than cuts it.
- Reinstall the blade adapter and washers in the exact order and orientation you noted during removal.
- Thread the center bolt by hand to avoid cross-threading.
- Torque the bolt to specification. The commonly cited general range is 35 to 50 ft-lbs, but this varies meaningfully by manufacturer and model. Consult your owner’s manual for the exact value before torquing. Under-torqued bolts can allow the blade to slip or eject; over-torqued bolts can strip threads or warp the adapter. Use a torque wrench, do not estimate.
- Set the mower upright.
- Reconnect the spark plug wire. Push the boot firmly onto the plug until it seats.
- Test-run the mower. Start it on a patch of grass and listen for unusual vibration, rattling, or noise. Any abnormal vibration after a fresh sharpening indicates the blade may still be unbalanced or incorrectly installed, stop the engine immediately and recheck.
Everything You Need to Know: How To Sharpen A Push Lawn Mower Blade FAQ
Can you sharpen a push mower blade without removing it?
Technically possible with a file or rotary tool attachment, but not recommended. Working on an installed blade leaves it unsecured and makes consistent bevel angle nearly impossible to maintain. Off-mower sharpening is safer, more precise, and allows proper balance testing before reinstallation.
How do you know if you are sharpening at the right angle?
Follow the factory bevel, the shiny, angled face already ground into the cutting edge. Place your file or grinder wheel flat against that existing face and match it. For most rotary mower blades this is approximately 45 degrees, but the exact angle matters less than consistently following the original grind. Do not attempt to change the bevel angle.
What happens if you skip balancing the blade?
An unbalanced blade creates cyclical vibration at operating RPM. Over time this vibration damages spindle bearings, loosens engine mounts, and can crack the mower deck. Symptoms include a vibrating handle, unusual noise, and premature wear on the blade bolt hole. The five-minute nail test eliminates this risk entirely.
How many times can you sharpen a push mower blade before replacing it?
A blade can typically be sharpened multiple times over several seasons, depending on how much metal is removed each session and the original blade thickness. Replace the blade when the cutting edges are visibly thin, when nicks are too deep to file out without removing an excessive amount of metal, or when the blade body shows any bend or crack, regardless of how many prior sharpenings it has had.
Related Maintenance and Operating Guides
To keep your equipment running at peak operating efficiency, explore our related technical walkthroughs and maintenance tutorials:
- Consult our detailed breakdown on residential zero-turn lawn mower guide.
Technical Standards and Compliance
Mechanical safety standards, operational tolerances, and protective gear guidelines align with benchmark specifications established by the American National Standards Institute (ANSI).









