

Quick Answer: How to Change Riding Mower Blades
Park on a flat surface, engage the parking brake, and disconnect the spark plug wire. Tilt or raise the deck to access the blades, then loosen each blade bolt counterclockwise using a socket wrench — blocking the blade with a block of wood to prevent spinning. Slide the old blade off, position the new blade with the cutting edge facing the ground and the sail (curved fin) pointing upward toward the deck, and retighten the bolt to your manufacturer’s specified torque — typically 70–90 ft-lbs for most consumer riding mowers. Always wear cut-resistant gloves throughout the entire process.

Pros
- Large-size design named in product title
- Sharpening and balancing functions listed
- Listed as a new upgraded version

Pros
- Adjustable 15-to-45-degree range in title
- Sharpening and balancing functions listed

Pros
- Sharpener and balancer functions in title
- 15-to-45-degree adjustable setting listed
- Built for lawn mower blade maintenance
Pros
- Includes replacement gaskets and a 98079-55846 spark plug
- Matches Honda HRR216 and HRS216 lawn mower models
- Designed around the 16100-Z8B-901 carburetor specification
Cons
- Restricted to select Honda GCV160 mower applications
- Installation requires basic mechanical tools and skills
When to Replace vs. Sharpen Your Riding Mower Blades
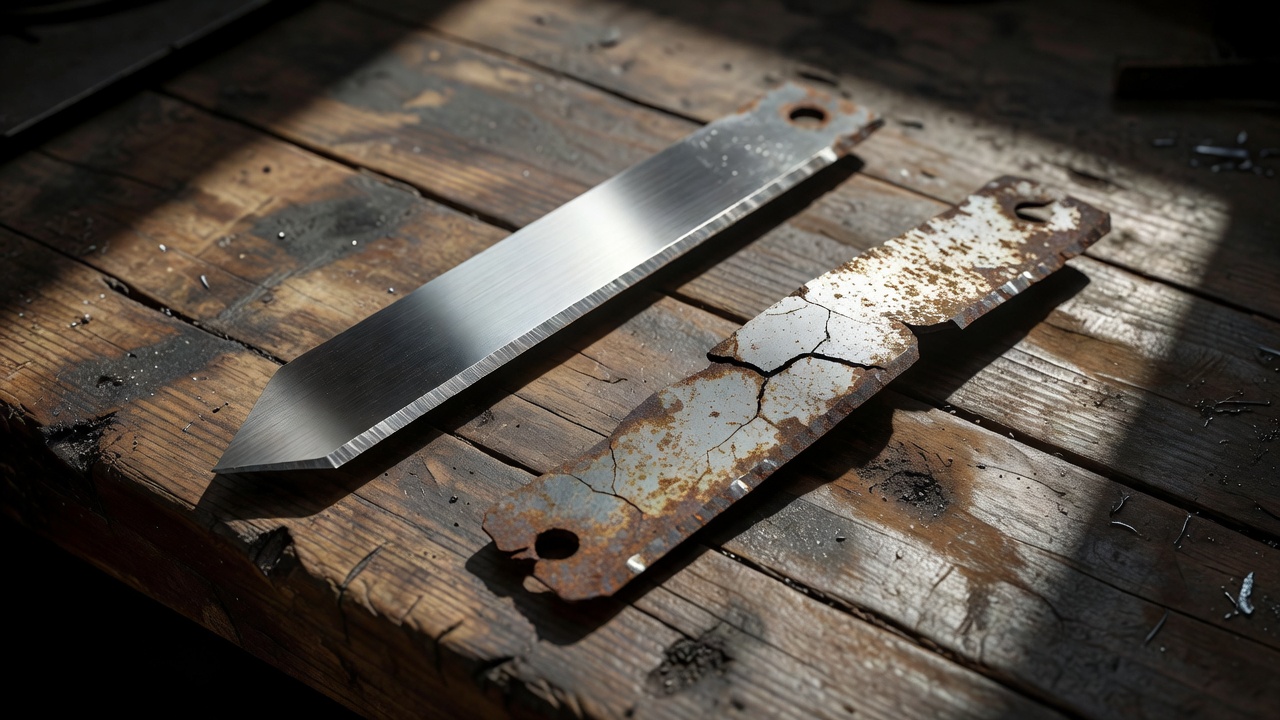
Before pulling wrenches, confirm that replacement — not sharpening — is actually what your mower needs. The two jobs are distinct, and confusing them wastes money or, worse, leaves a dangerous blade in service.
Signs the blade needs sharpening only
- Grass tips look torn or frayed rather than cleanly cut
- The cutting edge is dull but the blade body is straight and uncracked
- Less than 1/2 inch of blade width has been lost to previous sharpenings
Signs the blade must be replaced
- Visible cracks, chips, or gouges in the blade body — a cracked blade can shatter at operating speed
- Noticeable bend — set the blade on a flat surface; any rock or warp means replace it
- Excessive metal loss — if repeated sharpening has significantly thinned the blade or changed its balance, retire it
- Severe impact damage from hitting rocks, roots, or stumps — the blade and possibly the spindle need inspection
- The blade is older than 1–2 seasons or roughly 25 hours of use in abrasive or rocky conditions
A bent or cracked blade cannot be safely sharpened back into service. Attempting to do so risks catastrophic blade failure, crankshaft damage, and serious injury to bystanders. Replace it. Readers comparing setup options can review our technical analysis on jbl partybox club 120 vs sony srs xv500. For complementary hardware performance, examine our breakdown on riding lawn mower.
Tools and Replacement Blades You Need Before You Start
Gathering everything before you begin prevents mid-task pauses with a raised, unstable mower. Readers comparing setup options can review our technical analysis on jbl partybox club 120 vs sony srs xv500.
Tools checklist
- Heavy-duty cut-resistant gloves (leather or Kevlar-lined)
- Safety glasses
- Socket wrench with a 5/8-inch or 3/4-inch socket (verify your model’s bolt size — most common sizes)
- Torque wrench — required for correct reinstallation, not optional
- Breaker bar or impact wrench (for seized or overtorqued bolts)
- Scrap 2×4 wood block (to lock the blade during loosening)
- Floor jack and jack stands or a drive-over mower lift (do not rely on a hydraulic jack alone)
- Penetrating oil (e.g., PB Blaster) for rusted bolts
- Wire brush to clean the spindle hub before reinstallation
- Marker or paint pen to note old blade orientation before removal
Choosing the correct replacement blade
Blade compatibility depends on three variables: deck width, spindle center-hole diameter, and blade length. An incorrect blade can contact the deck shell, create dangerous vibration, or fail to engage the spindle correctly. For complementary field maintenance guidelines, examine our breakdown of z890 vs x870e motherboard.
- Locate your mower’s model and serial number (typically on a sticker under the seat or on the frame)
- Cross-reference against the manufacturer’s parts diagram or an online parts lookup tool (e.g., Jack’s Small Engines, PartsTree)
- OEM blades (Original Equipment Manufacturer) guarantee fit and meet factory balance standards — recommended for safety-critical components
- Aftermarket blades can be cost-effective but verify they meet ANSI B71.1 safety standards and match OEM dimensions exactly
Blade type selection
| Blade Type | Best For | Characteristic |
|---|---|---|
| Standard / Medium-lift | General mowing on flat lawns | Moderate airflow, balanced cut quality |
| High-lift | Tall or thick grass, bagging | Strong upward airflow for clean discharge and collection |
| Mulching | Mulching kits, fine clipping return | Curved blade body re-cuts clippings multiple times |
| Low-lift / Flat | Sandy or dry conditions | Reduces dust and debris pickup into the deck |
Safety Precautions Before Removing Riding Mower Blades
Mower blades rotate at approximately 200 mph at the tip. Every safety step below exists to prevent an accidental engine start or a blade movement during removal.
Step 1 — Move to a flat, stable surface
Work on concrete or firm, level ground. An uneven surface increases tip-over risk when the deck is raised or the mower is jacked up. To evaluate matched hardware tolerances, consult our detailed overview of marshall stanmore iii vs harman kardon onyx studio 8.
Step 2 — Engage the parking brake and remove the ignition key
Set the parking brake fully. Remove the ignition key and keep it in your pocket — not in the ignition — for the entire job. For complementary field maintenance guidelines, examine our breakdown of z890 vs x870e motherboard.
Step 3 — Disconnect the spark plug wire(s)
Pull the spark plug boot firmly off the plug(s). On twin-cylinder engines, disconnect both. This is the single most important safety step: it physically prevents the engine from firing if the blade is bumped, which can cause the crankshaft — and blade — to rotate. Tape the boot back so it cannot spring onto the plug accidentally.
Step 4 — Let the engine cool completely
Wait at least 15–20 minutes after the last mow. Hot engine components and hot exhaust near fuel can ignite vapors if fuel is disturbed. To evaluate matched hardware tolerances, consult our detailed overview of marshall stanmore iii vs harman kardon onyx studio 8.
Step 5 — Address fuel before tilting (model-dependent)
If your mower requires tilting the deck significantly, check your owner’s manual on fuel handling. Some manufacturers require running the tank to near-empty or using a fuel shut-off valve before tilting to prevent carburetor flooding or fuel spills. Do not make a blanket assumption — your model’s manual is the authoritative source on this step.
Step 6 — Raise the deck safely
Use a purpose-built mower lift, a drive-over lift ramp, or a floor jack with rated jack stands positioned under the frame (never under the deck shell). Confirm the mower cannot roll or shift before sliding underneath. When planning workspace deployment, consider the engineering criteria outlined in our dyson v8 cyclone vs bissell featherweight stick guide.
Step-by-Step: How to Remove Old Blades from a Riding Mower
With safety precautions complete, follow these steps in order.
Step 1 — Set the deck to its lowest position
Lower the cutting deck using the height-adjustment lever before raising the mower. This gives maximum working clearance between the blade tips and the deck shell. For additional operational safety benchmarks, see our published testing notes on bissell crosswave hydrosteam vs shark stainforce.
Step 2 — Mark the blade orientation
Before touching the bolt, use a marker to draw an arrow on the blade body pointing downward toward the ground. This eliminates any guesswork during reinstallation — a blade installed upside down causes immediate scalping and vibration damage.
Step 3 — Block the blade
Wedge a scrap 2×4 block firmly between the blade tip and the inner deck wall. This stops the blade from spinning freely when you apply torque to the bolt. Do not use your hand or foot to hold the blade.
Step 4 — Loosen the blade bolt counterclockwise
Using your socket wrench or breaker bar, turn the blade bolt counterclockwise (left/righty-loosey standard thread) to loosen it. Most riding mower blade bolts use standard right-hand threads. Apply steady force — do not jerk the wrench. If using an impact wrench, use short bursts to avoid damaging the spindle.
Step 5 — Handle a seized or rusted bolt
If the bolt does not move, spray penetrating oil (PB Blaster or equivalent) directly onto the bolt threads. Wait 15–20 minutes and attempt again. For severely seized bolts, use a breaker bar with a cheater pipe extension rather than an impact wrench, which can strip the bolt head or damage spindle bearings. Repeat penetrating oil applications if needed — forcing a seized bolt risks snapping it flush with the spindle, requiring professional repair.
Step 6 — Remove the blade and hardware
Keep track of every washer, star washer, or spacer in the order they came off. Some spindles use a blade adapter or blade carrier between the spindle hub and the blade — photograph the assembly before disassembly if you are unfamiliar with your specific model.
Zero-turn vs. standard riding mower access
On a standard riding mower with a belly-mounted deck, the deck typically drops down and forward for access — the deck engagement lever releases belt tension so the deck can be rolled out from under the mower on some models. On a zero-turn mower, the deck is accessed from below; many zero-turn models have hinged anti-scalp roller brackets that swing out of the way to improve wrench clearance. Refer to your model’s service manual for deck-drop or deck-removal procedures specific to your machine.
How to Install New Blades Correctly and Safely
Correct installation is as critical as safe removal. An improperly seated or undertorqued blade is a projectile.
Step 1 — Clean the spindle hub
Use a wire brush to remove rust, grass buildup, and debris from the spindle hub and blade mounting surface. A clean mating surface ensures the blade seats flush and the bolt torques accurately.
Step 2 — Orient the blade correctly
Position the new blade so the cutting edge (sharpened edge) faces downward toward the ground and the sail — the curved or angled fin at each blade end — points upward toward the inside of the deck. The sail creates the airflow that lifts grass for a clean cut and moves clippings toward the discharge chute. Cross-check with the orientation mark you made in Step 2 of removal.
- On mulching blades, the sail is more pronounced and curves back — the same rule applies: fin faces up into the deck
- If your spindle uses a blade adapter/carrier, confirm the blade seats fully into the adapter’s locating tabs before installing the bolt
Step 3 — Reinstall hardware in correct order
Replace all washers and spacers in the exact order you removed them. Install the blade bolt by hand first to confirm it threads smoothly — cross-threading a blade bolt is a serious hazard.
Step 4 — Torque the bolt to specification
Using a torque wrench, tighten the blade bolt to your manufacturer’s specified value. The commonly cited range for consumer riding mowers is 70–90 ft-lbs, but this varies by brand and model:
- John Deere: Typically 35–55 ft-lbs for residential models (consult your model’s Technical Manual — values vary significantly across the lineup)
- Husqvarna: Approximately 70–90 ft-lbs for most residential decks
- Cub Cadet / Troy-Bilt: Typically 70–90 ft-lbs
- Craftsman: Typically 70–90 ft-lbs
Always verify against your specific model’s owner’s manual or manufacturer service manual. Undertorquing allows the blade to wobble and loosen mid-operation. Overtorquing can crack the spindle hub or make future removal dangerously difficult.
Step 5 — Check blade balance (new blades)
Quality OEM blades are factory-balanced. Aftermarket blades may have minor balance inconsistencies. To check: hang the blade horizontally on a blade balancer (a simple cone-shaped tool, under $10) or a nail through the center hole. If one end dips, that side is heavier — remove a small amount of metal from the heavy end’s non-cutting surface with a file until the blade hangs level. An unbalanced blade causes vibration that accelerates spindle bearing wear and can damage the deck.
Step 6 — Reassemble and perform a test run
- Lower the mower off the jack stands
- Reconnect the spark plug wire(s)
- Start the engine and engage the blades at low throttle first — listen for unusual vibration, grinding, or rattling
- Engage full throttle and make one slow pass across a small grass area — inspect the cut quality before resuming normal operation
- After the first mow, re-check blade bolt torque (blades can settle slightly after the first use under load)
Model-Specific Variations and Common Mistakes to Avoid
Model-specific notes
The core process above applies to the majority of residential riding mowers, but confirm these variables for your machine:
- John Deere (100, 200, X300, X500 series): Many John Deere decks use a blade-retaining bolt with a washer and nut assembly rather than a single bolt into the spindle. The deck on some models can be rolled out sideways using the deck leveleing adjustment — consult the specific series’ Operator’s Manual on JohnDeere.com
- Husqvarna (YTH, TS, Z series): Most use a standard single bolt. Some TS series have an integrated deck wash port — cap it before raising the deck
- Cub Cadet / Troy-Bilt: Some models use a reverse-thread blade bolt (clockwise to loosen) — check your manual before applying force. These models typically have a label on the deck indicating reverse thread
- Craftsman (Husqvarna-built models): Generally follow the same procedure as Husqvarna; older Craftsman (AYP-built) models may vary
Blade count by deck width
- 30–38 inch deck: Typically 1 blade
- 42–46 inch deck: Typically 2 blades
- 48–54 inch deck: Typically 3 blades
- 60+ inch deck: 3 blades standard; some commercial decks use 4
Replace all blades at the same time. Mixing a new blade with worn blades creates uneven cut height and deck imbalance.
Common mistakes and their consequences
| Mistake | Consequence |
|---|---|
| Skipping spark plug disconnection | Accidental engine start — severe laceration risk |
| Installing blade upside down | Immediate scalping, vibration, no lift — visible in the first 10 seconds of operation |
| Undertorquing the bolt | Blade loosens under load, can eject from the deck |
| Replacing only one blade on a multi-blade deck | Uneven cut height, deck vibration, accelerated bearing wear |
| Reusing a bent blade after impact | Persistent vibration, crankshaft seal and bearing damage over time |
| Using an incorrect-length blade | Blade contacts the deck shell at speed — catastrophic failure risk |
| Skipping post-installation torque check | Blade bolt can work loose after first use |
Vibration after blade change — diagnosis
If the mower vibrates noticeably after new blades are installed, check in this order: (1) blade installed upside down, (2) blade not seated flush on spindle hub, (3) aftermarket blade is out of balance, (4) blade bolt undertorqued, (5) blade adapter/carrier damaged during removal. If vibration persists after confirming all of the above, inspect the spindle bearings — an impact with hard debris may have damaged the bearing before or during the job.
Common Questions on How To Change Blades On Riding Lawn Mower Answered
Which direction do I turn the bolt to remove a riding mower blade?
Counterclockwise (standard right-hand thread) on the vast majority of riding mowers. A small number of models — some older Cub Cadet and Troy-Bilt units — use reverse-thread bolts that loosen clockwise. Check your owner’s manual before applying force. A label on the deck near the blade spindle will indicate reverse thread if present.
Do I need to drain the fuel before changing mower blades?
Not always — it depends on how far you tilt or tip the mower and your specific model. For most blade changes using a floor jack or drive-over lift (where the mower stays level), fuel draining is not required. If your process requires significant deck tilting past 45 degrees, consult your owner’s manual. Some manufacturers recommend running the tank low or using a fuel shutoff valve to prevent carburetor overflow or fuel spillage. Never make a blanket assumption; the owner’s manual for your specific model is the definitive source.
What is the correct torque for a riding mower blade bolt?
The commonly referenced range is 70–90 ft-lbs for most consumer riding mowers (Husqvarna, Cub Cadet, Craftsman, many others). John Deere residential models are often lower — some in the 35–55 ft-lbs range depending on the series. Always verify against your specific model’s Operator’s Manual or manufacturer service manual rather than relying on a general figure. Using a calibrated torque wrench — not just a socket wrench tightened by feel — is the only way to confirm correct torque.
Why does my mower vibrate after I changed the blades?
The most common causes, in order of likelihood: blade installed upside down (sail facing down instead of up into the deck), blade not fully seated on the spindle hub, an unbalanced aftermarket blade, or an undertorqued blade bolt. If all installation factors check out, the spindle bearing may have been damaged by the same impact event that required the blade change. Persistent vibration should be diagnosed before continued mowing — vibration transmits directly to the crankshaft and can cause progressive engine damage.
For more hands-on benchmarks and buying recommendations, consult our guides on high-CFM commercial leaf blower guide, as well as durable ride-on lawn tractor guide.
Mechanical safety standards, operational tolerances, and protective gear guidelines align with benchmark specifications established by the American National Standards Institute (ANSI).









