

The Short Answer: How to Edge with a Weed Wacker
Rotate the trimmer head 90° so the cutting string spins on a vertical plane, parallel to the hard surface edge, not horizontal to the ground. Walk slowly forward along the sidewalk, driveway, or garden bed border, keeping only the tip of the string in contact with the turf. Do not press the head into the soil or force the cut; let the monofilament line do the work.
Can You Use a Weed Wacker as an Edger?
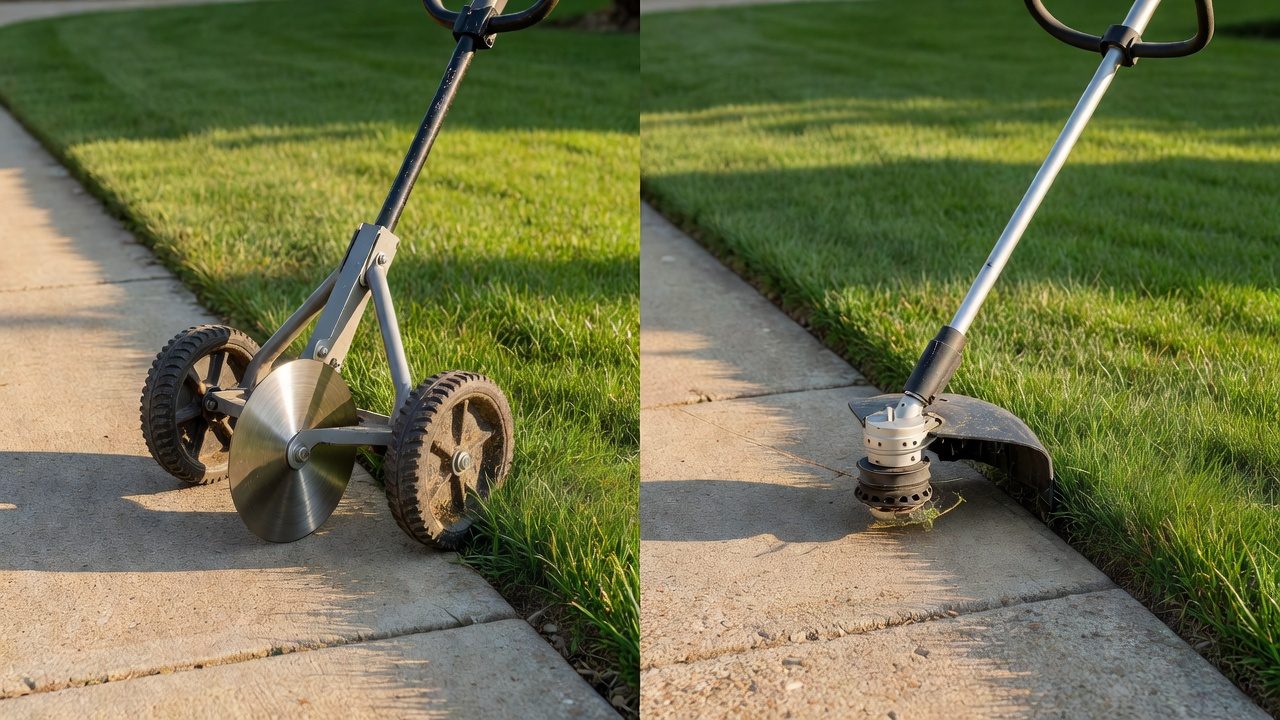
Yes. A string trimmer (commonly called a weed wacker or weed whip) can produce clean, defined borders without a dedicated lawn edger, provided you use the correct head orientation and technique. The two tools differ in one core way: a dedicated edger has a fixed vertical blade wheel designed exclusively for cutting along hard surfaces, while a string trimmer is a multi-position tool you must manually rotate into the edging position.
The practical result is nearly identical when technique is correct. A string trimmer is also more versatile, you already own it, and it handles both open trimming and edging in one pass around the yard. The trade-off is that a string trimmer demands more operator control than a wheeled edger, so technique discipline matters more.
What Is the Difference Between Edging and Trimming?
Trimming means cutting grass that the mower missed, around trees, fence posts, and tight corners, with the string spinning horizontally (parallel to the ground). Edging means cutting a defined vertical border along a hard surface or bed line, with the string spinning vertically (perpendicular to the ground). Same tool, different head orientation, different purpose.
What You Need Before You Start: Safety and Setup
Personal Protective Equipment (PPE)
String trimmer operation ejects debris at high velocity. Before starting:
- Eye protection: ANSI Z87.1-rated safety glasses or goggles. Standard prescription glasses do not meet impact standards for power tool operation.
- Hearing protection: Gas trimmers in particular exceed 85 dB at operator ear level, use foam earplugs or earmuffs rated NRR 25 or higher for extended sessions.
- Closed-toe shoes: Steel- or composite-toe footwear is strongly preferred. Never operate a string trimmer in sandals or open shoes.
- Long pants: Protect legs from debris throw and monofilament contact.
- Gloves: Reduce vibration fatigue on gas models and protect hands during line replacement.
Area Inspection
Walk the edge you plan to cut before starting. Remove rocks, pet toys, irrigation heads, and any objects the string could strike. A monofilament line travelling at trimmer speed turns small stones into projectiles with meaningful kinetic energy. For broader ecosystem context, read through our operational guide on z890 vs x870e motherboard.
Fuel and Charge Check
Startup procedure varies by power source, but edging technique is identical across all three:
- Gas trimmer: Check fuel level and oil (two-stroke models use premixed fuel; four-stroke models have a separate oil reservoir). Ensure the choke and throttle are set per the manufacturer’s cold-start sequence. Flood risk is highest on gas models if the primer bulb is over-pressed.
- Battery trimmer: Confirm the battery pack is charged and seated fully. Voltage drop on a depleted lithium-ion pack reduces cutting speed mid-edge, producing an uneven cut.
- Corded electric trimmer: Use an outdoor-rated extension cord of sufficient gauge for the run length (typically 16 AWG for runs under 50 feet, 14 AWG for longer runs). Route the cord behind you and away from the cutting path.
Line Check
Edging consumes line faster than open trimming because the string contacts hard surface material at the border. Before starting, advance the line manually (or bump-feed it on auto-feed models) so you have at least 4, 6 inches of line exposed per side. Insufficient line length forces the operator to press harder, which causes scalping and uneven depth. For troubleshooting and reliability insights, consult our in-depth marshall stanmore iii vs harman kardon onyx studio 8 report.
How to Hold and Position the Trimmer for Edging
The 90° Rotation: The Core Technique Unlock
Standard trimming holds the shaft roughly parallel to the ground with the cutting head horizontal, string spinning like a horizontal fan blade. For edging, rotate the entire trimmer 90° so the cutting head is now vertical, string spinning like a wheel rolling along the ground edge.
On most straight-shaft and curved-shaft trimmers, this means tilting the whole tool sideways until the motor head and shaft are oriented vertically (or near-vertically). The cutting guard should now face toward the hard surface (sidewalk, driveway), protecting you from debris thrown toward pavement. Readers comparing setup options can review our technical analysis on dyson v8 cyclone vs bissell featherweight stick.
Body Stance
- Stand so the hard surface edge is immediately to your dominant-hand side.
- Keep the trimmer shaft at a slight inward angle, the very tip of the cutting string should track directly over the grass-to-pavement boundary line.
- Do not bend at the waist to lower the head; adjust the trimmer angle at your grip instead. Bending promotes fatigue and reduces control over cutting depth.
Debris Throw Direction and Where to Stand
String rotation direction determines which side debris is ejected. Most trimmers rotate counter-clockwise (viewed from below the cutting head), which means debris is thrown to the operator’s left. A minority of models rotate clockwise and throw debris to the right. Check your trimmer’s manual or look for a rotation arrow on the head housing before your first edging pass.
Practical implication: position yourself so the debris throw is directed away from your body, bystanders, vehicles, and windows. When edging a sidewalk with a counter-clockwise trimmer, walk with the lawn on your left and the pavement on your right , debris ejects onto the lawn, not the street or your legs. For complementary field maintenance guidelines, examine our breakdown of bissell crosswave hydrosteam vs shark stainforce.
Can You Edge with a Curved-Shaft Trimmer?
Yes, though it requires slightly more wrist angle adjustment than a straight-shaft model to achieve a truly vertical string plane. Curved-shaft trimmers are shorter and lighter, which some operators find easier to control for the sustained slow pace that edging demands. Straight-shaft models offer better reach and are generally preferred for extended edging runs.
Step-by-Step: How to Edge Along Sidewalks and Driveways
- Start the trimmer and let it reach operating speed before moving to the edge. Gas models should idle briefly; battery models reach full speed almost immediately on trigger engagement.
- Position the head at the start of the edge, the tip of the cutting string directly over the grass-pavement boundary. The string should not yet be contacting turf.
- Engage full throttle. Edging at partial throttle produces a ragged, torn cut rather than a clean slice. Full RPM allows the monofilament line to cut rather than bend or drag the grass.
- Begin walking forward at a slow, deliberate pace, roughly half the speed of a normal walking pace. Moving too fast is the single most common mistake; it produces a wavy, inconsistent border rather than a straight line.
- Use only the tip of the string. The outer 1 to 2 inches of the monofilament line is the effective cutting zone. Allowing more of the string to contact the turf or soil causes scalping, excessive line wear, and loss of depth control.
- Maintain consistent string depth. The string should cut through the grass at the border and just barely break the soil surface, enough to define a clean edge line, not enough to excavate a trench. Keep the cutting depth to approximately ½ inch below the turf surface on established edges.
- Handle corners by pivoting slowly rather than swinging the trimmer. On 90° corners (driveway aprons, sidewalk junctions), stop forward motion, pivot your body around the corner, and re-establish the edge line before continuing. Swinging through a corner produces a curved cut on what should be a square edge.
- Release the throttle and stop the string before stepping over the cord (corded models), changing direction, or setting the trimmer down.
How to Edge Garden Beds and Lawn Borders with a Weed Wacker
Edging soft-surface borders, mulched garden beds, landscape borders, planting areas, follows the same 90° head rotation principle but with two technique adjustments.
Angle Adjustment for Bed Edges
Unlike a hard surface edge (where the pavement acts as a natural depth stop), a garden bed border has no rigid reference plane. Tilt the trimmer head very slightly inward, 5 to 10° off vertical, so the tip of the string cuts into the turf side of the border and deposits clippings onto the lawn rather than into the bed. This also reduces the risk of flinging mulch or disturbing shallow plant roots near the bed perimeter.
Creating a Trench Line
On an overgrown or undefined bed edge, a single pass will not create a clean trench. Make a first pass to cut grass back to the approximate border line, then make a second, slower pass at the correct depth to define the trench. The target is a crisp vertical wall of soil approximately 2 to 3 inches deep, enough to visually separate lawn from bed and slow grass encroachment.
Scalping Risk
Scalping, cutting grass so short the soil is exposed, occurs most often at bed edges because there is no hard surface to reference depth against. Signs of scalping: brown or bare patches appearing within 24 to 48 hours of edging. Prevention: keep walking pace slow and controlled, use only the string tip, and do not tilt the trimmer head more than 10 to 15° off vertical. If scalping occurs, raise the effective cutting point by shortening your string exposure to 3 to 4 inches and reducing inward tilt.
Common Edging Mistakes and How to Fix Them
| Mistake | What It Looks Like | Fix |
|---|---|---|
| Walking too fast | Wavy, inconsistent border line | Slow pace to roughly half normal walking speed; use a fixed reference line (expansion joint, chalk line) to maintain straight tracking |
| Using too much string | Rapid line wear, scalping, loss of depth control | Retract excess line; only 4 to 6 inches of string per side should be exposed; use only the outer tip for cutting contact |
| Pressing the head into soil | Uneven trench depth, string breaks frequently | Do not force the cut; hold the head at consistent height and let string velocity do the work |
| Edging wet grass | Clumping clippings, clogged guard, uneven cut | Edge dry grass whenever possible; wet grass wraps around the head and produces torn rather than cut edges |
| Partial throttle operation | Ragged, torn grass rather than clean cut | Always edge at full throttle; lower RPM reduces string tension and cutting efficiency |
| Not rotating head 90° | String cuts horizontally into pavement surface, no defined vertical edge | Confirm head is fully rotated so string plane is vertical before beginning any edging pass |
Cleanup and Maintenance After Edging
Clearing Clippings from Hard Surfaces
Grass clippings and soil ejected onto sidewalks and driveways should be cleared promptly. Wet clippings left on concrete or asphalt can stain the surface and become a slip hazard. Use a leaf blower to move clippings back onto the lawn (direct airflow toward the turf, not the street drain), or sweep with a stiff-bristle broom.
Line Replacement Indicators
Replace or re-spool trimmer line when:
- The exposed string length drops below 3 inches and bump-feeding no longer advances new line
- Cuts become ragged or require noticeably more throttle for the same result
- The spool is visibly depleted to the last few wraps
For edging work, round monofilament line (0.080″ – 0.095″ diameter for residential trimmers) is adequate. Heavier square or twisted line lasts longer but may be unnecessary for light edging on maintained borders.
Edging Frequency
Edge borders every one to two mowing cycles to prevent grass from re-establishing over the cut line. Overgrown edges require more line, more passes, and more operator effort to restore, frequent light edging is more efficient than infrequent heavy restoration cuts.
Should You Edge Before or After Mowing?
Edge before mowing. Edging first defines the border cleanly, and the subsequent mowing pass collects the clippings ejected from the edge cut. Mowing first then edging leaves a second distribution of debris on the lawn surface that the mower has already processed, requiring additional cleanup. This sequence is consistent with practices recommended by professional turf and landscaping organizations.
Trimmer Storage
- Gas models: Run the fuel tank dry or add a fuel stabilizer before storage longer than 30 days. Stale fuel is the leading cause of carburetor failure on small engines.
- Battery models: Store the battery pack at approximately 40 to 60% charge in a climate-controlled space. Avoid storage at full charge or full discharge for extended periods, as both accelerate lithium-ion degradation.
- Corded models: Coil the cord loosely without tight kinks; store indoors away from UV exposure.
- All models: Retract or trim string flush with the guard housing before storage to reduce brittleness from UV exposure on extended outdoor storage.
Everything You Need to Know: How To Use A Weed Wacker To Edge FAQ
What angle should a weed wacker be at for edging?
The trimmer head should be rotated 90° from its normal trimming position so the cutting string spins on a vertical plane, straight up and down, parallel to the edge of the sidewalk or driveway. The shaft will be angled slightly toward the hard surface, but the string itself must be vertical to produce a defined vertical cut rather than a horizontal scalping pass.
How do you edge with a weed wacker for the first time?
Start on a straight, established edge, a long sidewalk or driveway border is ideal. Put on eye protection, hearing protection, and closed-toe shoes. Rotate the trimmer head 90°, engage full throttle, and walk at half your normal walking pace with only the string tip tracking the grass-pavement boundary. Make one slow pass, assess the depth and straightness, then make a second pass if the border needs further definition. Do not attempt curved bed edges or overgrown borders on a first session.
Why does my weed wacker leave a ragged edge instead of a clean cut?
Three causes account for nearly all ragged-edge complaints: (1) operating at partial throttle, always edge at full RPM; (2) walking too fast, slow your pace significantly; (3) worn or too-short line, advance fresh line before starting and expose at least 4 inches per side. Wet grass compounds all three issues, so edge dry turf whenever conditions allow.
Is it better to edge before or after mowing?
Edge before mowing. Defining the border first lets the mower collect edging clippings in its discharge path, reducing total cleanup time. Edging after mowing scatters a second layer of clippings on an already-processed lawn surface and offers no technique or quality advantage.
Technical Standards and Compliance
For practical maintenance advice and setup requirements, check our guide on push lawn mower.
Mechanical safety standards, operational tolerances, and protective gear guidelines align with benchmark specifications established by the American National Standards Institute (ANSI).









