

Quick Answer: How to Jack Up Riding Lawn Mower
Not all riding lawn mowers share the same weight distribution or frame geometry. A rear-engine rider concentrates mass over the back axle; a zero-turn mower carries most of its weight at the rear hydrostatic drive units; a garden tractor distributes weight more evenly but still favors the rear engine. Choosing the wrong lift point or the wrong method for your mower type risks bending the frame, tipping the machine, or collapsing a jack under an off-center load.
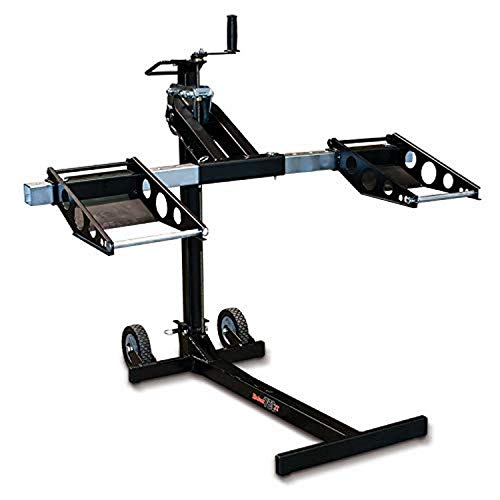
Pros
- 750 lb front-end lifting capacity
- Adjustable wheel span from 31.5" to 62.5"
- Compatible with a manual crank or power drill
- Lock-in-place design secures raised equipment
- Folds flat for trailer or shop storage
Cons
- Heavy unit weight of 99 pounds
- Rated strictly for front-end lifting, not full mower weight

Pros
- Heavy-duty carbon steel construction provides long-lasting durability and reliable 500-lb support
- Adjustable width and 4-level wheel design fit various riding mowers and garden tractor tire sizes
- Secure safety lock mechanism holds equipment stable at three height levels during maintenance
- Easy assembly and smooth manual crank operation reduce setup effort for everyday users
- Anti-slip rubber base enhances overall stability and protects floor surfaces
Cons
- Manual crank requires more physical effort than hydraulic or powered lift alternatives
- Only three adjustable height levels may limit flexibility for certain maintenance positions
- 500-lb maximum capacity restricts use to lighter riding mowers and small garden tractors
The VigorTool Lawn Mower Jack Lift is a robust carbon steel floor jack built for elevating riding lawn mowers and small garden tractors. Its reinforced construction creates a solid first impression of durability and structural stability for repeated use in home garages or sheds.
In real-world performance the 500-lb rating combined with 4-level adjustable wheel supports and width settings delivers multi-vehicle fitment across different tire sizes. The manual crank raises the equipment smoothly to three locked heights while the anti-slip rubber base keeps everything planted securely for blade changes or undercarriage cleaning.
Potential drawbacks include the manual crank which demands more physical input than hydraulic options and the restriction to only three height levels plus a 500-lb limit that may not accommodate heavier equipment. Dimensions and additional accessories are not detailed in the available data.
This lift is best suited for homeowners and small-property owners who need a reliable adjustable tool for routine riding mower maintenance and want dependable safety features without complex setup.

Pros
- Robust 880 lbs load rating with sturdy steel construction and stable base
- Flexible dual-mode operation supporting both manual handle and power drill use
- Fully adjustable telescopic design that fits a wide range of lawn tractors and ATVs
- Completely foldable flat profile for space-saving storage and portability
- Rust-resistant powder-coated finish plus secure locking for dependable safety
Cons
- Power-assisted mode requires a separate low-speed high-torque electric drill that is not included
- Maximum vehicle width limited to 40 inches which may exclude some larger models
- No additional accessories or detailed dimensional specs provided beyond core capacity and adjustability
The Vertlley 880 Lbs Riding Mower Lift is a foldable steel jack built specifically for lawn tractor and ATV maintenance. Its thick sturdy steel body, high-carbon steel threaded bearing column, and red powder-coated finish create an immediate impression of durability and rust resistance while the stable base and locking mechanism prioritize user safety.
In real-world use the dual-mode system allows effortless height changes via the included manual handle or by attaching a low-speed high-torque electric drill. Telescopic adjustability of height, width, and angle makes it compatible with most riding mowers and garden tractors up to 40 inches wide, giving clear undercarriage access for oil changes, blade sharpening, and debris removal without shop assistance.
Considerations include the need for a separate electric drill to unlock powered operation and the 40-inch width limit that may not suit every oversized tractor. The product also arrives without extra accessories, so buyers should plan for any required tools based on their specific equipment.
Overall this lift delivers excellent value for homeowners and small-shop users who want a reliable, space-saving way to perform routine mower maintenance safely and economically at home.
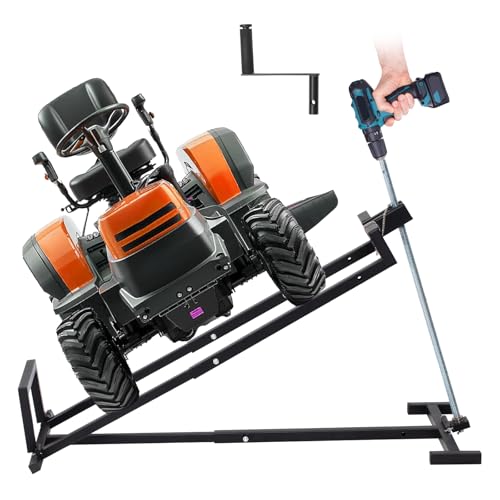
Pros
- Robust 880 lbs weight capacity handles a wide range of lawn equipment securely
- Convenient dual crank and power tool handle options reduce physical effort
- Compact foldable construction simplifies storage and transport
- Built-in safety lock and non-slip base enhance stability during maintenance
- Quick tool-free assembly makes it accessible for DIY users
Cons
- Compatibility limited to mowers with outer tire distance of 38.5 inches or less
- Power tool for faster lifting must be purchased separately as it is not included
- No detailed folded dimensions provided to confirm exact storage space needs
The Wishtofly Lawn Mower Lift Jack is a heavy-duty telescopic floor jack built for lawn mowers and garden tractors. It features a reinforced frame with rust-resistant coating and a non-slip base that creates a solid first impression of durability and stability for garage or outdoor use.
In performance, the 880 lbs capacity safely raises zero-turn mowers, riding mowers, and small tractors. Users select the removable hand crank for accurate height control or attach a power tool for faster elevation, while the safety lock holds position firmly during blade sharpening, belt replacement, or undercarriage cleaning.
Key considerations include the need to verify outer tire distance of 38.5 inches or less for proper fitment and the fact that a power tool is required separately for the high-speed mode. Storage size when fully folded is not specified in detail.
Overall this lift jack delivers strong value for DIY homeowners and professional technicians seeking safer, more efficient mower maintenance without bulky permanent equipment. It is ideal for anyone prioritizing portability, dual lifting options, and reliable support within the stated capacity and size limits.

Pros
- Robust carbon steel build supports 880 lbs for reliable lifting of mowers and tractors
- Easy dual-handle operation speeds up raising with either hand crank or power drill
- Foldable structure simplifies storage and transport after use
- Secure locking and stable base enhance safety during maintenance tasks
- Direct chassis access without needing to remove the mower platform
Cons
- Maximum height of 23.6 inches may restrict deep undercarriage access on some models
- Tire width limit of 39.5 inches excludes wider or oversized equipment
- Requires precise tire positioning into the frame which can need practice for first-time users
Overview & Design: The VEVOR Ride on Lawn Mower Lift Jack is a sturdy carbon steel telescopic maintenance jack engineered for ride-on lawn mowers, ATVs, and garden tractors. Its foldable lightweight frame creates a practical tool that stores compactly in a garage or shed while projecting solid build quality from the start.
Performance & Key Features: Position the tires into the bottom frame that accepts widths up to 39.5 inches then turn the handle to lift the unit to 23.6 inches at a 36 degree angle. Dual handles support both manual cranking and power drill use for quick elevation, while the stable base and locking mechanism keep the mower secure for oil changes, blade work, belt replacements, and debris removal without any platform disassembly.
Drawbacks & Considerations: The 23.6 inch maximum height and 36 degree angle can limit reach for more intensive repairs. Compatibility stops at a 39.5 inch tire width so wider models will not fit, and first-time users may need a short learning curve to seat the tires correctly for stable operation.
Verdict: This lawn tractor lifter delivers excellent value for homeowners and landscapers who need a simple reliable way to perform regular mower maintenance on compatible equipment and want to avoid costly shop visits.
The task also determines required lift height. Blade changes and deck cleaning need only 6 to 12 inches of undercarriage clearance. Belt replacements around the deck spindles require similar access. A flat tire on the rear axle may need 8 to 10 inches to slip a wheel free. Working on the hydrostatic drive or transmission demands more clearance still. Match the method to the job before you choose a tool.
| Mower Type | Approx. Weight | Primary Jack Point | Recommended Method |
|---|---|---|---|
| Garden Tractor | 300 to 600 lb | Front axle center or rear frame rails | Floor jack + stands, or mower lift stand |
| Zero-Turn Mower | 700 to 1,100 lb | Rear frame rails outboard of discharge chute | Mower lift stand or heavy-duty floor jack + stands |
| Rear-Engine Rider | 250 to 450 lb | Front axle or designated rear frame bracket | Drive-over ramp or floor jack + stands |
Jack capacity rule: Use a floor jack and jack stands rated for at least 1.5× the mower’s listed weight. A 2-ton (4,000 lb) floor jack handles every consumer riding mower on the market with margin to spare. For jack stands, a 3-ton (6,000 lb) pair is a practical, inexpensive baseline. For complementary hardware performance, examine our breakdown on riding lawn mower specifications.
Before You Lift: Universal Safety Checklist
These steps are non-negotiable regardless of which lifting method you use. Skipping any one of them is the leading cause of preventable mower-maintenance injuries.
- Choose a flat, hard surface. Concrete is the only acceptable surface. Grass and gravel shift under load and will allow a jack or stand to sink or tip. A slope of even a few degrees multiplies tip risk dramatically.
- Engage the parking brake. The brake locks the rear axle and is the first mechanical line of defense against roll-off. Confirm it is fully set before the front wheels leave the ground.
- Move the blade engagement lever to the OFF/disengaged position. An engaged blade control left in the ON position creates a startup hazard if the spark plug wire is accidentally reconnected.
- Disconnect the spark plug wire. Pull the wire boot off the spark plug tip and tuck it away from the plug. This is the standard pre-maintenance step cited in virtually every OEM operator’s manual (see your specific model’s safety section) and prevents accidental engine cranking while your hands are under the deck.
- Chock the wheels that stay on the ground. Place wheel chocks, or solid blocks of wood, snug against both the front and rear faces of the tires that remain on the surface. If you lift the front, chock the rear wheels, and vice versa.
- Do not drain the fuel tank unless tipping the mower. For standard underside access via a floor jack or ramp, draining fuel is unnecessary and adds steps. Draining is required only if the mower must be tipped on its side, which is not recommended for most maintenance tasks and is outside the scope of this guide.
Method 1: Floor Jack and Jack Stands (Most Versatile)
A hydraulic floor jack is the tool most homeowners already own, and it works on every riding mower category when used on the correct jack point.
Locating the Jack Point
- Front lift: Position the floor jack saddle under the center of the front axle, the solid steel tube that runs side to side beneath the front of the tractor. This is a robust, factory-intended contact point. Do not place the jack under the sheet-metal nose housing or the steering linkage.
- Rear lift: Locate the main frame rails, the two heavy steel channels that run front-to-back along the underside of the mower chassis. On garden tractors, they are typically visible just inboard of the rear wheels. On zero-turn mowers, the lift point is usually the thick crossmember frame behind the cutting deck or the outboard rear frame bracket specified in the service manual. Consult your operator’s manual for the exact symbol (often a triangle or scissor-jack icon) that marks approved lift points.
- Never jack under the mowing deck. The deck shell is stamped or welded sheet metal designed to deflect debris, not bear concentrated vertical loads. Jacking under the deck bends or cracks the housing and shifts the blade spindle alignment, leading to uneven cuts and accelerated bearing wear.
Step-by-Step: Front Lift (Blade Change / Deck Access)
- Complete the full safety checklist above.
- Slide the floor jack under the front of the mower and center the saddle on the front axle.
- Pump the jack handle slowly until the front wheels clear the ground by 2 to 3 inches more than your required working height.
- Slide a jack stand under each side of the front frame, just inboard of the front wheels, and lower the mower onto the stands. The jack remains in place but weight transfers to the stands.
- Gently attempt to rock the mower side to side. If it shifts, reposition stands on a more solid frame point and recheck.
- Work under the mower. When finished, jack back up slightly, remove stands, and lower slowly.
Step-by-Step: Rear Lift (Tire Change / Hydrostatic Access)
- Complete the full safety checklist. Chock the front wheels from both sides.
- Position the floor jack under the designated rear frame crossmember or frame rail.
- Lift until the rear wheel clears the ground with working clearance.
- Place jack stands under the rear frame rails on both sides before releasing weight from the jack.
- Confirm stability, then proceed with tire or drivetrain work.
Method 2: Drive-Over Ramp (Fastest for Blade and Deck Work)
Drive-over lawn mower ramps, sold under brands such as Jungle Jim’s, Black Widow, and Larin, are two angled ramps the mower drives up onto, elevating the front or rear axle by a fixed height (typically 5 to 7 inches) without any jack operation. They are the fastest option for routine blade sharpening and deck cleaning because there is no jack positioning or stand placement involved.
How to Use a Drive-Over Ramp
- Place both ramp sections on flat concrete, spaced to match your mower’s wheel track width.
- Align the mower directly in front of the ramps and drive forward slowly (or reverse onto rear ramps) at the lowest possible throttle.
- Stop when the wheels reach the flat platform section at the top, the ramp design includes a raised lip or stop tab to prevent overshoot.
- Engage the parking brake immediately and shut off the engine.
- Disconnect the spark plug wire.
- Chock the elevated wheels if the ramp does not include integrated chocks.
- Verify the mower does not rock or slide before going underneath.
Ramp Limitations
- Maximum lift height is fixed at the ramp’s design height, usually 5 to 7 inches. Deep drivetrain or transmission work requiring more clearance needs a floor jack or mower lift stand instead.
- Ramps are weight-rated (commonly 3,000 to 6,000 lb per pair). Verify your mower’s weight is within the ramp’s rating before use.
- Ramps only elevate one end at a time. Full undercarriage access requires repositioning the mower and re-driving onto the ramps from the opposite end, or using a different method.
Method 3: Dedicated Mower Lift Stand (Best for Frequent Maintenance)
A dedicated riding mower lift stand, also called a saddle jack or mower service lift, is a foot-pedal- or hand-crank-operated platform designed specifically for riding mowers. The lift saddle cradles the frame at manufacturer-approved contact points, and a ratcheting or hydraulic mechanism raises the entire mower to working height.
How a Saddle Mower Lift Works
The mower drives or is pushed onto the lift platform. The operator positions the saddle brackets under the frame rails (not the deck), then actuates the foot pedal or hand crank. The lift raises the mower uniformly, which eliminates the side-to-side tip risk inherent in single-point floor jacking. A locking pawl or pin secures the lift at height so the mower cannot drop unexpectedly.
Selecting the Right Lift Stand
- Weight capacity: Choose a lift rated above your mower’s curb weight. Lifts rated 300 to 500 lb suit most garden tractors and rear-engine riders. Zero-turn mowers often exceed 800 lb and require a heavy-duty lift rated 1,000 lb or more.
- Lift height: Most consumer mower lifts reach 8 to 12 inches, sufficient for blade, belt, and spindle work. Verify the maximum height covers your intended task.
- Saddle compatibility: Some lifts include adjustable saddle brackets for narrow or wide frame rails. Confirm bracket width accommodates your mower’s frame track before purchase.
For homeowners who sharpen blades, replace belts, or clean the deck multiple times per season, a mower lift stand reduces task time, eliminates jack-stand setup steps, and lowers the risk of a pinch-point injury from a slipping floor jack.
Jack Points by Mower Type: Quick-Reference Guide
Garden Tractor (e.g., John Deere X300/X500 series, Cub Cadet XT2, Husqvarna YT series)
- Front: Center of the front axle beam. On John Deere tractors, a molded jack point symbol appears on the frame near the front axle, reference the specific model’s operator’s manual for location.
- Rear: Main frame rails just forward of the rear axle. Avoid the axle housing itself, which can rotate under load if the parking brake is not fully engaged.
- Tipping caution: Do not tip a garden tractor on its side. Oil migrates into the cylinder and air filter, causing a hydrostatic lock or oil-fouled filter on restart.
Zero-Turn Mower (e.g., Husqvarna Z200/Z400, Toro TimeCutter, Ariens IKON)
- Front: The front caster wheel frame crossmember, a steel tube bridging the two caster forks. Lightweight front end means the mower tips forward easily if weight shifts; keep rear wheels chocked firmly.
- Rear: Outboard rear frame brackets or the heavy rear crossmember behind the deck discharge opening. Zero-turns are rear-heavy; always chock front caster wheels before lifting the rear.
- Note: Zero-turn mowers weigh 700 to 1,100 lb. Use a 2-ton or heavier floor jack and 3-ton jack stands minimum.
Rear-Engine Rider (e.g., Cub Cadet CC30, Husqvarna R Series)
- Front: Center of the front axle. Front-heavy relative to rear-engine riders; front lift is straightforward.
- Rear: Designated rear frame bracket or crossmember, consult operator’s manual, as rear-engine riders have compact frames with fewer obvious contact points.
- Drive-over ramp suitability: Rear-engine riders are the easiest mower type to use with drive-over ramps due to low overall weight and compact dimensions.
Common Mistakes That Cause Injuries or Mower Damage
- Jacking under the mowing deck. The deck shell is not structural. It deflects under concentrated jack load, bending the housing, displacing spindle mounts, and voiding any warranty coverage on the cutting system.
- Working under a mower supported only by a floor jack. Floor jacks are lifting tools, not support tools. A hydraulic seal leak, a bumped release valve, or simple slow bleed-down drops the mower without warning. Jack stands are mandatory before any part of your body goes under the machine.
- Lifting on grass or gravel. Soft or shifting surfaces allow jack feet and stand legs to sink unevenly. The mower can tilt off the stand laterally with no visible warning beforehand.
- Forgetting to chock the opposite wheels. With the parking brake engaged, the rear axle is locked, but front wheels remain free to roll. An unchocked front end on a rear-lifted mower can roll the machine off the jack stands.
- Leaving the blade engagement engaged. Even with the spark plug wire disconnected, restoring the wire and accidentally cranking the engine starts the blades instantly if the PTO switch was left on.
- Using an undersized jack or stands. A 1-ton jack under a 900 lb zero-turn is operating at the equipment’s maximum rated load before the mower’s weight is even considered. Always build in a safety margin.
Everything You Need to Know: How To Jack Up Riding Lawn Mower FAQ
Can I use a regular car floor jack on a riding lawn mower?
Yes, provided the jack’s weight rating exceeds the mower’s weight and you place the saddle on a solid frame point, the front axle beam or a rear frame rail, not the mowing deck or sheet-metal bodywork. A standard 2-ton hydraulic floor jack handles every consumer riding mower. The concern is not the jack type but jack point selection and always backing the jack with rated jack stands before working underneath.
What is the safest place to jack up a riding lawn mower?
The front axle center point (for front lifts) and the main rear frame rails or manufacturer-designated crossmember (for rear lifts) are the correct jack points on virtually all riding mower categories. The exact location on your specific model is marked in the operator’s manual, often with a triangle or jack symbol. Avoid the mowing deck shell, steering linkage, and axle housings that can rotate under load. To compare alternative configurations, check our hands-on review of marshall stanmore iii vs harman kardon onyx studio 8.
Do I need to disconnect the spark plug wire before jacking up the mower?
Disconnect it before any undercarriage work, not necessarily before the lift itself. OEM operator’s manuals universally require spark plug wire disconnection as a pre-maintenance safety step because accidental engine cranking, from a bump, a child, or an inadvertent key turn, can engage the blade or drivetrain while hands are under the deck. Pull the boot off the plug tip and move it away from the terminal before going under the mower.
Is a dedicated mower lift stand worth buying for a homeowner?
If you perform undercarriage maintenance , blade sharpening, belt replacement, spindle greasing , more than twice per season, a mower lift stand pays back in time and reduced injury risk within the first year. Setup time drops from 10, 15 minutes (floor jack, position stands, verify stability) to under 2 minutes (drive on, actuate pedal, lock). For once-a-year blade changes, a floor jack and stands accomplish the same task at lower upfront cost. Users looking for related component recommendations can explore our dyson v8 cyclone vs bissell featherweight stick breakdown.
Related Maintenance and Operating Guides
To keep your equipment running at peak operating efficiency, explore our related technical walkthroughs and maintenance tutorials:
- Consult our detailed breakdown on mowing.
- Consult our detailed breakdown on heavy-duty chainsaw buyer guide.
Technical Standards and Compliance
Mechanical safety standards, operational tolerances, and protective gear guidelines align with benchmark specifications established by the American National Standards Institute (ANSI).









