Replacing a lawn mower tire can be completed at home in 20-90 minutes depending on your approach. The fastest method involves swapping the entire wheel assembly as one unit, while the tire-only method requires breaking the bead and remounting the tire onto your existing rim. This guide covers both approaches for riding mowers, push mowers, and zero-turn mowers with safety precautions, tool requirements, and inflation specifications to ensure a successful DIY repair.
Understanding Your Mower Type and Replacement Path
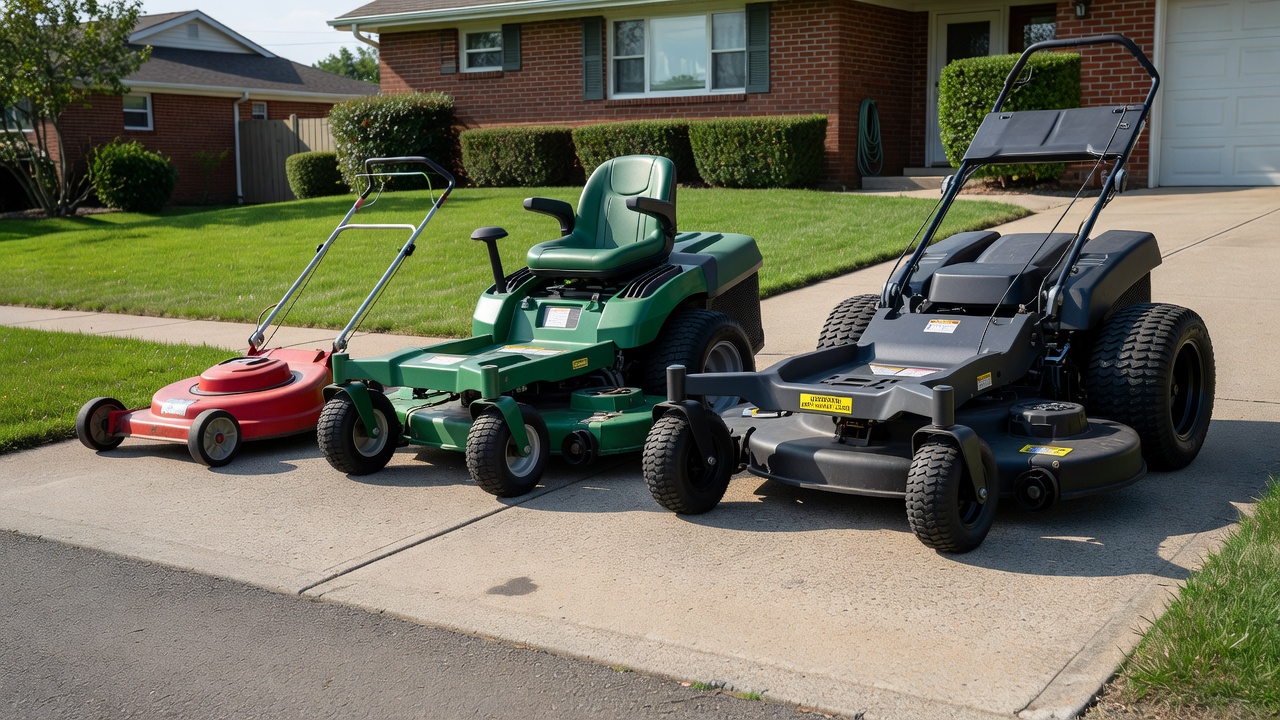
Before beginning any tire replacement work, you must identify your mower type and decide which repair approach suits your situation. These two factors determine the tools you’ll need and the complexity of the job.
Mower Type Overview
- Riding Mowers: Larger wheels secured with lug nuts or wheel bolts. Rear tires typically handle more weight and may require higher PSI. Front tires are often smaller and may use a different mounting system.
- Push Mowers: Smaller wheels often held by retaining clips, cotter pins, or castle nuts. Front wheels are commonly press-fit or held with a simple retention mechanism.
- Zero-Turn Mowers: Rear wheels are substantially larger than front wheels. Typically use lug nuts or heavy-duty wheel bolts. May feature specialized tire compounds for maneuverability.
Decision Fork: Full Wheel Assembly vs. Tire-Only Swap
Once you identify your mower type, choose between these two replacement methods:
- Full Wheel Assembly Swap (Recommended for Most): Remove the entire wheel with tire attached as one piece, then bolt on a pre-assembled replacement wheel. This method is faster, requires fewer specialized tools, and eliminates the need for bead breaking. Choose this path if your rim is in good condition or if you want the simplest possible repair.
- Tire-Only Replacement (Requires Bead Breaking): Remove the tire from your existing rim by breaking the bead, then mount the new tire. This method saves the rim if it’s still functional and may be necessary if replacement wheel assemblies aren’t available for your specific model. This approach requires more tools and intermediate mechanical skill.
Tubeless vs. Tube-Type Tire Identification
Inspect your current tire to determine which type you have before purchasing a replacement. Tubeless tires have a valve stem inserted directly through the rim with no inner chamber. Tube-type tires contain a separate inner tube inside the tire cavity, and the valve stem is part of that inner tube. Tube-type tires require additional steps during removal and installation to properly handle the inner tube.
Tools and Materials Checklist
Gather all necessary tools before starting. Being prepared prevents mid-job delays and ensures you complete the repair safely.
Universal Tools (Both Methods)
- Socket wrench set or appropriate wrenches (sizing depends on your mower)
- Wheel chocks or blocks
- Flat-head screwdriver
- Owner’s manual (for torque specs and tire pressure)
- Tire pressure gauge
- Air compressor or CO2 inflator
- Soapy water in a spray bottle (for leak testing)
- Safety glasses and work gloves
Wheel Assembly Swap Tools
- Lug nut socket or wrench (for riding mowers and zero-turns)
- Pliers (for retaining clips and cotter pins on push mowers)
- Penetrating lubricant (for stuck wheels)
- Rubber mallet (for stubborn wheel removal)
Tire-Only Replacement Tools (Bead Breaking Path)
- Bead breaker tool (specialized tool for breaking the tire bead)
- Tire irons or tire spoons (for prying tire off rim)
- C-clamps or bar clamp (alternative bead-breaking method)
- Wheel dollies or wooden blocks (for stabilizing during work)
- Patching kit or plug kit (if planning to reuse rim)
- Replacement inner tube (if your tire is tube-type)
Finding the Correct Replacement Tire
Check three sources to confirm the correct tire size: your owner’s manual, the tire sidewall of your current tire (format typically reads like 20×10-8, 15×6-6, or similar), and the rim diameter measurement. Replacement tires must match the size designation, load rating, and type (tubeless or tube-type) of your original equipment.
Essential Safety Precautions
Working on a lawn mower involves mechanical hazards that require specific safety measures. Follow these precautions without exception to prevent injury.
- Engine and Ignition: Turn off the engine and allow it to cool completely. Disconnect the spark plug wire to prevent accidental starting. Remove the key and keep it in your pocket during the repair.
- Stabilization: Park the mower on a flat, stable surface such as a concrete driveway or garage floor. For riding mowers and zero-turn mowers, engage the parking brake firmly.
- Lifting Support: If you need to lift the mower to access wheels, use jack stands rated for the mower’s weight. Never work under a mower supported only by a hydraulic jack. Place wheel chocks on remaining wheels.
- Eye Protection: Wear safety glasses when using bead breakers, tire irons, or when inflating tires. Tire beads can snap unexpectedly during removal or seating.
- Proper Inflation: Never exceed the maximum inflation pressure marked on the tire sidewall. Inflate in small increments and check frequently with a gauge.
Method One: Full Wheel Assembly Replacement
This is the fastest and most straightforward approach. Time estimate: approximately 20-45 minutes for most home users.
Step 1: Deflate the Current Tire
Locate the valve stem on the tire. Remove the valve cap and press the valve core with a small tool or the back of the valve cap to release all air pressure. Wait until you hear no more air escaping. For tube-type tires, this process may take longer as the inner tube deflates.
Step 2: Remove Wheel Fasteners
For riding mowers and zero-turn mowers with lug nuts: Loosen the lug nuts slightly while the wheel is still on the ground. Then use a jack to lift the mower enough to spin the wheel freely, and remove lug nuts completely. Keep hardware organized for reinstallation.
For push mowers with retaining clips: Pull the retaining clip from the axle using pliers. Some push mowers use a castle nut secured by a cotter pin—straighten the cotter pin, remove the nut, and slide the wheel off the axle.
Step 3: Remove the Wheel
Slide the wheel straight off the axle. If the wheel resists, apply penetrating lubricant around the axle and wait five minutes. Tap the tire sidewall gently with a rubber mallet to break any rust or debris seal. Never strike the rim directly as this can cause damage.
Step 4: Inspect and Prepare the New Wheel
Compare the new wheel assembly to your removed wheel. Verify that the bolt pattern, center bore, and overall diameter match. Check that the new tire PSI rating matches your requirements. If the new tire is tubeless, inspect the valve stem for a factory-installed rubber stem or metal stem based on your rim type.
Step 5: Mount the New Wheel Assembly
Slide the new wheel assembly onto the axle, ensuring it seats fully against the hub. Hand-tighten fasteners in a star pattern to ensure even seating. Do not fully tighten at this stage.
Step 6: Torque to Specification
Consult your owner’s manual for exact torque specifications. If specifications are unavailable, general guidelines suggest tightening lug nuts on riding mowers to 50-75 foot-pounds, and push mower wheel bolts to 20-35 foot-pounds. Use a calibrated torque wrench for accuracy. Re-torque after the first 15 minutes of operation.
Step 7: Inflate and Verify
Inflate the tire to the pressure specified in your owner’s manual or on the tire sidewall. Use a tire gauge to confirm pressure. Perform a soap-and-water test around the valve stem and bead area to verify no air leaks. Reinstall the valve cap.
Method Two: Tire-Only Replacement with Bead Breaking
This method allows you to reuse your existing rim. Time estimate: approximately 45-90 minutes depending on experience and available tools. Note: Time estimates are approximate and vary based on user experience and specific equipment conditions.
Step 1: Remove the Wheel from the Mower
Follow Steps 1-3 from Method One to safely remove the wheel from your mower. This creates a stable work surface for the bead-breaking process.
Step 2: Deflate Completely
Remove the valve core entirely to ensure complete deflation. For tube-type tires, deflate the inner tube before attempting any bead work. The tire must be completely flat before breaking the bead.
Step 3: Break the Bead
The bead is the sealing edge where the tire meets the rim. Breaking this seal is necessary to remove and install tires.
Using a Bead Breaker Tool: Position the bead breaker blade between the tire and rim approximately two inches from the valve stem. Pump the handle to apply pressure and break the bead. Rotate the tire and repeat every 4-6 inches around the circumference. Complete one full rotation to break the outer bead, then flip the tire and break the inner bead.
Alternative: C-Clamp Method: Place two wooden blocks on a stable work surface. Position the tire so the rim edge rests on the blocks. Place a hardwood board across the tire sidewall near the rim edge. Apply a C-clamp between the board and a stable surface to force the tire bead away from the rim. Reposition and repeat around the tire.
Alternative: Vehicle Weight Method: Some users report using the weight of a vehicle to break particularly stubborn beads. This involves positioning the flat tire under a vehicle tire and driving forward slowly to apply pressure. Exercise extreme caution with this method as it can cause rim damage and injury if performed improperly.
Step 4: Remove the Old Tire
Lubricate the rim edge and bead area with tire-mounting lubricant or soapy water. Insert tire irons under the tire bead approximately 6 inches apart. Work one iron around the rim while using the second to hold the bead up. For tube-type tires, carefully extract the inner tube once the outer bead is loosened enough to access it.
Remove the old tire completely. Inspect the rim for signs of rust, corrosion, or structural damage. Minor surface rust can be cleaned with a wire brush, but bent or cracked rims must be replaced.
Step 5: Install the New Tire
Apply lubricant generously to the new tire bead and rim edge. Position the tire so the valve stem hole aligns with the valve stem on your rim. Begin working the tire onto the rim opposite the valve stem, using tire irons to work the bead over the rim edge. Work gradually around both sides until the tire is seated on the rim.
For tube-type tires: Install the inner tube first, partially inflating it to give it shape, then mount the tire over the tube. Ensure the tube is not pinched or bunched during tire installation.
Step 6: Seat the Bead
Inflate the tire in short bursts, checking the bead position after each burst. The bead should begin to seat against the rim as air pressure increases. Most lawn mower tires seat at 20-30 PSI. If the bead resists seating, tap the tire sidewall with a rubber mallet while continuing to inflate.
Perform a soap-and-water test around the entire bead circumference. Watch for bubbles indicating air leaks. If bubbles appear, deflate slightly, adjust the tire position, and reinflate.
Step 7: Reinstall the Wheel
Follow the reinstallation steps from Method One, Steps 5-7. Ensure the wheel seats properly against the hub and torque fasteners to specification. Inflate to the final PSI specification and verify with a leak test.
Tubeless vs. Tube-Type Tire Callout
For Tube-Type Tires: The inner tube adds complexity to the replacement process. When removing, extract the tube before attempting to pull the tire off the rim to avoid tearing the tube. When installing, ensure the tube sits flat inside the tire with no folds or bunching. Position the valve stem carefully to prevent the tube from shifting during installation. After seating the bead, check for tube pinch by ensuring smooth inflation without sudden pressure drops. Replace the inner tube if it shows signs of cracking, dry rot, or has been in service for more than two seasons.
PSI Reference Table by Mower Type
Always verify against your owner’s manual and the tire sidewall. The following ranges represent typical specifications but vary by manufacturer and tire model.
| Mower Type | Position | Typical PSI Range | Notes |
|---|---|---|---|
| Push Mower | Front Wheels | 14-20 PSI | Lighter load, smaller tires |
| Push Mower | Rear Wheels | 14-24 PSI | Driven wheels may carry more load |
| Riding Mower | Front Wheels | 14-20 PSI | Steering tires typically lower pressure |
| Riding Mower | Rear Wheels | 18-30 PSI | Higher load capacity, check load rating |
| Zero-Turn Mower | Front Wheels (casters) | 12-20 PSI | Small diameter, frequent turning |
| Zero-Turn Mower | Rear Wheels | 18-35 PSI | Drive wheels with high torque load |
Common Mistakes and Troubleshooting
Bead Won’t Seat
If the tire bead refuses to seat against the rim, deflate completely and verify the tire size matches the rim. Ensure you’re using proper tire-mounting lubricant on both the bead and rim edge. Try inflating to 40 PSI briefly to force the bead to seat, then release to proper inflation level. For stubborn beads, using a ratchet strap wrapped around the tire circumference and tightening while inflating can provide additional pressure.
Air Leak After Mounting
Leaks typically occur at the valve stem or bead edge. Spray soapy water around the valve core area—if bubbles appear, tighten or replace the valve core. For bead leaks, the tire may not be fully seated on that section of rim. Deflate, reposition the tire, and reinflate with lubricant applied to the problem area.
Wheel Wobbles After Reinstallation
Wobble indicates improper seating on the axle or uneven fastener tightening. Remove the wheel and inspect the axle for debris or damage. Clean the axle surface and wheel hub bore. Reinstall following the star-pattern tightening sequence and verify with a torque wrench.
Wrong Tire Size Purchased
If the replacement tire doesn’t fit, verify the size designation on the tire sidewall matches your application. Common formats include 20×10-8 (where 20 is overall diameter, 10 is section width, and 8 is rim diameter). Compare against your original tire and the specification in your owner’s manual. Most hardware stores accept unused tire returns within a reasonable period—keep your receipt.
Tube Pinched During Installation
A pinched inner tube will show rapid pressure loss after inflation. If this occurs, deflate completely and remove the tire. Inspect the tube for punctures at the pinch points. Replace damaged tubes rather than attempting repair on pinched areas. Apply ample lubricant to the tube surface before reinstalling to prevent pinching.
Final Checks After Replacement
- Verify all fasteners are torqued to specification and the wheel is secure
- Confirm tire pressure matches specifications using a quality tire gauge
- Ensure valve stem cap is reinstalled to prevent debris entry
- Check that the tire sits evenly on the rim with no visible lifting at the bead
- Re-torque lug nuts or wheel bolts after the first 15 minutes of mower operation
- Listen for unusual sounds during initial operation that might indicate wheel imbalance or loose hardware
Frequently Asked Questions
Can I replace a lawn mower tire without special tools?
Yes, if you choose the full wheel assembly swap method. This only requires basic hand tools like wrenches and a socket set. The tire-only replacement method requires a bead breaker and tire irons, which are specialized tools available at automotive supply stores or online.
How do I know if my lawn mower tire is tubeless or has a tube?
Examine the valve stem location. If the valve stem threads directly into a hole in the rim metal, you have a tubeless setup. If the valve stem is part of a rubber tube that sits inside the tire cavity, you have a tube-type tire. You can also deflate the tire and attempt to push the valve stem through the rim—if it pulls through easily, the stem is attached to an inner tube.
What happens if I over-inflate my lawn mower tire?
Over-inflation causes the tire sidewall to become rigid and reduces the contact patch with the ground. This leads to a harsher ride, increased vibration, and higher stress on the wheel assembly. More seriously, over-inflation increases the risk of sudden tire failure or bead unseating during operation. Always stay within the PSI range printed on the tire sidewall.
Should I replace both tires on the same axle at the same time?
While not always necessary, replacing both tires on the same axle ensures even wear characteristics, matching tire diameters, and consistent handling. If the remaining tire has significant wear, mixing old and new tires can cause handling issues, especially on riding mowers and zero-turn mowers where differential tire sizes affect turning behavior.