

Direct Answer: Are Lawn Mower Blades Reverse Thread?
Most residential lawn mower blades use standard right-hand threads, meaning they tighten clockwise and loosen counterclockwise. However, some mowers, particularly those with dual blades or commercial-grade equipment, use reverse threads on specific blade positions (typically the left side) to prevent the fastener from loosening during rotation. Always consult your mower’s manual before attempting blade removal or installation, as incorrect threading direction can strip threads, damage the blade, or create safety hazards.

Pros
- Large-size design named in product title
- Sharpening and balancing functions listed
- Listed as a new upgraded version

Pros
- Adjustable 15-to-45-degree range in title
- Sharpening and balancing functions listed
Pros
- Includes replacement gaskets and a 98079-55846 spark plug
- Matches Honda HRR216 and HRS216 lawn mower models
- Designed around the 16100-Z8B-901 carburetor specification
Cons
- Restricted to select Honda GCV160 mower applications
- Installation requires basic mechanical tools and skills
Understanding Lawn Mower Blade Threading
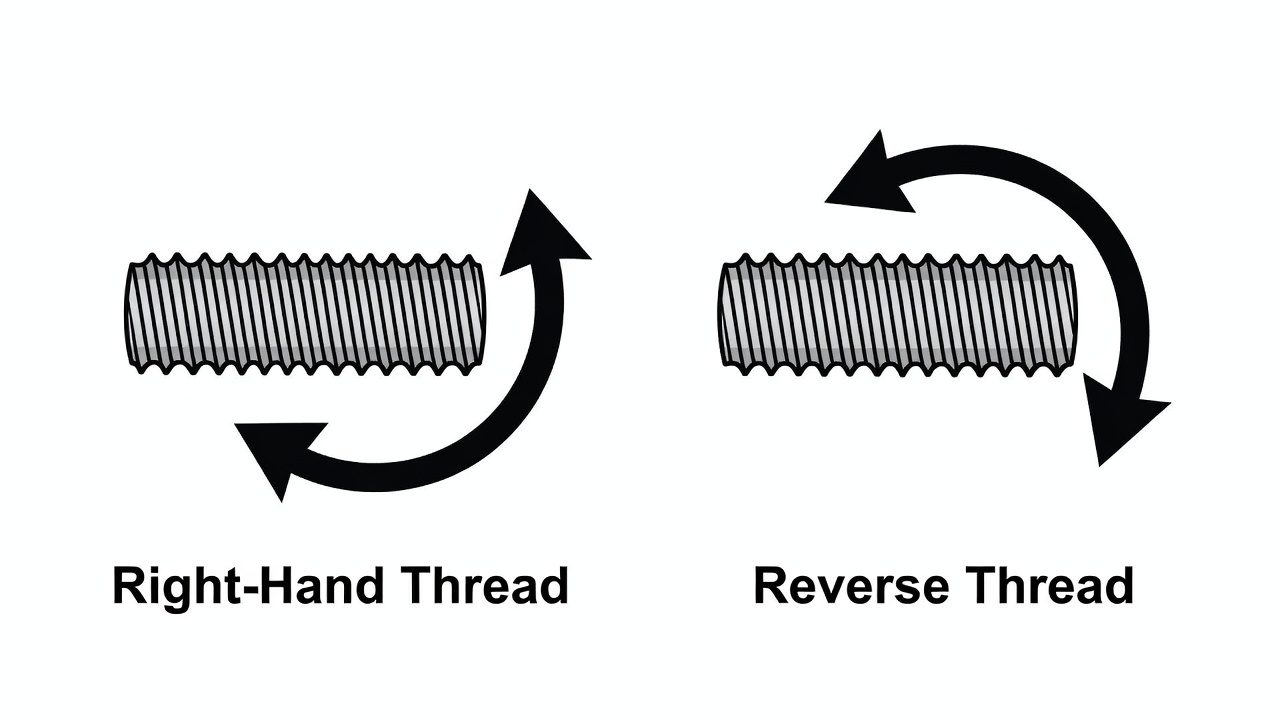
What Is Standard Right-Hand Threading?
Right-hand threading is the universal standard for most fasteners worldwide. On a right-hand threaded bolt:
- Tightening: Turn clockwise (righty-tighty)
- Loosening: Turn counterclockwise (lefty-loosey)
- Direction: The threads spiral upward when viewed from above
The vast majority of residential rotary lawn mowers use right-hand threads on blade fasteners. This is the default assumption for most homeowners and the standard found in most DIY repair guides.
What Is Reverse Threading and Why Does It Exist?
Reverse threading (also called left-hand threading) works opposite to standard threading:
- Tightening: Turn counterclockwise
- Loosening: Turn clockwise
- Direction: The threads spiral downward when viewed from above
Reverse threads exist for a specific engineering reason: preventing self-loosening on rotating components. When a blade spins at high speed (typically 3,000 to 4,000 RPM on residential mowers), centrifugal force and vibration naturally attempt to unwind standard right-hand fasteners. Reverse threads on one side of a dual-blade system counteract this force, keeping the bolt tight during operation.
How Does Blade Rotation Affect Fastener Loosening?
A spinning blade creates multiple forces that work against fastener security:
- Centrifugal force: Pushes the blade outward, creating tension in the bolt
- Vibration: From the blade striking debris and engine vibration
- Impact loads: When the blade contacts rocks, sticks, or debris
On a single-blade system, these forces are directional and relatively balanced. On dual-blade systems (common on zero-turn mowers and commercial equipment), the second blade rotates in the opposite direction. If both blades used right-hand threads, the second blade’s rotation would actively loosen its fastener. By using reverse threads on one blade, engineers ensure both fasteners remain equally secure. For troubleshooting and reliability insights, consult our in-depth z890 vs x870e motherboard report.
When Lawn Mower Blades Use Reverse Threads
Do Residential Rotary Mowers Typically Use Reverse Threads?
Most standard residential rotary mowers with a single blade use only right-hand threads. Single-blade systems don’t require reverse threads because the engineering challenge of self-loosening is minimal when only one blade rotates in one direction.
However, if your mower has a single blade but you’ve had persistent problems with the blade bolt loosening during operation, check your manual, some manufacturers add a secondary lock washer or use thread-locking compound instead of reverse threads to solve the problem. Readers comparing setup options can review our technical analysis on marshall stanmore iii vs harman kardon onyx studio 8.
Why Do Dual-Blade Systems Use Reverse Threads on One Side?
Dual-blade mowers (found on most zero-turn radius mowers, commercial walk-behinds, and some premium residential models) have two blades rotating in opposite directions beneath the deck. This design provides:
- Better cutting coverage and efficiency
- Reduced vibration compared to single-blade systems
- More consistent deck discharge patterns
The challenge: if both blades use right-hand threads, one blade’s rotation will naturally tighten its bolt while the other’s rotation will loosen it. Manufacturers solve this by using reverse threads on the left-side blade (or sometimes on both, depending on the rotation direction). This way, both blades’ centrifugal forces work to tighten their respective fasteners. For complementary field maintenance guidelines, examine our breakdown of dyson v8 cyclone vs bissell featherweight stick.
Critical detail: On dual-blade mowers, the left blade almost always uses reverse threads, while the right blade uses standard threads. This is industry standard, but you must verify with your specific mower’s manual.
Are Commercial Mowers More Likely to Have Reverse-Threaded Blades?
Yes. Commercial-grade mowers, particularly those with multiple blades, high RPM specifications, or heavy-duty applications, are more likely to use reverse threads because: To evaluate matched hardware tolerances, consult our detailed overview of bissell crosswave hydrosteam vs shark stainforce.
- They operate at higher speeds and for longer hours, increasing self-loosening risk
- Multiple-blade decks require precise fastener security
- Equipment downtime is costly, so fastener failure is unacceptable
- Professional operators need consistency and predictability across blade positions
If you operate or service commercial mowing equipment, assume reverse threads are present and always consult the manual.
How to Identify the Threading Direction on Your Mower
Where Can You Find Threading Information in Your Manual?
Your mower’s manual is the authoritative source. Look in these sections:
- Maintenance or Service chapter: Usually includes blade removal/installation procedures
- Blade assembly diagrams: May include threading direction icons or notes
- Torque specifications: Often listed alongside threading direction
- Parts diagram or exploded view: May indicate reverse threads with symbols or annotations
Many modern manuals include explicit instructions like: “Left blade uses reverse threads, turn clockwise to loosen.” If your manual is unclear, contact the manufacturer’s customer service with your mower’s model number.
What Visual or Tactile Clues Indicate Reverse Threading?
Without a manual, you can identify reverse threads through careful inspection:
- Inspection mark: Some manufacturers mark reverse-threaded bolts with paint, a groove, or an engraved line
- Bolt head markings: Reverse-threaded bolts occasionally have an “L” stamped into the head (for “left-hand”)
- Thread direction test: Visually inspect the bolt’s threads. Tilt the bolt so light hits the threads at an angle. Standard right-hand threads slope downward from left to right; reverse threads slope upward from left to right
- Position logic: If your mower has dual blades, the left blade almost certainly uses reverse threads
Warning: Do not rely solely on visual inspection. A bolt can look reverse-threaded due to lighting or viewing angle. Always verify with your manual or test carefully before applying force.
What Should You Do If Your Manual Is Unavailable?
If you’ve lost your manual:
- Contact the manufacturer: Provide your mower’s model and serial number (usually on the deck or frame). They’ll confirm threading direction in minutes
- Search online: Many manufacturers post manuals on their websites; search by brand and model number
- Try gentle force first: Attempt to loosen the bolt with a wrench using standard right-hand direction (counterclockwise). If it doesn’t budge with moderate pressure, try reverse (clockwise). Stop immediately if you feel grinding or resistance, this indicates you’re going the wrong direction and may strip threads
- Ask a professional: A mower repair shop can identify threading in seconds and won’t charge much for the consultation
Never force a bolt. Stripped threads are expensive to repair and create safety hazards.
Safe Blade Removal and Installation
What Tools and Safety Precautions Are Necessary?
Required tools:
- Wrench or socket set (size varies by mower; check manual)
- Blade holder or wooden block (to prevent blade rotation while loosening the bolt)
- Gasket scraper or wire brush (to remove rust or debris)
- Torque wrench (to properly tighten fasteners to specification)
- Shop rag or small container (to prevent losing fasteners)
Safety precautions:
- Disconnect the spark plug wires from both spark plugs to prevent accidental engine start
- Allow the engine to cool for at least 30 minutes
- Tip the mower properly: If accessing blades from underneath, tip away from the carburetor to prevent oil leakage (consult manual for correct tipping direction)
- Wear work gloves to protect against sharp blade edges
- Never reach underneath a running engine, ensure the mower is off and has cooled
- Mark the blade orientation with paint or marker before removal so you reinstall it correctly
What Is the Correct Removal Sequence for Dual-Blade Mowers?
For dual-blade mowers, follow this sequence:
- Disconnect spark plugs and allow the engine to cool
- Tip the mower safely away from the carburetor (refer to manual)
- Remove the right blade first (standard right-hand threads). Hold the blade steady with a block or holder, then turn the bolt counterclockwise to loosen
- Mark the blade orientation with paint (note which side faces up)
- Remove and inspect the right blade for damage, dulling, or cracks
- Move to the left blade and consult your manual to confirm reverse threads
- Hold the left blade steady and turn the bolt clockwise to loosen (reverse threading)
- Mark the left blade orientation similarly
- Remove and inspect the left blade
- Clean the mounting bolts and spindle of rust or debris before reinstalling
Reinstallation is the reverse process: Right blade uses counterclockwise to tighten (standard); left blade uses clockwise to tighten (reverse). Double-check threading direction before applying force.
How Do You Properly Torque Blade Fasteners After Installation?
Torque specification ensures the bolt is tight enough to prevent loosening but not so tight that it strips threads or cracks the spindle. Most residential mowers require:
- Blade bolts: 35 to 90 ft-lbs of torque (varies by manufacturer)
- Check your manual for the exact specification
Proper torquing procedure:
- Insert the blade with correct orientation (mark facing the same direction as before removal)
- Thread the bolt by hand in the correct direction (clockwise for right blade, counterclockwise for left blade if reverse-threaded) until you feel light resistance
- Use a torque wrench set to the manufacturer’s specification
- Tighten slowly and steadily, holding the blade still
- Stop when the torque wrench clicks or indicates the target value
- Do not over-tighten; this is a common cause of fastener and spindle failure
- Repeat for the second blade
If you don’t own a torque wrench, many auto parts stores will loan or rent one inexpensively, or a local repair shop can torque the blades for a small fee.
Common Mistakes When Working with Lawn Mower Blades
What Happens If You Turn a Reverse-Threaded Bolt the Wrong Direction?
Turning a reverse-threaded bolt counterclockwise (the standard loosening direction) will actually tighten it further. This creates several problems:
- Over-tightening: The bolt can become dangerously tight, crushing the blade or cracking the spindle
- Stripped threads: Excessive force can tear the threads inside the spindle, rendering it unusable
- Blade damage: Over-tightening can warp or crack the blade itself
- Frustration: You’ll feel increasing resistance and assume the bolt is stuck, when really you’re tightening it
If you experience unexpected resistance while attempting to loosen a bolt, stop immediately and verify the threading direction before continuing.
Why Is Over-Tightening Blade Bolts Dangerous?
Over-tightening creates multiple hazards:
- Blade ejection: If threads are stripped and the bolt fails during operation, the blade can eject at high speed, causing severe injury or death
- Equipment damage: Spindle cracks are expensive to repair and may total the mower
- Uneven blade contact: Warped blades cut unevenly, creating visible stripes in your lawn and requiring more frequent blade replacement
- Vibration increase: A loose or warped blade vibrates excessively, damaging the deck, frame, and engine mounts
Always torque to specification, never to a “feel” or guess.
How Can You Avoid Stripping Threads?
- Verify threading direction first: Confirm in your manual or with the manufacturer before applying force
- Start slowly: Turn the bolt by hand initially to ensure it’s threading smoothly
- Use the correct wrench size: An ill-fitting wrench can slip and strip the bolt head
- Don’t force a stuck bolt: If a bolt won’t move, apply penetrating oil (like WD-40) and wait 15 to 30 minutes before trying again
- Tighten gradually: Use a torque wrench and apply steady, even pressure rather than jerky motions
- Replace rusted bolts: If a bolt is heavily corroded, replace it with a new one rather than forcing the old one
- Use thread-locking compound on reinstallation: A medium-strength compound (like Loctite 243) can provide additional security and is compatible with both standard and reverse threads
Buyer FAQs: Are Lawn Mower Blades Reverse Thread Solved
Q: My mower has dual blades but I can’t find the manual. How do I know which blade uses reverse threads?
A: On virtually all dual-blade mowers, the left blade uses reverse threads and the right blade uses standard threads. This is industry standard. However, verify by contacting your mower’s manufacturer with the model number, it takes minutes and ensures you won’t damage your equipment. If you must proceed without confirmation, test the left blade gently: try turning the bolt counterclockwise with moderate pressure. If it doesn’t loosen and you feel resistance, switch to clockwise. Stop immediately if you feel grinding or metal-on-metal sounds.
Q: Can I use the same torque specification for both blades on a dual-blade mower?
A: Yes, in most cases. The torque specification is determined by the bolt size and spindle material, not the threading direction. However, some manufacturers may list different torques for left and right blades due to spindle differences. Always check your manual for any blade-specific torque values. When in doubt, use the same torque for both blades.
Q: If my blade bolt keeps loosening, does that mean I need reverse threads?
A: Not necessarily. A repeatedly loosening blade bolt usually indicates: (1) insufficient initial torque, (2) a missing lock washer, (3) the bolt is being over-tightened and then vibration loosens it slightly, or (4) the bolt or spindle is stripped. First, verify the torque specification and use a torque wrench. Second, ensure a lock washer or spring washer is under the bolt head. Third, apply thread-locking compound. If the problem persists, the bolt or spindle may be damaged and require replacement. Reverse threads are rarely the solution for a residential mower unless it’s a dual-blade system designed for them.
Q: What’s the difference between a lock washer and reverse threads?
A: A lock washer (or spring washer) is a simple, cheap way to prevent loosening through vibration. It compresses under the bolt head and exerts spring force to keep the bolt tight as vibration tries to loosen it. Reverse threads are an engineering solution for rotating dual-blade systems where centrifugal force actively tries to loosen one blade’s bolt. Many mowers use both: standard threads with a lock washer on the right blade, and reverse threads on the left blade of a dual-blade system. Lock washers are easier to install and adjust; reverse threads are permanent and more reliable on high-speed equipment.
Key Takeaways
- Most residential single-blade mowers use standard right-hand threads
- Dual-blade mowers almost always use reverse threads on the left blade to prevent self-loosening
- Always consult your mower’s manual before removing or installing blades
- Use a torque wrench and tighten to specification, never guess or over-tighten
- Mark blade orientation before removal to ensure correct reinstallation
- If unsure about threading direction, contact the manufacturer or a repair professional
- Improper blade fastening can cause blade ejection, equipment damage, and serious injury
Technical Standards and Compliance
Mechanical safety standards, operational tolerances, and protective gear guidelines align with benchmark specifications established by the American National Standards Institute (ANSI).









