

Quick Answer: How To Change Riding Mower Blades Without Removing Deck?
On many residential riding mowers and lawn tractors, you can replace blades from underneath without unbolting the cutting deck if you can safely raise and support the machine and reach each spindle with a wrench and both hands. Park on level ground, disable the engine, chock the wheels, and support the chassis independently. If clearance is unsafe, bolts are seized,…

Pros
- Large-size design named in product title
- Sharpening and balancing functions listed
- Listed as a new upgraded version

Pros
- Adjustable 15-to-45-degree range in title
- Sharpening and balancing functions listed

Pros
- Sharpener and balancer functions in title
- 15-to-45-degree adjustable setting listed
- Built for lawn mower blade maintenance
Pros
- Includes replacement gaskets and a 98079-55846 spark plug
- Matches Honda HRR216 and HRS216 lawn mower models
- Designed around the 16100-Z8B-901 carburetor specification
Cons
- Restricted to select Honda GCV160 mower applications
- Installation requires basic mechanical tools and skills
Can You Change the Blades Without Taking the Deck Off?
A blades-only job does not always require dropping the entire mower deck. On a typical home riding mower or lawn tractor, each cutting blade is held to a spindle with a center blade bolt and a small stack of washers or a blade adapter. If you can reach that hardware from below, you can usually swap the blades without unbolting deck hangers, linkages, or the belt cover.
That shortcut only works when three things are true at the same time. First, the chassis can be raised or the deck can sit low enough that you have room for a socket, a breaker bar, a block of wood to lock the blade, and both hands. Second, anti-scalp wheels, baffles, and packed grass do not block the bolt head. Third, the hardware will actually break free without twisting the spindle. Deck height, lift travel, and underside clutter vary widely by brand and generation, so treat this as a common residential method, not a promise that every zero-turn, rear-engine rider, or commercial unit has enough room. Readers comparing setup options can review our technical analysis on jbl partybox club 120 vs sony srs xv500.
Even when the blades themselves are reachable, some jobs still call for deck removal. Belt replacement, spindle-bearing work, a bent or badly rusted deck pan, leveling that needs the deck on the ground, or hardware so seized that you would damage the spindle from below are all reasons to stop the underside-only approach. Model-specific lift points, thread direction, washer order, and torque specification belong in the owner’s manual. Do not assume a neighbor’s tractor uses the same bolt, star center, or lift procedure as yours. Readers comparing setup options can review our technical analysis on jbl partybox club 120 vs sony srs xv500.
When the underside method is a reasonable choice
- You only need to replace worn or nicked blades, not service belts or spindles.
- The machine can be parked on firm, level ground and independently supported.
- After support, you can see each blade bolt and swing a wrench without pinning your arm against the deck lip.
- The replacement blades match the existing length, center-hole or star pattern, and cutting style.
When you should plan to drop the deck instead
- Hands or tools will not fit even with the chassis supported and the deck-height lever at its most helpful setting.
- A bolt is rounded, the spindle wobbles, or the blade adapter is cracked.
- You also need to inspect pulleys, replace a belt, or correct a deck that is cutting high on one side.
- The manual’s service procedure is to remove the deck for blade work, or the machine is too low-profile to support safely at home.
Safety Setup Before You Work Under the Mower
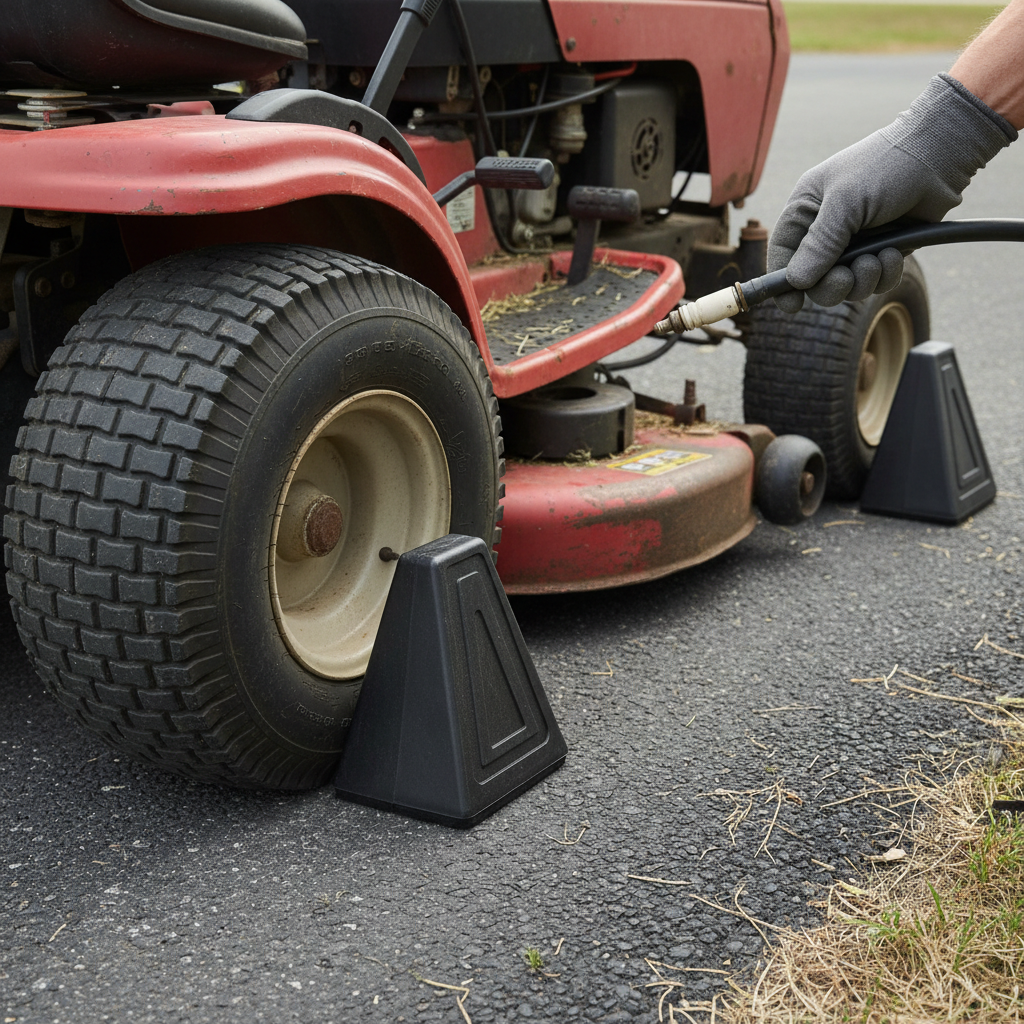
Working under a riding mower combines crush, cut, and accidental-start hazards. An unsupported chassis can drop. A dull-looking blade can still slice through a glove. A machine that can crank while you are under the deck can pull a hand into a spindle. Set the machine up so it cannot start, roll, or fall before any body part goes underneath.
Park outdoors or in a well-ventilated area on firm, level ground. Disengage the PTO, set the parking brake, and remove the key. Chock wheels that will stay on the ground so the mower cannot roll forward or back. Keep children, pets, and bystanders away for the whole job, not just while the engine is running. For complementary field maintenance guidelines, examine our breakdown of z890 vs x870e motherboard.
Prevent an accidental start. On most gasoline riding mowers, that means disconnecting the spark-plug lead and parking it where it cannot snap back onto the plug. Some machines also have battery, operator-presence, or fuel-related steps in the manual. Follow those instructions rather than inventing a universal electrical sequence. Do not rely on “I took the key out” as the only safeguard if the plug lead is still connected.
Never work under a mower that is held up only by a floor jack, a loader, a hydraulic lift, ramps with no additional stands, or the deck-height lever. Jacks can leak or kick. Ramps can shift. Deck lifts are for cutting height, not for holding the machine while you crawl under it. After you raise the chassis, transfer the load to rated jack stands under solid frame or axle points, then try to rock the machine gently from outside the danger zone before you go under it. To evaluate matched hardware tolerances, consult our detailed overview of marshall stanmore iii vs harman kardon onyx studio 8.
Wear sturdy gloves and eye protection. Treat every blade as sharp. Do not put fingers along the cutting edge to hold the blade still, and do not brace yourself on a neighboring blade. If the ground is soft, the mower is on a slope, you do not have stands that match the machine’s size, or you cannot get a stable three-point support, stop. A shop lift or a helper with proper equipment is safer than improvising with cinder blocks as the only support or stacking random lumber under sheet metal.
Pre-work checklist
- Level, firm surface; parking brake on; wheel chocks in place.
- Key removed; PTO disengaged; spark-plug lead disconnected and secured away from the plug.
- Any manual-required battery or fuel steps completed.
- Independent support under structural points; jack used only to place stands, then lowered so the stands carry the weight.
- Gloves, eye protection, and a clear exit path if the machine shifts.
How to Raise or Support the Mower So the Underside Is Reachable
You need practical clearance, not a dramatic lift. Enough room means you can seat a socket on the blade bolt, pull a breaker bar, wedge a wood block to lock the blade, and use both hands without your shoulders being trapped under the deck lip. Exact inches are not universal. Deck depth, tire size, anti-scalp wheels, and how far the blades sit inside the pan all change the gap. Check the jack, stand, ramp, and mower manuals for capacity and approved lift points instead of guessing a single height that fits every tractor.
Three access patterns are common on home machines. One is to drive or winch the mower onto purpose-built ramps, chock the remaining wheels, then place jack stands under the frame or axle so the ramps are no longer the only thing holding the machine. Another is to jack a specified or obviously structural frame or axle point just high enough to set stands, then lower the jack so the stands take the load. A third is to support the chassis first, then use the deck-height lever to drop the mower deck and open more gap at the blades. If you use that last trick, the chassis must already be independently supported. Do not lower the deck while the machine is balanced only on a jack. When planning workspace deployment, consider the engineering criteria outlined in our dyson v8 cyclone vs bissell featherweight stick guide.
Lift and support only on solid structure. Frame rails, a front axle tube, or other points the manufacturer identifies are the usual candidates. The stamped deck pan, plastic covers, pulleys, belt guards, and spindles are not lift points. Jacking on the deck can bend the pan, crack a spindle housing, or let the machine slip. After the stands are set, confirm the mower cannot roll or twist. Chock grounded wheels, keep the parking brake on, and avoid lifting one corner so high that the machine wants to pivot off a stand.
Before you touch a blade, look under the deck with a light. Note packed grass, wet clumps, wire or sticks wrapped on a spindle, missing anti-scalp wheels, oil or grease at a spindle, and whether each blade bolt is visible. Scrape or brush loose debris so you can see hardware order later. If a spindle already looks bent or the deck rim is crumpled into the blade path, this is no longer a simple underside swap. For additional operational safety benchmarks, see our published testing notes on bissell crosswave hydrosteam vs shark stainforce.
Support habits that keep the job conservative
- Use the jack only as a lifting tool, then immediately transfer weight to jack stands.
- Place stands under frame or axle structure, never under the mower deck or a spindle.
- Maximize gap with the deck-height lever only after the chassis is on stands.
- Test stability from outside the machine before putting your head or arms underneath.
- Leave yourself a way out; do not crawl fully under a narrow gap you cannot exit quickly.
Tools, Replacement Blades, and Hardware to Have Ready
Most underside blade changes are a hand-tool job. A socket set, a breaker bar or long ratchet, penetrating oil, a scraper or stiff brush, work gloves, eye protection, and a block of hardwood or a blade-holding tool cover the usual needs. A six-point socket is kinder to a rusty bolt head than a twelve-point that can round the corners. A torque wrench belongs on the list if the owner’s manual publishes a torque specification for the blade bolt. Do not assume one socket size or one tightness number fits every riding mower.
Match replacement blades to the machine, not to a generic “lawn tractor” bin. Check cutting width setup, blade length, thickness class if the manual lists one, and the center-hole shape or star pattern that indexes on the spindle or blade adapter. Mixing lengths on a multi-blade deck, forcing a round hole onto a star adapter, or pairing a mulching blade with a high-lift blade on the same deck can cause vibration, poor cut quality, or a blade that will not seat. Mulching blades and high-lift blades are not interchangeable just because they are the same length. Confirm the part using the blade stamp, the existing blade laid next to the new one, and the owner’s manual—not a guess from memory.
Photograph or lay out the hardware as it comes off. Many spindles hide a large flat washer, a star or spring washer, and sometimes a blade adapter or stiffener above the cutting blade. Those parts control how the blade sits and how clamp load reaches the spindle. Reuse them only if they are flat, uncracked, and not egg-shaped. A crushed washer, a rounded bolt, or a cracked adapter is a stop point. Replace damaged hardware with the correct OEM-equivalent parts rather than a random bolt from a drawer. Worn or incorrect fasteners are a common reason a newly installed blade comes loose.
If the spindle shaft is mushroomed, the threads are badly rusted, or the blade adapter no longer indexes, do not treat that as a blades-only job. A simple swap cannot fix a damaged spindle, and tightening a bolt into damaged threads will not make the cutting blade safe.
Remove the Old Blades From Under the Deck
Work one spindle at a time on a multi-blade deck. That keeps each washer stack with its own blade and reduces the chance you will mix timed or offset blades. Clean packed grass from the bolt head and the area where the blade meets the adapter so the socket seats fully.
Lock the blade so the spindle cannot spin while you loosen the bolt. Brace a wood block between the blade and the deck pan, or use a holder designed for that purpose. Do not hold the cutting edge with your hand. Do not jam a screwdriver into a pulley or belt; those can slip and scar the pulley or let the blade jump. Keep the lock on the body of the blade, away from the sharpened edge, and keep your other hand on the tool, not in the blade path.
Loosen the center blade bolt in the direction the manual specifies. If the manual is silent and you do not already know the thread direction, start with the common righty-tighty, lefty-loosey convention. If the bolt tightens instead of breaking free, stop and reverse direction. Do not assume every riding-mower blade bolt is reverse-thread. That is a model-specific detail, not a universal rule.
Stubborn bolts need patience more than force. Apply penetrating oil, wait, and use steady pressure on a breaker bar with the socket fully seated. Avoid heat on a machine that still has fuel, plastic, and grease nearby. Avoid impact methods that can crack a cast spindle housing or stretch the shaft. If the head starts to round, switch to a snug six-point socket and reassess. Rounding the bolt under the deck often means the deck should come off so you can work with better access—or the job should go to a shop.
Once the bolt is out, lower the washers and blade in order. Inspect the spindle shaft, the blade adapter, and the old blade. A bent blade, a missing chunk at the tip, a cracked sail, a wobbly spindle, or a shaft that is not round are all reasons to stop. Keep that spindle’s hardware in a labeled pile or bag. Repeat on the next blade only after the first stack is organized.
Some decks use blades that must return in a set orientation so their paths overlap correctly. If the manual or the old blades show timing marks, offset tips, or a left and right part number, note that before anything leaves the machine. Guessing overlap on a multi-blade deck is not a safe substitute for the manufacturer’s layout.
Install the New Blades in the Correct Orientation
Seat each new blade fully on the spindle or adapter before the bolt goes in. On a typical high-lift cutting blade, the sharpened edge leads in the direction of rotation and the cupped lift sail or blade wing faces up, toward the deck and spindles, so grass is lifted into the housing. Mulching blades and some Gator-style designs look different, so confirm with the blade stamp, any “this side toward deck” marking, and the owner’s manual. Installing a blade upside down reduces lift, can scrape the pan, and may let the blade loosen because the clamp faces do not meet as designed.
Restack washers, adapters, and the blade bolt in the same order they came off. The large washer or adapter usually sits against the blade; spring or star washers have a specific face direction if they were used from the factory. Do not add extra washers to “make up” for a blade that will not sit flush. If the center hole or star will not drop onto the spindle, you have the wrong blade—not a part that needs filing.
Tighten the bolt firmly enough that the blade cannot shift, then finish to the manufacturer’s torque specification when the manual provides one. Use a torque wrench for that final pass. Do not treat a guessed foot-pound number, or a vague “good and tight,” as equivalent to the spec. A breaker bar is for breaking rusted hardware free, not for inventing a tightness standard on reassembly. Under-torqued hardware can let a blade loosen and eject. Over-torqued hardware can stretch the bolt or crack an adapter.
Before you lower the machine, rotate each blade by hand—gloves on, spark-plug lead still disconnected—and confirm it clears the deck pan, neighboring blades, and anti-scalp wheels. Tips should not kiss each other or the baffle. If two blades on a multi-blade deck seem to occupy the same space, stop and check timing or part numbers instead of forcing a test run.
Lower the mower onto its wheels, remove stands and chocks only after it is stable on the ground, and reconnect the spark-plug lead last. Keep feet and hands clear of the mower deck. Start the engine in an open area, engage the PTO briefly, and listen for scraping or a heavy vibration. Shut down immediately if you hear metal contact or feel a shake that was not there before. Unbalanced blades, mixed lengths, a missing washer, or a failing spindle can all show up as vibration. Mixing one new blade with a heavily worn mate on the same deck is more likely to vibrate than replacing a matched pair or the full set.
When This Method Is Not Enough
Changing blades from below is only an access shortcut. It is not a complete deck service, and it is not worth forcing. Remove the deck—or have a shop do it—when you cannot support the machine safely, when hands will not fit, when a bolt will not break free without damaging the spindle, or when the spindle already wobbles.
Related repairs are poor candidates for a blades-only underside job. A glazed or jumped belt, a spindle that leaks grease, rusted baffles that sit in the blade path, a bent deck lip, and leveling problems all need more room and often a deck on the bench. Shops drop decks for those reasons even when the blade bolts are theoretically reachable: they can see the hardware, replace worn pulleys, and verify the deck is not twisted.
Professional service is the safer choice if you lack rated stands, if the mower is too heavy or low to lift without a shop lift, if hardware is rounded, or if you are not comfortable working under equipment. This article cannot eliminate crush or cut risk. Follow the owner’s manual for deck-removal steps if you go that route; those procedures are model-specific and are not covered here as a full tutorial.
Troubleshooting Underside Blade Changes
If the blade spins with the bolt, improve the lock rather than yanking harder. Reset the wood block so it wedges the blade against a solid part of the deck, or use a proper holder. A second person can steady the block from outside the deck while you stay on the wrench—still with the engine disabled and the machine on stands. Do not grab the cutting edge.
If the bolt head is rounding or the threads are frozen, add penetrating oil and time, confirm you are turning the correct direction, and use a fully seated six-point socket. Stop before you destroy the head. Drilling out a live spindle, homemade extractors, or heating near fuel and plastic are not reasonable home steps under a fueled riding mower. At that point, drop the deck for better access or take the machine to a shop that can replace the bolt and inspect the spindle.
If the new blade’s center hole or star center will not seat, do not file the spindle to fit. Filing removes the index that keeps the blade from spinning on the shaft. Get the correct blade for that adapter. Compare the old and new centers in good light; a similar-looking aftermarket hole is not always the same hole.
If the mower vibrates or cuts poorly after the swap, inspect before you keep mowing. Look for a missing washer, a blade that is not fully seated, mixed lengths, a bent new blade (they can arrive damaged), or a spindle that rocks in its housing. “Just run it until it balances” is not a fix. Scraping usually means a blade is upside down, a sail is hitting a baffle, or the deck is bent into the blade path.
If two blades seem to overlap unsafely, do not invent a timing procedure. Some decks need blades clocked to a factory diagram; others simply use matched parts that clear when installed correctly. Recheck part numbers, orientation, and the manual. If the geometry still looks wrong, leave the PTO off and get model-specific help.
Practical Limits to Keep in Mind
Residential riding mowers and lawn tractors often allow this from-below method because their decks hang with enough air under the pan once the chassis is on stands. Low-profile riders, some zero-turns, and decks crowded with extra baffles may not. Anti-scalp wheels can sit right where you want to swing a breaker bar. Wet, packed grass can hide a washer that must go back on. None of those problems is solved by lifting the machine higher on an unsafe support.
Keep the job inside its scope. You are replacing cutting blades, not rebuilding the spindle, and you are using the owner’s manual for torque specification, thread direction, lift points, and any battery or PTO disable steps that differ from the general sequence above. When clearance, rust, or damage push the work outside a straightforward swap, removing the mower deck—or stopping and using a qualified shop—is the correct next step, not a more aggressive underside technique.
For more hands-on benchmarks and buying recommendations, consult our guides on heavy-duty chainsaw buyer guide.
Mechanical safety standards, operational tolerances, and protective gear guidelines align with benchmark specifications established by the American National Standards Institute (ANSI).
For further specifications and verified tests, explore our breakdown of how much is a battery for a riding lawn mower.









