

Quick Answer: How To Clean A Carburetor On A Lawn Mower?
Cleaning a lawn mower carburetor involves removing it from the engine, disassembling it, and cleaning all components with carburetor cleaner and compressed air to remove varnish, gum, and debris that cause poor engine performance. The process requires basic tools, safety precautions, and attention to small parts. Regular cleaning can restore starting issues, rough idling, and stalling problems, potentially saving you…

Pros
- Targets common deposits such as carbon, gum, and varnish
- Useful across multiple intake and fuel-system cleaning applications
- VOC compliant across all 50 states
- Convenient 13 oz aerosol format for easy spray application
Cons
- Intended for unpainted metal parts, so it is not suitable for painted surfaces
- Aerosol spray can be less precise than a brush or pinpoint applicator in tight areas
- It is a cleaner, not a repair solution for worn or damaged engine components
Valvoline Carb, Choke & Throttle Body Cleaner, 13 oz is a spray cleaner made for routine maintenance of carburetors, throttle bodies, intakes, and similar engine components. The aerosol format is simple to use, and the formula is focused on removing deposit buildup rather than acting as a general purpose degreaser.
Its extra-strength solvent blend is designed to break down carbon, gum, and varnish so airflow and fuel delivery passages stay cleaner. That makes it a practical choice for addressing rough idle, sticking residue, and hard starting caused by buildup on unpainted metal parts. The VOC compliant, chlorinated-solvent-free formula is also a useful feature for buyers who want broader compliance coverage.
Considerations: this product is limited to cleaning, so it will not fix worn sensors, vacuum leaks, or other mechanical issues. It is also intended for unpainted metal surfaces, which means users should avoid applying it where the surface material is not compatible.
Verdict: this is a solid option for DIY users and technicians who want a straightforward carburetor and throttle body cleaner with broad compliance and strong deposit removal. It is best suited for maintenance and light restoration, not as a cure for deeper engine problems.

Pros
- Targets common carburetor buildup on key moving and airflow parts.
- Safe for catalytic converters and oxygen sensors according to the product description.
- Meets all state and federal VOC regulations as a 50-state formula.
- Useful for maintenance on carburetors and choke assemblies.
Cons
- It is a specialty cleaner, so it will not repair worn carburetor parts or mechanical issues.
- The 12 wt oz can size may be limiting for frequent or heavy cleaning tasks.
- Best suited to carburetor and choke cleaning rather than broader engine repair needs.
Overview: The CRC Clean-R-Carb Carburetor Cleaner 05379 is a carb and choke cleaner designed for routine fuel system maintenance. It focuses on cleaning the deposits that can interfere with airflow and throttle response, and its 50-state formula gives it broad regulatory compatibility.
Performance: According to the product details, it instantly dissolves buildup on venturi, linkages, butterflies, and PCV systems. That makes it a practical option for users looking to improve carburetor performance and keep older fuel systems running more cleanly. It is also described as harmless to catalytic converters and oxygen sensors.
Drawbacks: This is a cleaning chemical, not a mechanical repair product, so it will not fix worn jets, damaged gaskets, or other failing carburetor components. The 12 wt oz size may also be small for repeated or heavy-duty use, especially on badly neglected systems.
Verdict: The CRC Clean-R-Carb 05379 is a solid fit for drivers, hobbyists, and technicians who need a compliant carburetor cleaner for maintenance and light restoration. It is most valuable for users who want targeted cleaning without the added concern of harming catalytic converters or oxygen sensors.

Pros
- Broad tool assortment covers both fine passages and heavier residue removal.
- Stainless steel and reinforced nylon materials are designed for repeated use.
- Suitable for many small-engine and fuel-system cleaning jobs.
- Light, ergonomic tools are easier to handle during detailed maintenance.
Cons
- No storage case is mentioned in the product details, so organization may be less convenient.
- The listing does not provide needle or brush dimensions, so exact sizing for specific jets is unclear.
- This is a manual cleaning kit only and does not include carburetor cleaner fluid or replacement parts.
Overview & Design: The lasuroa Carburetor Cleaning Kit is a manual cleaning set built for small-engine maintenance. It combines stainless steel needles, nylon brushes, a scraper, and cleaning hooks in one compact kit, giving it a practical first impression for users who need a simple, multi-tool solution.
Performance & Key Features: Its main strength is reach. The fine needles and hooks are designed to access narrow carburetor jets, torch tips, and other tiny openings, while the nylon brushes help remove carbon, oil residue, and varnish buildup. The mix of tools makes it useful for motorcycles, ATVs, chainsaws, lawn mowers, welding torches, stoves, and similar equipment.
Drawbacks & Considerations: The product details do not list dimensions, so compatibility with very specific jet sizes is harder to confirm before purchase. There is also no storage case mentioned, and the kit does not include cleaner fluid or replacement carburetor parts, so it is best viewed as a cleaning accessory rather than a full repair solution.
Verdict: This kit is a solid fit for home users, DIY mechanics, and maintenance workers who want a reusable set of precision cleaning tools for small engines. If you need a budget-friendly carburetor cleaning kit with multiple manual tools, the lasuroa set offers good practical coverage.

Pros
- Very versatile kit for many small-engine and precision cleaning tasks.
- Includes both nylon brushes and thin metal wires for different levels of buildup.
- Useful for tight spaces and tiny jets thanks to the extra-thin copper needles.
- Portable, compact tool set with keychain-style attachments.
Cons
- Best for small passages and light-to-moderate cleaning, not a substitute for heavy restoration or ultrasonic cleaning.
- Thin wires and needles may bend if used too aggressively.
- No storage case or exact product dimensions are provided in the listing.
Overview: The Strongthium Carburetor Cleaning Kit is a compact multi-tool set built for cleaning carburetors, jets, nozzles, spray guns, and other small engine passages. The mix of nylon brushes, copper wire tools, and fine cleaning wires gives it a practical, workshop-ready feel.
Performance: With 5 short nylon brushes, 5 long nylon brushes, 13 cleaning wires from 0.4 mm to 1.6 mm, a copper wire brush, and 6 extra-thin copper needles, the kit is designed to reach dirt in tight channels that are difficult to clean by hand. It is especially useful for small-engine maintenance on equipment like motorcycles, lawn tools, generators, stoves, welders, and ATVs.
Drawbacks: This is a precision cleaning kit, so it is better suited to small openings and routine maintenance than to heavy carbon removal. The thin wire tools also require careful handling, since they can bend if forced into clogged passages too aggressively.
Verdict: For DIY users and technicians who frequently work on carburetors or small fuel and air passages, this kit offers strong versatility in a low-cost, portable format. It is most valuable as a detailed cleaning aid rather than a full repair solution.
Pros
- Wide mix of needles and brushes for small-detail cleaning tasks.
- Rust-resistant materials are better suited to workshop and garage use.
- Compact storage box improves portability and organization.
- Broad compatibility with many small-orifice maintenance jobs.
Cons
- This is a manual cleaning kit, so stubborn buildup may still require solvent, compressed air, or additional tools.
- Brush sizes are limited to 2 mm through 7 mm, which may not suit larger openings.
- Best for small passages and precision work, not heavy-duty or large-area cleaning.
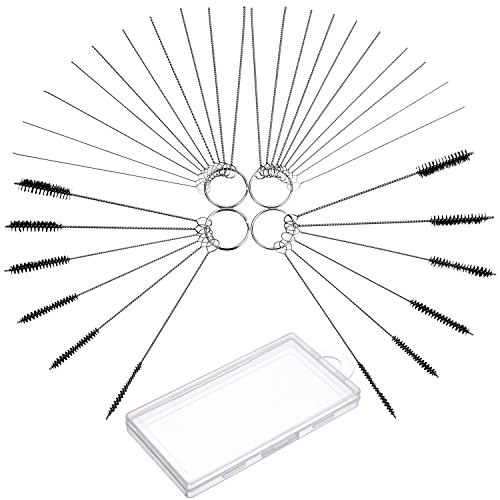
Overview: The Frienda 32 Piece Carburetor Cleaning Kit combines 20 stainless steel cleaning needles with 12 nylon tube brushes. It is built for precision cleaning and arrives with a storage box plus detachable key rings for easier organization.
Performance: The helical brush design and 2 mm to 7 mm brush range make the set practical for small passages such as carburetor jets, nozzles, firing holes, torch tips, and stove burners. The nylon and stainless steel materials are intended to resist rust and stay usable after repeated cleaning jobs.
Drawbacks: This kit is manual, so it works best on light to moderate debris and may need help from solvent or compressed air for tougher blockages. It is also focused on small openings, so larger components fall outside its main use case.
Verdict: For riders, mechanics, and DIY users who need an affordable, compact kit for detailed cleaning, this is a practical choice. It offers a useful mix of sizes and storage convenience, but it is best viewed as a precision maintenance tool rather than a heavy-duty cleaning solution.
Why Cleaning Your Lawn Mower Carburetor Matters
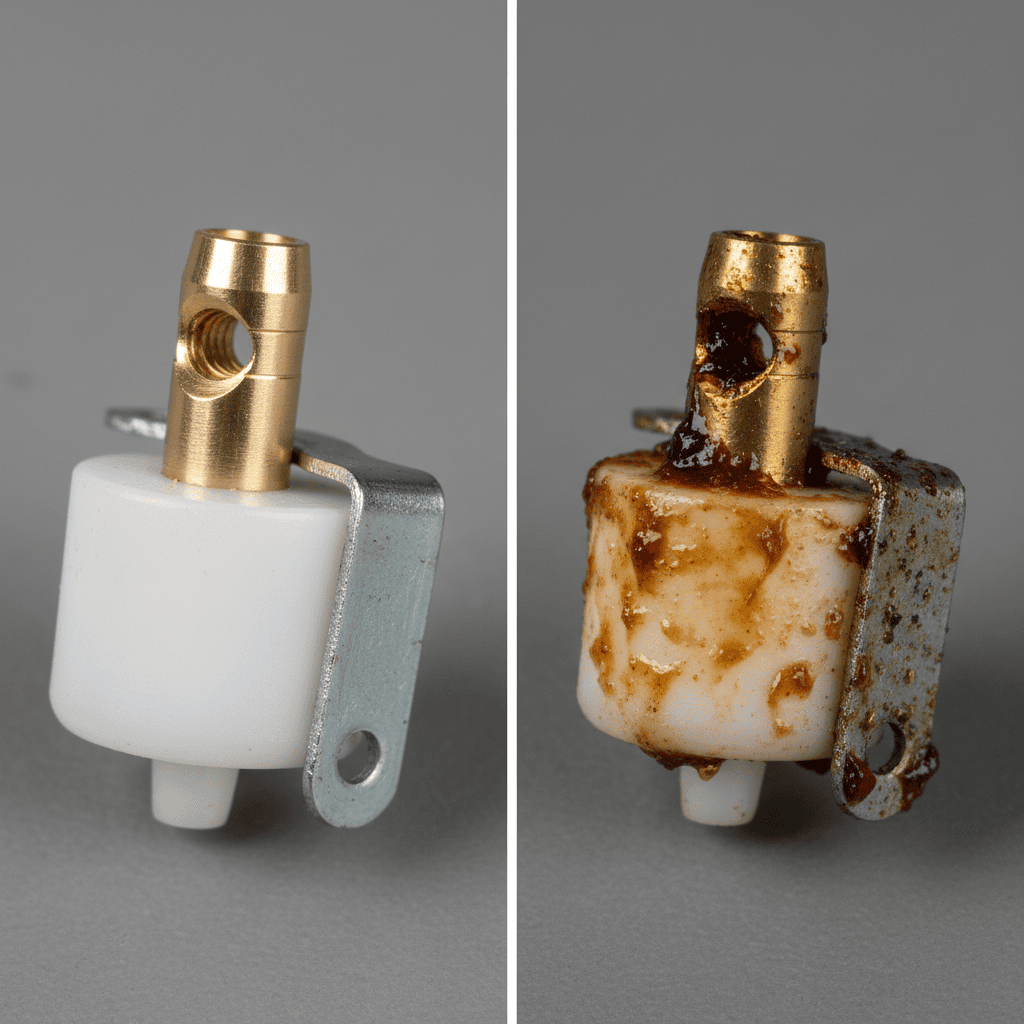
The carburetor is responsible for mixing air and fuel in the correct ratio for combustion. Over time, especially with modern ethanol-blended fuels, deposits can form inside the carburetor, disrupting this mixture and leading to performance issues.
What are the signs that a lawn mower carburetor needs cleaning?
- Difficulty starting: The engine may require multiple pulls or cranks to start.
- Rough idling: The engine runs unevenly or may stall when idling.
- Stalling under load: The mower may die when you engage the blades or push it through thick grass.
- Poor fuel efficiency: The mower consumes more fuel than usual.
- Black smoke: This indicates a rich fuel mixture due to a clogged jet.
How does a dirty carburetor affect lawn mower performance?
A dirty carburetor restricts fuel flow, leading to an imbalanced air-fuel mixture. This results in incomplete combustion, which reduces power, increases fuel consumption, and can cause engine damage over time. The buildup of varnish and gum from old fuel is the primary culprit.
When should you clean vs. replace a carburetor?
Cleaning is often the first and most cost-effective step. However, if the carburetor is physically damaged, has corroded beyond repair, or if cleaning doesn’t resolve the issues, replacement may be necessary. For most mowers, a thorough cleaning is sufficient to restore function.
Safety Precautions and Preparation
Before you begin, safety is paramount. Working with fuel and cleaning chemicals requires careful preparation.
What safety gear is needed when cleaning a carburetor?
- Safety glasses: To protect your eyes from fuel splashes and cleaning chemicals.
- Nitrile gloves: To protect your skin from harsh solvents.
- Work in a well-ventilated area: Fumes from carburetor cleaner and gasoline are harmful.
How should you prepare the lawn mower before starting?
- Disconnect the spark plug wire: This prevents accidental engine start-up.
- Drain the fuel tank: Use a siphon or fuel pump to remove as much fuel as possible.
- Place the mower on a stable, flat surface.
- Have clean rags and a container ready to catch any spilled fuel or small parts.
What are the risks of improper carburetor cleaning?
Risks include fuel fires, damage to delicate carburetor components (like gaskets and floats), and incomplete cleaning that leaves debris behind. Always follow the steps carefully and use the correct tools. Readers comparing setup options can review our technical analysis on z890 vs x870e motherboard.
Tools and Materials Needed for Carburetor Cleaning
Having the right tools makes the job easier and more effective.
What basic tools are required to remove and clean a carburetor?
- Socket or wrench set
- Screwdrivers (Phillips and flat-head)
- Needle-nose pliers
- Carburetor cleaner spray
- Compressed air can or air compressor with a blow gun attachment
- Small wire brush or old toothbrush
- Clean rags and paper towels
Which carburetor cleaning solutions work best?
A dedicated carburetor cleaner spray is essential. These are formulated to dissolve varnish, gum, and carbon deposits without damaging metal components. Avoid using generic degreasers, as they may leave residues or harm rubber seals. For complementary field maintenance guidelines, examine our breakdown of marshall stanmore iii vs harman kardon onyx studio 8.
Are there any specialized tools that make the process easier?
A carburetor adjustment tool can be helpful for fine-tuning after reassembly. A parts tray or magnetic mat is excellent for keeping small screws and components organized during disassembly.
Step-by-Step Carburetor Removal Process
Locating and removing the carburetor is the first major step. The exact location varies by mower model, but it’s typically found between the air filter housing and the engine intake. To evaluate matched hardware tolerances, consult our detailed overview of dyson v8 cyclone vs bissell featherweight stick.
How do you locate the carburetor on different lawn mower models?
Look for the component connected to the air filter on one side and the engine block on the other. It will have fuel lines and throttle/choke linkages attached.
What steps are involved in disconnecting fuel lines and linkages?
- Remove the air filter housing: This usually involves unscrewing a few bolts or clips.
- Disconnect the fuel line: Use pliers to slide the clamp back and gently twist the line off. Have a rag ready to catch drips.
- Disconnect linkages: Carefully note or take a picture of how the throttle and choke linkages are connected before disconnecting them.
- Unbolt the carburetor: Remove the mounting bolts that secure it to the engine.
How do you remove the carburetor without damaging surrounding components?
Work slowly and gently. Do not force any parts. If a linkage is stuck, check for a hidden clip or screw. Keep track of all gaskets, as they often need to be replaced. When planning workspace deployment, consider the engineering criteria outlined in our bissell crosswave hydrosteam vs shark stainforce guide.
Disassembling and Cleaning Carburetor Components
Once removed, you can disassemble the carburetor for a thorough cleaning.
How do you properly disassemble a carburetor?
- Remove the float bowl: This is the bottom cup-like part, usually held by a single bolt or screw.
- Remove the float and needle valve: These control fuel level. Be careful not to bend the float tab.
- Remove jets: The main jet and pilot jet are small, precision-drilled components. They are often located inside the float bowl or body.
- Remove any other removable parts like the choke plate or throttle shaft if possible.
Which parts typically need the most attention during cleaning?
- Jets: The tiny holes in these are most susceptible to clogging.
- Float bowl: Often contains sediment and varnish.
- Needle valve and seat: Debris here can cause flooding.
- All small passages and orifices in the carburetor body.
What cleaning techniques work best for different types of buildup?
-
li>For varnish and gum: Soak parts in carburetor cleaner for 15-30 minutes, then scrub with a brush.
- For clogged jets: Spray cleaner directly through the orifices. Use a thin wire (like a strand from a wire brush) only if absolutely necessary, and be extremely gentle to avoid enlarging the hole.
- For general grime: Use compressed air to blow out passages after spraying with cleaner.
Reassembly and Reinstallation
Careful reassembly is critical for proper function.
How do you ensure all carburetor parts are correctly reassembled?
Refer to the photos you took during disassembly. Ensure all gaskets are in place (replace if damaged). Reinstall parts in the reverse order of removal. Make sure the float moves freely and the needle valve seats properly.
What adjustments might be needed after reinstallation?
Most modern mowers have fixed jets and require no adjustment. However, if your carburetor has an adjustable idle screw, you may need to set it according to your engine’s specifications after the engine is warmed up.
How do you test the carburetor after cleaning?
- Reconnect the fuel line and fill the tank with fresh fuel.
- Reconnect the spark plug wire.
- Start the engine. It may take a few extra pulls to prime the system.
- Let it run for a few minutes, checking for leaks and smooth operation.
- Test under load by engaging the blades.
Maintenance Tips to Prevent Future Carburetor Issues
Prevention is easier than repair.
How often should you clean a lawn mower carburetor?
A good rule of thumb is to clean it at the start of each mowing season or every 50-100 hours of use. If you use your mower infrequently, cleaning it before storage and after storage is key.
What fuel additives help prevent carburetor buildup?
Fuel stabilizer is the most important additive. Add it to fresh fuel before storing the mower for more than a month. It prevents ethanol-related varnish and gum formation.
What regular maintenance practices reduce carburetor problems?
- Use fresh fuel: Don’t use gas that’s been sitting for more than 30 days.
- Run the carburetor dry for storage: Before winter, either run the engine until it stalls from lack of fuel or shut off the fuel valve and let it run dry.
- Change the air filter regularly: A dirty air filter can introduce dirt into the carburetor.
Frequently Asked Questions About How To Clean Carb On Lawn Mower
Can I use regular gasoline to clean a carburetor?
No. Gasoline is a fuel, not a cleaner. It will not dissolve varnish or gum effectively and is a fire hazard. Always use a dedicated carburetor cleaner spray.
What if my lawn mower still won’t start after cleaning the carburetor?
Double-check your work. Ensure the fuel line is connected, the spark plug is firing, and you haven’t pinched any gaskets. If it still doesn’t start, the issue may be with the ignition system or compression, not the carburetor.
Is it safe to use a wire to clean carburetor jets?
It should be a last resort. The holes in jets are precision-sized. Using a wire can easily enlarge or damage them, ruining the jet. Try compressed air and chemical cleaner first.
How much does it cost to clean a carburetor versus replace it?
Cleaning is essentially free if you have the tools and cleaner. A new carburetor for a typical walk-behind mower can cost anywhere from $20 to $80 or more, depending on the model. Cleaning is almost always the more economical first step.
Related Maintenance and Operating Guides
To keep your equipment running at peak operating efficiency, explore our related technical walkthroughs and maintenance tutorials:
- Consult our detailed breakdown on residential zero-turn lawn mower guide.
Technical Standards and Compliance
Mechanical safety standards, operational tolerances, and protective gear guidelines align with benchmark specifications established by the American National Standards Institute (ANSI).









