

Quick Answer: How to Clean a Riding Lawn Mower Carburetor
Disconnect the battery and fuel line, remove the air filter housing, then unbolt the carburetor from the engine. Disassemble the float, needle valve, and jets, soak all metal components in carburetor cleaner solvent for 20–30 minutes, and blow every passage clear with compressed air. Reassemble in reverse order, reinstall the carburetor, reconnect all lines, and test-start the engine.

Pros
- Large-size design named in product title
- Sharpening and balancing functions listed
- Listed as a new upgraded version

Pros
- Adjustable 15-to-45-degree range in title
- Sharpening and balancing functions listed

Pros
- Sharpener and balancer functions in title
- 15-to-45-degree adjustable setting listed
- Built for lawn mower blade maintenance
Pros
- Includes replacement gaskets and a 98079-55846 spark plug
- Matches Honda HRR216 and HRS216 lawn mower models
- Designed around the 16100-Z8B-901 carburetor specification
Cons
- Restricted to select Honda GCV160 mower applications
- Installation requires basic mechanical tools and skills
Why Clean Your Riding Lawn Mower Carburetor?
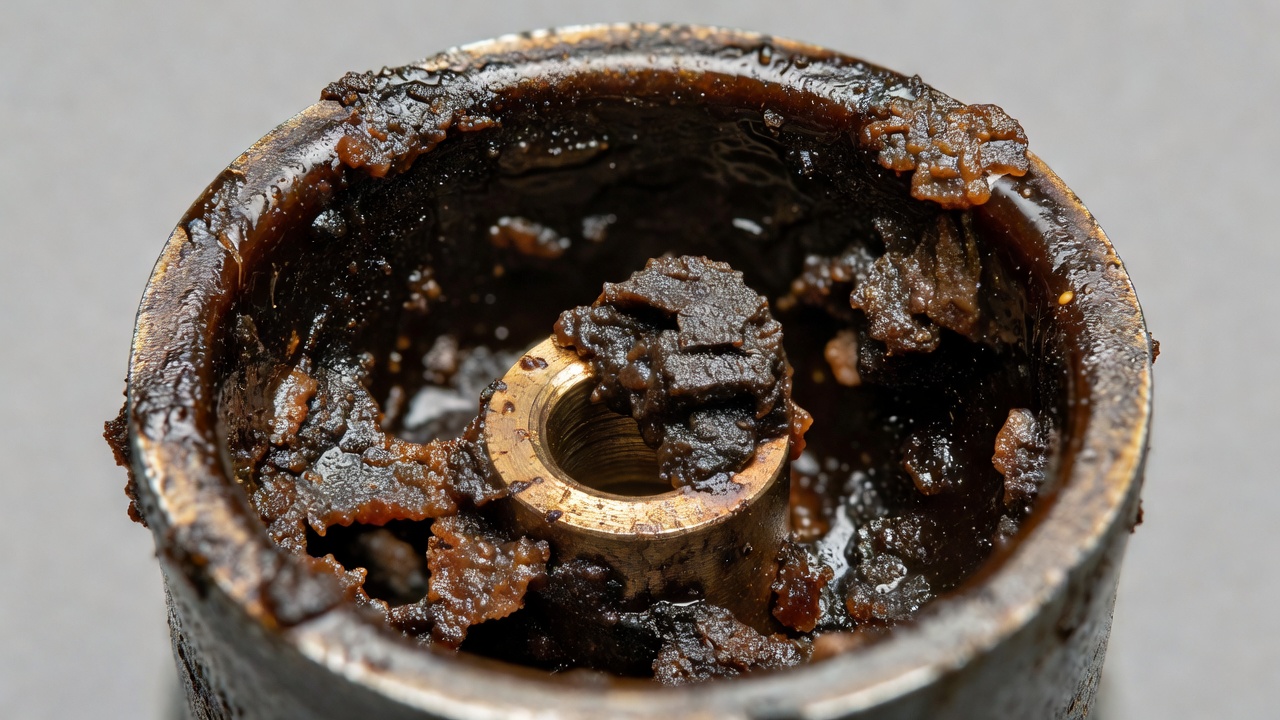
The carburetor mixes air and fuel in the precise ratio the engine needs to run. Over time — especially after sitting unused through winter — ethanol-blended gasoline breaks down and leaves behind a sticky varnish residue that clogs the tiny jets and passages inside the carburetor. Even partial blockage throws off the air-fuel mixture and causes noticeable performance problems.
Common Signs of a Dirty or Clogged Carburetor
- Hard starting or no-start: The engine cranks but won’t fire, or requires excessive choking.
- Rough idle or surging: The engine hunts up and down in RPM instead of holding a steady speed.
- Black smoke from the exhaust: Indicates a fuel-rich mixture caused by clogged air passages.
- Engine stalling under load: The mower cuts out when you engage the blades or climb a slope.
- Fuel leaking from the carburetor bowl: A stuck float or damaged needle valve lets fuel overflow.
Cleaning the carburetor resolves all of these symptoms when the root cause is varnish or debris buildup. It restores the correct air-fuel ratio, improves throttle response, and reduces fuel consumption. In most cases, a thorough cleaning costs under $15 in supplies and takes 60–90 minutes — far less than a shop visit or a full carburetor replacement. When planning workspace deployment, consider the engineering criteria outlined in our jbl partybox club 120 vs sony srs xv500 guide.
Safety and Preparation Before You Start
Working around gasoline and chemical solvents requires strict safety habits. Follow every step below before touching the carburetor. When planning workspace deployment, consider the engineering criteria outlined in our jbl partybox club 120 vs sony srs xv500 guide.
Essential Safety Precautions
- Work outdoors or in a well-ventilated garage. Carburetor cleaner solvent fumes are flammable and toxic. Keep a fire extinguisher rated for chemical fires (Class B) nearby.
- No open flames or sparks. Do not smoke. Turn off any gas-powered equipment in the vicinity.
- Wear nitrile gloves and safety glasses. Carburetor cleaner solvent is a skin and eye irritant. Fuel exposure carries its own risks.
- Let the engine cool completely before beginning — at least 30 minutes after last use.
- Disconnect the spark plug wire. Pull the wire off the spark plug and tuck it away so the engine cannot accidentally crank while your hands are near moving parts.
Tools and Supplies You Need
| Item | Purpose |
|---|---|
| Carburetor cleaner spray (aerosol) | Dissolves varnish and fuel deposits from external surfaces |
| Carburetor cleaner dip solution | Soaks and loosens heavy internal buildup on metal parts |
| Compressed air (can or compressor) | Blows debris out of jets and internal passages |
| Flathead and Phillips screwdrivers | Removes housing covers, bowl screws, and clamps |
| Combination wrench set (metric and SAE) | Unbolts carburetor mounting nuts |
| Needle-nose pliers | Removes fuel line clamps and the float pin |
| Small wire brush or old toothbrush | Scrubs external passages and bowl threads |
| Clean rags or shop towels | Wipes components dry and contains fuel spills |
| Small container or tray | Catches fuel when the bowl is removed |
| Carburetor rebuild kit (optional) | Replaces gaskets, O-rings, needle valve, and float if worn |
Note on solvent selection: Aerosol carburetor cleaners from brands such as Berryman B-12 Chemtool, Gumout Carb and Choke Cleaner, and WD-40 Specialist Carb/Throttle Body Cleaner are widely used for this task. For heavily varnished carburetors, a liquid dip solution (sold by Berryman and others) provides deeper penetration. Always read the product’s safety data sheet before use and ensure adequate ventilation as directed by the manufacturer.
Step-by-Step Guide to Removing the Carburetor
Carburetor location varies by mower brand and engine model (Briggs & Stratton, Kawasaki, Kohler, and Tecumseh are common), but the removal process follows the same sequence on virtually all riding mowers. Consult your engine’s service manual for model-specific torque specs and fastener locations. For additional operational safety benchmarks, see our published testing notes on z890 vs x870e motherboard.
Step 1: Disconnect the Battery
Open the battery compartment (usually under the seat or hood). Disconnect the negative (black) cable first, then the positive. This eliminates any risk of accidental ignition.
Step 2: Turn Off the Fuel Valve
Locate the fuel shut-off valve on the fuel line between the tank and the carburetor. Turn it to the OFF or CLOSED position. If your mower has no shut-off valve, use a fuel line pinch clamp to stop fuel flow before disconnecting the line. To compare alternative configurations, check our hands-on review of marshall stanmore iii vs harman kardon onyx studio 8.
Step 3: Remove the Air Filter Housing
Unscrew or unclip the air filter cover. Remove the foam or paper air filter element and set it aside. Remove the bolts or wing nut securing the air filter housing to the carburetor inlet. Lift the housing off — the carburetor is now exposed.
Step 4: Disconnect the Fuel Line
Use needle-nose pliers to slide the spring clamp back along the fuel line, then pull the line off the carburetor inlet fitting. Place a rag beneath to catch residual fuel. Have your small tray ready. Users looking for related component recommendations can explore our dyson v8 cyclone vs bissell featherweight stick breakdown.
Step 5: Disconnect the Throttle and Choke Linkages
The throttle and choke are connected to the carburetor via small metal rods or springs. Photograph the linkage arrangement with your phone before disconnecting anything — this photo is essential for reassembly. Carefully unhook the linkage rods from their mounting holes on the carburetor body using a screwdriver or needle-nose pliers.
Step 6: Unbolt and Remove the Carburetor
Two mounting nuts (typically 10mm) secure the carburetor to the engine intake manifold. Remove both nuts and slide the carburetor straight off the mounting studs. A gasket sits between the carburetor and the intake manifold — remove it carefully and note its orientation. If the gasket tears or shows compression damage, replace it with the correct part from a rebuild kit. Before finalizing equipment decisions, refer to our comprehensive bissell crosswave hydrosteam vs shark stainforce comparison.
Disassembling and Cleaning Carburetor Components
Work on a clean, flat surface. Keep all small parts together in a tray — the jets and float pin are tiny and easy to lose.
Step 7: Remove the Carburetor Bowl
The float bowl is the cup-shaped reservoir at the bottom of the carburetor. It is held on by a single bolt at its center or by one or two screws at its side. Place your tray beneath, then unscrew the bolt. Lower the bowl and drain any remaining fuel. Inspect the bowl interior for rust, water contamination (looks like a milky layer at the bottom), or dark varnish coating.
Step 8: Remove the Float and Needle Valve
With the bowl off, you will see the float — a hollow plastic or brass pontoon — hinged to a pin that spans two mounting posts. Use a small screwdriver or pin punch to push the float hinge pin sideways out of its posts. Lift the float away. The needle valve (also called the inlet needle) hangs beneath the float, held by a small clip or gravity. Pull the needle valve free gently. Inspect the rubber tip of the needle: if it has a groove or flat spot worn into it, replace the needle as part of a rebuild kit rather than reusing it.
Step 9: Remove the Jets
The main jet is typically a brass screw with a small hole drilled through its center, located at the base of the carburetor body where the bowl bolt passes through, or in the carburetor throat. Use a correctly sized flathead screwdriver — a loose fit will strip the soft brass head. Unscrew the main jet and set it aside. Some carburetors also have an idle jet (pilot jet); remove it the same way if present. Do not use wire or drill bits to enlarge jet holes — this permanently alters the fuel metering.
Step 10: Soak Metal Components
Place the carburetor body, bowl, main jet, and any other metal parts into a container of liquid carburetor dip solution, or spray them thoroughly with aerosol carburetor cleaner and let them soak for 20–30 minutes. Do not soak rubber parts, plastic floats, or O-rings — solvent degrades them. Keep those parts set aside on a clean rag.
Step 11: Clean All Passages with Compressed Air
After soaking, use short bursts of compressed air through every port, jet hole, and passage in the carburetor body. Hold the carburetor up to a light source and look through each jet hole — you should see light pass straight through a clean jet. Repeat the spray-and-air cycle on any passage that remains blocked. Use the aerosol carburetor cleaner spray tube to direct solvent precisely into stubborn passages. Never use wire, toothpicks, or drill bits to probe jet holes — even slight enlargement changes the calibrated fuel flow and will cause running problems.
Step 12: Scrub and Wipe All Surfaces
Use a small wire brush or old toothbrush to scrub the exterior of the carburetor body, the bowl interior, and the bowl mounting threads. Wipe everything dry with a clean rag. Allow all parts to air-dry for 5 minutes before reassembly to ensure no solvent remains trapped in passages.
Reassembling and Reinstalling the Carburetor
Reassemble in the reverse of disassembly. The photo you took of the linkage arrangement in Step 5 is essential here.
Step 13: Reinstall the Jets
Thread the main jet back into the carburetor body by hand first, then snug it with a screwdriver. Do not overtighten — brass jets strip easily. Firm resistance is sufficient.
Step 14: Reinstall the Needle Valve and Float
Clip the needle valve back onto the float tab or drop it into its seat. Set the float assembly into position over the mounting posts and push the hinge pin back through until it is fully seated and the float pivots freely. Check that the needle valve seats properly when you gently press the float upward — it should stop fuel flow at the correct float height. If your rebuild kit includes a new needle valve and O-ring for the bowl bolt, install them now.
Step 15: Reinstall the Bowl
If the bowl has a drain O-ring or gasket at its rim, inspect it for cracks or flattening and replace if needed. Set the bowl in place and thread the center bolt in by hand, then tighten snugly. Do not overtighten — the bowl is aluminum or zinc alloy and the threads strip easily.
Step 16: Reinstall the Carburetor on the Engine
Place the intake gasket onto the mounting studs, aligning it correctly. Slide the carburetor onto the studs and thread both mounting nuts on by hand. Tighten evenly — alternate between nuts in small increments to avoid warping the mounting flange and compressing the gasket unevenly. Reconnect the throttle and choke linkage rods by referencing your photo.
Step 17: Reconnect the Fuel Line and Air Filter Housing
Push the fuel line back onto the carburetor inlet fitting and slide the spring clamp into position to lock it. Turn the fuel valve back to the OPEN position. Reinstall the air filter housing and insert a clean air filter element — replace the filter if it is visibly dirty or damaged.
Step 18: Reconnect the Battery and Test-Start
Reconnect the positive battery cable first, then the negative. Reconnect the spark plug wire. Open the fuel valve fully. Engage the choke if the engine is cold, then attempt to start. Most mowers will start within two or three pulls or ignition attempts after a carburetor cleaning. Let the engine warm up for 2–3 minutes and check for fuel leaks around the bowl and fuel line fitting before mowing.
When to Clean vs. Replace the Carburetor
Cleaning resolves the majority of carburetor problems on riding mowers. However, cleaning is not effective in every situation. Replace the carburetor when:
- The carburetor body is cracked or warped. Cracks allow unmetered air into the intake and cannot be repaired reliably.
- Threads are stripped. A stripped bowl bolt thread or jet seat cannot hold proper fuel levels.
- The throttle shaft is worn. A loose throttle shaft causes an air leak that produces an uncontrollable lean condition regardless of how clean the jets are.
- Cleaning fails to resolve symptoms. If the engine still surges or stalls after a thorough cleaning and replacement of the needle valve and gaskets, the carburetor body itself is likely beyond serviceable condition.
Replacement carburetors for common riding mower engines (Briggs & Stratton, Kohler, Kawasaki) are widely available online for $15–$50 depending on the engine model — often less expensive than a full rebuild kit for a severely deteriorated unit. Compare the cost of a rebuild kit against a direct-replacement carburetor before committing to either path.
Frequently Asked Questions About How To Clean The Carburetor On A Riding Lawn Mower
How often should you clean the carburetor on a riding lawn mower?
Clean the carburetor once per season as preventive maintenance, or immediately whenever symptoms such as hard starting, surging, or stalling appear. If you store the mower for more than 30 days, drain the carburetor bowl or add a fuel stabilizer to the tank before storage — this prevents the ethanol-fuel varnish buildup that makes cleaning necessary in the first place.
Can you clean a riding mower carburetor without removing it?
Yes, for light buildup. Remove the air filter, spray aerosol carburetor cleaner directly into the carburetor throat while the engine is running at a low idle, and let the engine work the cleaner through the system. This method clears minor deposits from the throttle bore and accessible passages but cannot reach the bowl, float, jets, or internal channels. Full removal and disassembly is required for any significant varnish or clog.
What is the best carburetor cleaner for a riding lawn mower?
Aerosol sprays such as Berryman B-12 Chemtool and Gumout Carb and Choke Cleaner are effective for light-to-moderate deposits and for flushing passages during disassembly. For heavily varnished carburetors, a liquid dip solution provides longer contact time and more thorough penetration of internal passages. Always verify the product is safe for the materials in your specific carburetor (some plastics and rubber are sensitive to certain solvents) by reading the product label and safety data sheet.
Why is my riding mower carburetor leaking fuel after cleaning?
Fuel leaking from the bowl after reassembly usually means the bowl O-ring or gasket is damaged, the bowl bolt is not tight enough, or the needle valve is not seating correctly — allowing the float bowl to overfill and overflow. Remove the bowl, inspect the O-ring for cuts or compression set, and replace it. Check that the needle valve tip is smooth and undamaged and that the float moves freely without binding. If the float itself is cracked or has fuel inside it, it will not rise properly to shut off the fuel flow — replace the float.
For more hands-on benchmarks and buying recommendations, consult our guides on heavy-duty chainsaw buyer guide, as well as high-CFM commercial leaf blower guide, as well as durable ride-on lawn tractor guide, as well as automated robotic lawn mower guide.
Mechanical safety standards, operational tolerances, and protective gear guidelines align with benchmark specifications established by the American National Standards Institute (ANSI).









