How Do You Clean a Lawn Mower Carburetor? (Direct Answer)
To clean a lawn mower carburetor, start by disconnecting the spark plug wire and draining the fuel tank and fuel lines. Remove the carburetor from the engine, then disassemble the float bowl, jets, and needle and seat. Spray every component with carburetor cleaner to dissolve old fuel varnish and debris, and clear any clogged passages with compressed air or a thin wire. Reassemble the carburetor, reinstall it with a clean air filter, reconnect the fuel lines, and test the mower. If parts are badly worn or corroded, a carburetor rebuild kit or a replacement carburetor is often a better choice than cleaning alone.
Why Your Lawn Mower Carburetor Needs Cleaning
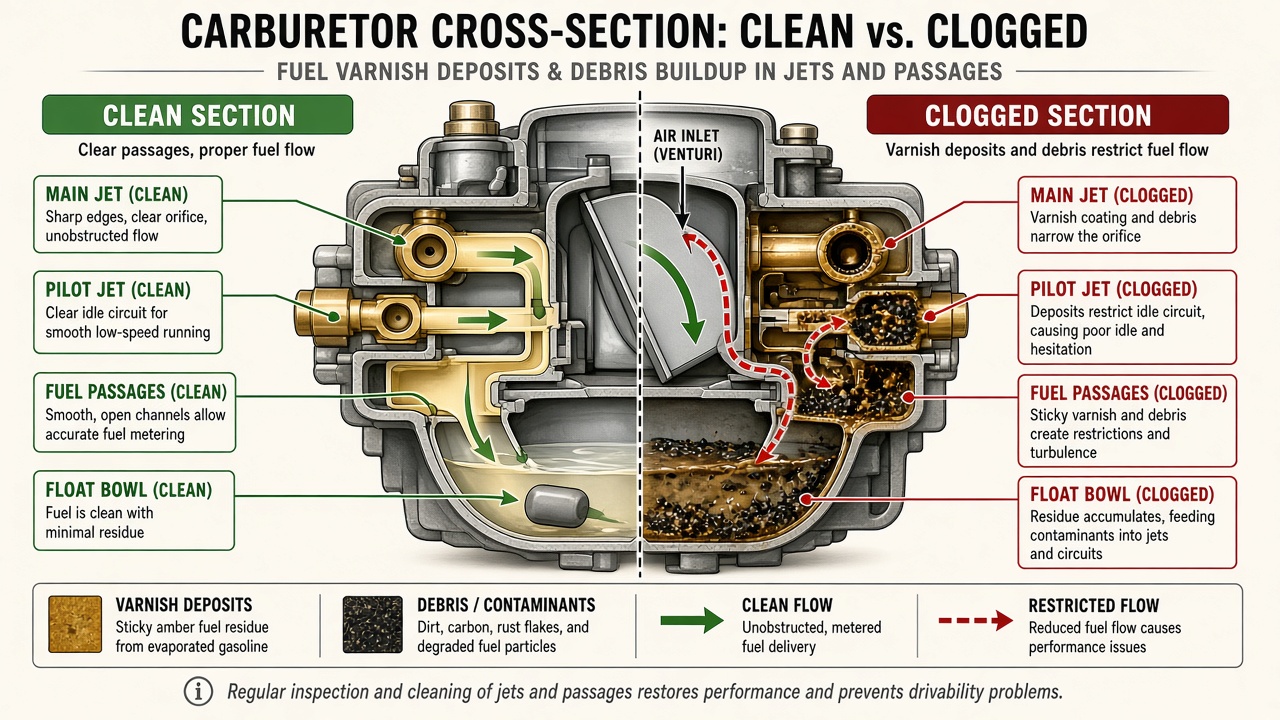
The carburetor is the part of a small engine that mixes air and fuel in the correct ratio before the mixture enters the cylinder. Over time, fuel evaporates and leaves behind a sticky, varnish-like residue. Dirt, dust, and debris from the fuel tank or air filter can also collect inside the carburetor. When these deposits build up, they block the tiny jets and passages that control fuel flow, making the engine hard to start, rough at idle, or prone to stalling.
Cleaning the carburetor removes this buildup and restores normal fuel delivery. It is one of the most common repairs for lawn mowers that have been sitting for months, especially after winter storage. In many cases, a thorough cleaning is all that is needed to get the engine running smoothly again.
Signs That Your Carburetor Is Dirty or Clogged
Before you remove the carburetor, look for these common symptoms of a dirty carburetor:
- Hard starting: The engine cranks but takes many pulls to fire, or it will not start at all.
- Rough idle: The engine runs unevenly, surges, or dies when you release the throttle.
- Stalling under load: The mower dies when the blade engages or when you mow thick grass.
- Black smoke or a strong fuel smell: This can indicate the float is stuck or the needle and seat are not sealing, causing too much fuel to enter the engine.
- Fuel leaks: Leaks around the carburetor or float bowl often mean a stuck float or damaged gasket.
- Poor performance after storage: Mowers that sat with old fuel in the tank commonly develop varnish-clogged jets.
Keep in mind that a dirty air filter, bad spark plug, or stale fuel can cause similar symptoms. Check those items first because they are quick and inexpensive to fix. If the mower still runs poorly, the carburetor is the next suspect.
Tools and Materials You Will Need
Gather the following items before you begin:
- Screwdrivers: Flathead and Phillips, in sizes that fit the carburetor and engine cover screws.
- Wrench set or socket set: For removing the carburetor mounting bolts and fuel bowl. Many small engines use 8mm, 10mm, or 12mm fasteners.
- Carburetor cleaner: A spray can of automotive or small-engine carburetor cleaner works well for dissolving varnish. Some brands come with a straw for precise spraying.
- Compressed air: An air compressor with a blow nozzle is ideal for clearing tiny passages. If you do not have one, a can of compressed air or a thin wire can work.
- Clean rags or shop towels: For wiping parts and catching spills.
- Small parts tray: A magnetic tray or egg carton helps you keep screws and small parts organized.
- Safety gear: Nitrile gloves and safety glasses protect your skin and eyes from fuel and cleaner.
- Fuel container: A approved gas can for draining old fuel.
- Replacement parts (optional): A carburetor rebuild kit with gaskets, an air filter, and a new spark plug are good to have on hand if you find damaged parts.
Step-by-Step Guide to Cleaning a Lawn Mower Carburetor
Step 1: Prepare the Mower Safely
Safety comes first. Work in a well-ventilated area, away from open flames, pilot lights, and sparks. Disconnect the spark plug wire and secure it away from the spark plug so the engine cannot accidentally start while you work. Remove the spark plug if you plan to turn the engine over or if you want easier access. Next, drain the fuel. You can siphon the old fuel out of the tank, or disconnect the fuel line from the carburetor and let the fuel drain into an approved container. If the fuel is old or smells like varnish, dispose of it properly and use fresh fuel when you refill.
Step 2: Remove the Carburetor
Depending on your mower, you may need to remove the air filter cover and air filter first to reach the carburetor. Take a photo with your phone before disconnecting anything so you remember how the parts and hoses go back together. Disconnect the fuel line from the carburetor inlet. Some fuel lines are held by a spring clamp; others use a small hose clamp that you can loosen with a screwdriver. Then disconnect the throttle linkage or governor linkage. These small rods and springs are easy to bend, so work gently and note their positions. Finally, remove the bolts or nuts that hold the carburetor to the engine intake manifold or cylinder. Lift the carburetor straight off and set it on a clean workbench.
Step 3: Disassemble the Carburetor
Place the carburetor on a clean surface and remove the float bowl. The bowl is usually held by a single bolt in the center of the bottom, or by a retaining clip. Have a small container ready because a little fuel may spill out. Once the bowl is off, you will see the float, the needle valve, and the main jet. Carefully remove the float by sliding out the hinge pin. The needle and seat can then be lifted out. Remove the main jet and any other jets you can access. On many lawn mower carburetors, the main jet is a small brass or aluminum part that unscrews from the center of the carburetor body. Do not force any part; if a jet is stuck, spray it with carburetor cleaner and let it soak for a few minutes before trying again.
Step 4: Clean the Carburetor Parts
Spray every part with carburetor cleaner, including the float bowl, the carburetor body, the jets, the needle and seat, and the gaskets. The cleaner dissolves fuel varnish and loosens dirt. For heavily gummed parts, place them in a small container, cover them with carburetor cleaner, and let them soak for 15 to 30 minutes. Never soak rubber or plastic parts in carburetor cleaner because the solvent can damage them. Remove the parts from the cleaner and rinse them with fresh cleaner or compressed air. Wipe the float bowl clean and inspect the gasket. If the gasket is cracked, hard, or compressed, replace it with a new one from a rebuild kit.
Step 5: Clear Clogged Passages
The tiny holes in the jets and the internal passages of the carburetor are the most common places for clogs. Hold each jet up to the light and look through it. If you cannot see light through the hole, it is clogged. Spray carburetor cleaner through the jet, then blow it out with compressed air. For stubborn blockages, use a very thin wire, such as a piece of wire from a twist tie or a specialized carburetor cleaning wire, to gently push the debris out. Do not use a drill bit or anything that can enlarge the hole, because the jet size is precisely calibrated and changing it will upset the air-fuel mixture. Also spray cleaner through the small passages in the carburetor body and blow them out with compressed air. Work in the direction opposite to normal fuel flow if possible, so debris is pushed out rather than deeper into the passage.
Step 6: Reassemble and Reinstall the Carburetor
Before reassembly, make sure every part is clean and dry. Install the main jet and tighten it snugly, but do not overtighten. Place the needle and seat back into position, then install the float and hinge pin. Check the float height if your service manual specifies a measurement; the float should sit level with the carburetor body when the needle is closed. Install a new float bowl gasket if the old one is damaged, then reattach the float bowl and tighten the retaining bolt or clip. Reinstall the carburetor on the engine and tighten the mounting bolts evenly. Reconnect the throttle and governor linkage exactly as shown in your photo. Reconnect the fuel line and make sure the clamp is secure. Install a clean air filter and reattach the air filter cover. Reconnect the spark plug wire last.
Step 7: Test the Mower
Refill the fuel tank with fresh gasoline. Turn the fuel valve on if your mower has one. Before starting, check for fuel leaks around the carburetor and fuel line connections. Start the engine according to your mower’s instructions. If the carburetor bowl was empty, you may need to pull the starter several times or prime the bulb to draw fuel through. Let the engine run for a few minutes and listen for a steady idle. Increase the throttle and engage the blade to confirm the engine does not stall. If the engine runs smoothly, the cleaning was successful.
Push Mower vs. Riding Mower: What Is Different?
The cleaning procedure is basically the same for push mowers and riding mowers because both use small carburetors with the same design principles. The main differences are access and size. On a push mower, the carburetor is usually exposed after removing the air filter cover, and the whole job can be done on a workbench. On a riding mower, the carburetor is often tucked under a shroud or between engine components, so you may need to remove additional covers, the battery, or other parts to reach it. Riding mowers may also have a fuel pump, a fuel filter, and more complex linkage. Take extra care when disconnecting the linkage, and label or photograph each part. If the mower has an inline fuel filter, replace it while you are working on the fuel system.
Troubleshooting Common Issues After Cleaning
The mower still will not start
If the mower will not start after cleaning, check the spark plug first. Remove it, inspect the electrode, and clean or replace it if it is fouled. Confirm that the spark plug wire is firmly connected. Then check for fuel delivery: disconnect the fuel line and see if fuel flows when the valve is open. If fuel does not flow, the tank vent or fuel filter may be blocked. If fuel flows but the bowl stays empty, the needle and seat may be stuck closed or the float may be misadjusted.
The engine starts but dies quickly
This usually means the carburetor is not getting enough fuel. The float bowl may not be filling, the main jet may still be partially clogged, or the float level may be too low. Remove the bowl and check that the needle moves freely and that the float is not sticking. Re-clean the jets and blow out the passages again. Also check the fuel cap vent; a blocked vent creates a vacuum that stops fuel flow.
The engine runs rich or floods
If the mower floods, smells strongly of fuel, or runs with black smoke, the needle and seat are probably not sealing. A worn needle, a dirty seat, or a float that is set too high will allow too much fuel into the bowl. Inspect the needle tip for wear and replace it if necessary. Clean the seat with carburetor cleaner and compressed air. Verify that the float moves freely and that the float height matches the specification for your engine.
There is a fuel leak from the carburetor
Leaks usually come from a damaged float bowl gasket, a stuck float, or a loose bowl screw. Replace the gasket, make sure the float is not punctured or saturated with fuel, and tighten the bowl screw evenly. If the leak continues, the carburetor body may be cracked and replacement is the safer option.
When to Rebuild or Replace Instead of Clean
Cleaning is not always the right answer. If the carburetor body is cracked, the throttle shaft is badly worn, or the threads for the mounting bolts are stripped, cleaning will not fix the problem. A carburetor rebuild kit is a good choice when the gaskets are leaking, the needle and seat are worn, or the float is damaged. These kits are inexpensive and include the gaskets, seals, needle, and sometimes the float. If the carburetor is severely corroded, has damaged threads, or is an older design with no available parts, replacing the entire carburetor is usually more practical. Replacement carburetors for common lawn mower engines are widely available and often cost less than the time spent trying to repair a badly damaged unit.
Maintenance Tips to Prevent Future Carburetor Clogs
- Use fresh fuel: Gasoline begins to degrade within a few weeks. Buy only what you will use in a month or two, and add a fuel stabilizer to keep it fresh.
- Run the engine dry before storage: At the end of the season, run the mower until the fuel tank and carburetor are empty. This prevents varnish from forming inside the carburetor.
- Drain the tank for long-term storage: If you will not use the mower for more than 30 days, drain the fuel tank and fuel lines or use a fuel shutoff valve to isolate the carburetor.
- Replace the air filter regularly: A dirty air filter lets dirt into the engine and carburetor. Check it every few mowings and replace it when it looks dirty.
- Keep the fuel clean: Use a clean fuel container and avoid leaving the fuel cap off. Dirt and water in the fuel are common causes of carburetor clogs.
- Clean the carburetor at the first sign of trouble: Do not let a rough-running mower sit for weeks. The longer varnish sits, the harder it is to remove.
Frequently Asked Questions
How often should I clean my lawn mower carburetor?
There is no fixed interval because it depends on fuel quality and storage habits. If you use fresh fuel, add a stabilizer, and run the carburetor dry before storage, you may go years without cleaning it. If the mower sits with old fuel in the tank for months, you may need to clean the carburetor every season. As a rule, clean the carburetor whenever the engine is hard to start, idles roughly, or stalls under load and the air filter and spark plug are already in good condition.
Can I clean a lawn mower carburetor without removing it?
You can spray carburetor cleaner into the carburetor intake while the engine is running, but this only cleans the outer passages and often does not remove varnish from the float bowl and jets. For a thorough cleaning, you must remove the carburetor, take it apart, and clean each component. A full removal and disassembly is the most reliable way to fix a clogged carburetor.
What is the best carburetor cleaner for lawn mowers?
Any quality spray carburetor cleaner designed for small engines or automotive use will work. Look for a product that dissolves varnish and gum and evaporates quickly. Aerosol cans with a straw attachment are convenient for directing the cleaner into small passages. For heavily gummed parts, soak them in a dip-style cleaner. Avoid soaking rubber, plastic, and gasket materials in aggressive solvents.
Why does my mower still not start after cleaning the carburetor?
If the mower still will not start, check the spark plug, spark plug wire, air filter, and fuel supply. Confirm that the fuel line is connected and the fuel valve is open. The carburetor may also have a stuck needle, an incorrectly adjusted float, or a jet that is still clogged. Remove the bowl and verify that fuel is present and that the jets are clear. If everything checks out, the problem may be unrelated to the carburetor, such as a faulty ignition coil or a valve issue.