Quick Answer: How to Fix a Lawn Mower Pull Cord
To fix a lawn mower pull cord, first identify whether the problem is a frayed or broken cord, a weak or detensioned recoil spring, or a stuck mechanism. If the cord itself is damaged, you can replace it by disassembling the recoil starter housing and threading new cord through the pulley—a 30-45 minute DIY job requiring only basic tools. If the recoil spring has lost tension or is damaged, retensioning or replacement may be necessary, though this requires more mechanical skill. For stuck or jammed mechanisms, cleaning and light lubrication often solves the problem.
Understanding the Pull Cord System
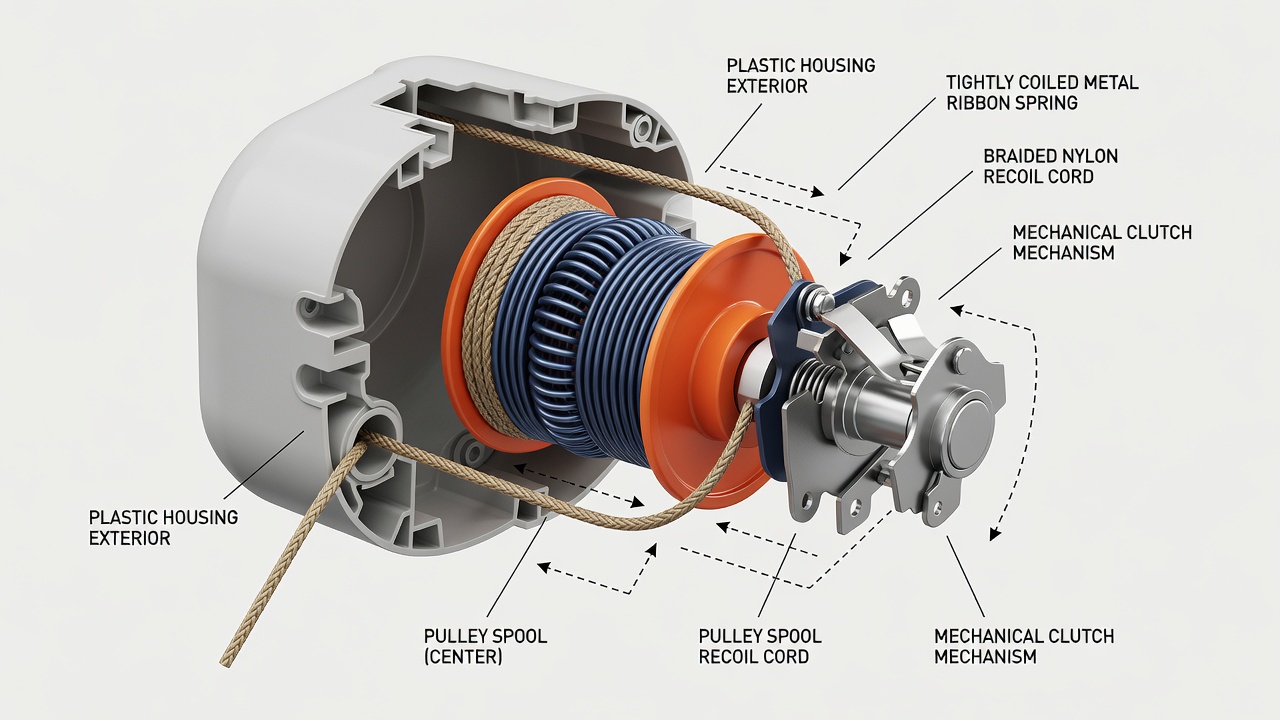
A lawn mower pull cord system consists of several interconnected parts that work together to turn over the engine. Understanding how these components function will help you identify exactly what’s gone wrong.
The recoil starter housing is the plastic or metal casing that contains the entire mechanism. Inside, a pulley sits at the center—this spool holds the cord and allows it to wind and unwind. A tightly coiled recoil spring (usually made of metal ribbon) is attached to the pulley and creates the tension that automatically rewinds the cord after you pull it. The pull cord itself is typically made of braided nylon or cotton, threaded through the housing and attached to a handle on the outside.
When you pull the cord, the pulley rotates, which engages a clutch mechanism that cranks the engine. Once you release the handle, the recoil spring automatically winds the cord back into the housing. If any of these components fails—the cord frays or breaks, the spring loses tension, or the pulley becomes stuck—you’ll notice difficulty pulling the cord or incomplete rewinding.
How to Diagnose Pull Cord Problems
Before you attempt any repair, accurately identify which component has failed. This diagnosis determines whether you’re looking at a simple 30-minute fix or a more complex internal repair.
Inspect the Cord Itself
Pull the cord out slowly and examine it along its entire length. A healthy cord should be intact with no fraying, splitting, or discolored sections. If you see:
- Fraying or unraveling strands—the outer braid is deteriorating, typically from age or sun exposure
- A visible break or snap—the cord has severed completely
- Soft or mushy sections—moisture damage or rot, common in mowers stored in damp conditions
- Stiffness or cracking—the cord has become brittle and may snap soon
If the cord shows any of these signs but feels like it pulls smoothly without resistance, the cord itself is the problem and needs replacement.
Test the Recoil Mechanism
Pull the cord out to full extension and release it. A properly functioning recoil spring should snap the cord back into the housing in about 1-2 seconds. If:
- The cord rewinds slowly or incompletely—the recoil spring has lost tension or is damaged
- The cord doesn’t rewind at all—the spring is broken or completely detensioned
- You feel resistance or grinding while pulling—the pulley or internal mechanism may be stuck or misaligned
Try pulling the cord multiple times. Consistent sluggish rewinding indicates a spring problem rather than a temporary jam.
Check for Mechanical Binding
If the cord pulls with difficulty or feels stuck partway through the pull, the problem is likely mechanical binding rather than a broken cord. Slowly pull the cord out and feel for the point of resistance. Try pulling from different angles. If the cord moves freely when you pull gently but binds when you pull hard, debris may be caught inside the housing, or the pulley may be slightly misaligned.
Examine the Handle
Look at the handle attachment point. If the handle is cracked, loose, or the cord is pulling away from the handle, this may be a separate issue from the cord or spring itself. A loose handle can create the illusion of a failing cord.
Step-by-Step Cord Replacement
Replacing a damaged pull cord is the most common DIY repair and typically takes 30-45 minutes with basic tools. This procedure works for most rotary lawn mowers with standard recoil starters.
Tools and Materials You’ll Need
- Screwdriver (flathead and Phillips, depending on your mower)
- Replacement cord (typically 3-4mm diameter nylon, 60-100 feet depending on mower size—check your manual or measure the old cord)
- Scissors or utility knife
- Needle or small hook (to thread new cord)
- Tape (masking or electrical tape)
- Small container (to hold screws as you remove them)
Disassemble the Recoil Starter Housing
Step 1: Locate all screws securing the recoil starter housing to the engine. Most lawn mowers have 3-4 screws. Remove them carefully and place in a container so you don’t lose them.
Step 2: Gently pull the housing away from the engine. Be cautious—the recoil spring is under tension and may try to snap the housing back into place. If the spring is still taut, hold the housing firmly and extract it slowly.
Step 3: Once removed, place the housing on a clean work surface. Look inside to see if the recoil spring appears intact and properly coiled.
Remove the Old Cord
Step 1: Locate where the cord is attached to the pulley (usually a knot or crimp on the inside). If the cord is knotted, carefully untie or cut through the knot.
Step 2: Unwind the old cord completely from the pulley spool.
Step 3: Look at how the cord exits the housing and exits through the handle. Note the routing so you can thread the new cord the same way.
Thread and Attach the New Cord
Step 1: Cut a length of new cord approximately 2-3 feet longer than the old cord (you’ll trim it to the correct length later). Seal the cut ends by briefly passing them through a flame to melt the nylon slightly and prevent fraying.
Step 2: Attach the new cord to the pulley using one of two methods: tie a tight knot around the pulley post, or (preferably) wrap the cord around the post and secure it with a figure-eight knot that won’t slip under tension.
Step 3: Carefully wind the cord onto the pulley in the same direction as the old cord wound. The cord should wrap tightly in concentric circles with no overlaps or gaps. Keep tension on the cord as you wind to ensure tight wrapping.
Step 4: Once the cord is wound on the pulley, route it through the exit hole in the housing, following the same path the original cord took.
Step 5: Thread the cord through the handle (or attach the handle to the cord if the cord passes through an eyelet). Tie a knot inside the handle that is large enough not to slip through the eyelet, or use a crimp if your handle design includes one.
Reassemble and Test
Step 1: Carefully position the recoil starter housing back onto the engine, ensuring the cord routes correctly and doesn’t get pinched.
Step 2: Reinstall the screws and tighten them firmly but not excessively—over-tightening can crack the plastic housing.
Step 3: Test the cord by pulling it out smoothly to full extension and releasing it. The cord should retract quickly and the handle should snap back into place. If the cord doesn’t retract smoothly, the recoil spring may need attention (see below).
Step 4: Once you’re satisfied the cord works, trim any excess cord at the handle and seal the end by melting it slightly.
Fixing Recoil Spring and Tensioning Issues
If your pull cord retracts slowly or incompletely, the recoil spring is likely the culprit. Recoil springs operate under considerable tension and require careful handling.
Understanding Spring Detensioning
A recoil spring loses tension when it becomes uncoiled, usually due to age, repeated stress, or because the pulley was spun backward (which unwinds the spring). When this happens, the spring can no longer create the force needed to retract the cord quickly.
Retensioning a Recoil Spring (Advanced DIY)
If the spring is intact but has lost tension, you can retension it—though this requires caution, as the spring is under significant force and can snap back suddenly if mishandled.
Step 1: Disassemble the recoil starter housing as described above.
Step 2: Locate the end of the spring that attaches to the housing (not the end attached to the pulley). This is usually a hook or slot at the outer edge of the housing.
Step 3: Gently lift the pulley slightly to create slack in the spring. Using a screwdriver or hook, carefully extract the spring’s outer end from its attachment point.
Step 4: Slowly rotate the pulley in the direction that tightens the spring (typically counterclockwise when viewed from above). Rotate in quarter-turn increments and periodically test the retraction tension by allowing the pulley to snap back.
Step 5: Once the spring tension feels similar to a properly functioning mower, re-engage the spring’s outer end in its attachment slot and reassemble the housing.
Important: Handle the spring carefully—it can pinch fingers or snap unexpectedly. If at any point you feel uncertain or the spring doesn’t cooperate, stop and consider professional service.
When to Replace Instead of Repair
If the recoil spring is visibly cracked, broken, or extremely rusty, replacement is necessary. Spring replacement is more complex than cord replacement and typically requires:
- Complete disassembly of the recoil starter
- Removal of the pulley (which may involve removing the flywheel in some designs)
- Careful extraction of the old spring (which will likely snap or crumble if very old)
- Installation of a new spring kit with correct tension and attachment
Many homeowners find spring replacement beyond their comfort level. Professional service typically costs $75-$150 for a spring replacement, compared to $0-$20 for cord replacement materials.
Clearing Stuck or Jammed Pull Cords
If your cord pulls with resistance or feels stuck, the problem may be mechanical binding rather than a broken cord or spring.
Identify the Point of Binding
Slowly pull the cord out and feel carefully for where the resistance begins. If the cord pulls smoothly for the first half and then binds, the obstruction is deeper in the mechanism. If it binds immediately, the issue is likely near the exit hole or handle.
Clean Debris from the Housing
Small bits of cord, dirt, or grass clippings can accumulate inside the recoil starter housing over time and cause binding.
Step 1: Remove the recoil starter housing as described above.
Step 2: Use a compressed air can or shop vacuum to blow out any visible debris from the housing interior, the pulley area, and the spring coils.
Step 3: Inspect the cord exit hole in the housing. If it’s rough or has debris stuck to it, gently clean it with fine sandpaper or a small file.
Step 4: Reassemble and test.
Lubricate Moving Parts
The pulley shaft and spring pivot points may benefit from light lubrication.
- Use a lightweight machine oil or silicone spray—do not use heavy grease, which attracts dirt and can gum up the mechanism
- Apply sparingly to the pulley shaft and spring attachment points
- Avoid lubricating the cord itself; oil-coated cord can slip on the pulley or deteriorate faster
- Reassemble and test, pulling several times to distribute the lubricant
Check for Pulley Misalignment
If the pulley is slightly bent or misaligned, it can drag against the housing interior. If you suspect this, the housing will need to be disassembled and the pulley inspected for bending or damage. A bent pulley typically requires replacement of the entire recoil starter assembly.
When to Repair vs. Replace or Seek Professional Help
What DIY Repairs Are Realistic
Cord replacement is a straightforward DIY task suitable for anyone comfortable with basic tool use. Cleaning debris and light lubrication are also beginner-friendly. Retensioning a recoil spring is intermediate-level and requires careful attention to safety.
When to Seek Professional Service
Consider professional repair if:
- The recoil spring is visibly broken or severely rusted—replacement requires specialized knowledge and tools
- The pulley is bent or damaged—the entire recoil starter assembly typically needs replacement
- You feel unsafe handling the tensioned spring—a professional can manage this risk
- Your mower has an unusual or proprietary recoil starter design—manufacturer-specific repairs may require specialized parts
Repair vs. Replace: Cost Considerations
For most lawn mowers, a DIY cord replacement costs $5-$15 in materials and takes less than an hour. Professional cord replacement typically costs $75-$150. If your mower is older or has high replacement value to you, the repair investment makes sense. If the mower is inexpensive and showing other signs of wear, buying a new mower may be more economical than investing in multiple repairs.
Preventive Maintenance to Extend Life
To avoid future pull cord problems:
- Store the mower indoors or under cover to protect from UV exposure and moisture
- Use smooth, steady pulling motions rather than aggressive jerking, which stresses the cord and spring
- Never force a stuck cord—stop and diagnose the problem instead of applying excessive force
- Keep the recoil starter area free of grass clippings and debris by cleaning after each mow
- Consider a cover for the mower during off-season storage to protect the recoil starter from dust and insects
Frequently Asked Questions
How much does a replacement pull cord cost, and where do I buy one?
A replacement pull cord costs $5-$20, depending on length, diameter, and material quality. Purchase cord from lawn mower parts retailers (online or at local shops), home improvement stores, or from the mower manufacturer. Most retailers sell universal cord that works across multiple mower brands. Measure your old cord or check your mower’s manual for the correct diameter (typically 3-4mm) and length (usually 60-100 feet).
Can I fix a pull cord that won’t pull hard enough to start the engine?
If the cord pulls but feels weak or sluggish, the recoil spring has likely lost tension. A weak spring can reduce the force you’re able to exert, making it harder to crank the engine. This is different from a cord that’s stuck—you can still pull it, but it doesn’t feel snappy. Retensioning the recoil spring (if you’re comfortable doing so) or professional service can restore the proper snap. Alternatively, ensure the engine isn’t flooded or fouled with old fuel, which can also make starting difficult regardless of pull cord strength.
Is it dangerous to work on the recoil spring myself?
The recoil spring operates under significant tension and can snap or pinch fingers if mishandled. If you choose to retension a spring, work slowly, use tools to maintain distance between your hands and the spring, and never force or rush the process. If the spring is cracked or broken, it’s best left to a professional. Always keep your face and hands clear of the pulley area when releasing tension, as the spring can snap back suddenly.
Why does my pull cord keep getting stuck in the same spot?
Consistent sticking at the same point suggests debris caught at that location inside the housing, or a rough spot in the cord exit hole. Disassemble the housing, inspect the area, and clean out any debris. If the exit hole is rough or jagged, sand it smooth. If the cord itself has a frayed section at that spot, you may need to trim and seal the cord or replace it entirely. If sticking persists after cleaning, the pulley may be slightly misaligned or bent.