Direct Answer: How to Put String on a Weed Eater
To put string on a weed eater, remove the trimmer head by twisting it counterclockwise, unwind any old string, insert new trimmer line through the feed holes in the spool (typically two holes), wind the line tightly around the spool in the direction indicated by the arrow, leave 4–6 inches of line extending from each hole, and reinstall the head by twisting clockwise until snug. The exact process varies slightly by brand and head design, but these fundamentals apply to most gas, cordless, and corded trimmers.
Understanding Your Weed Eater Trimmer Head
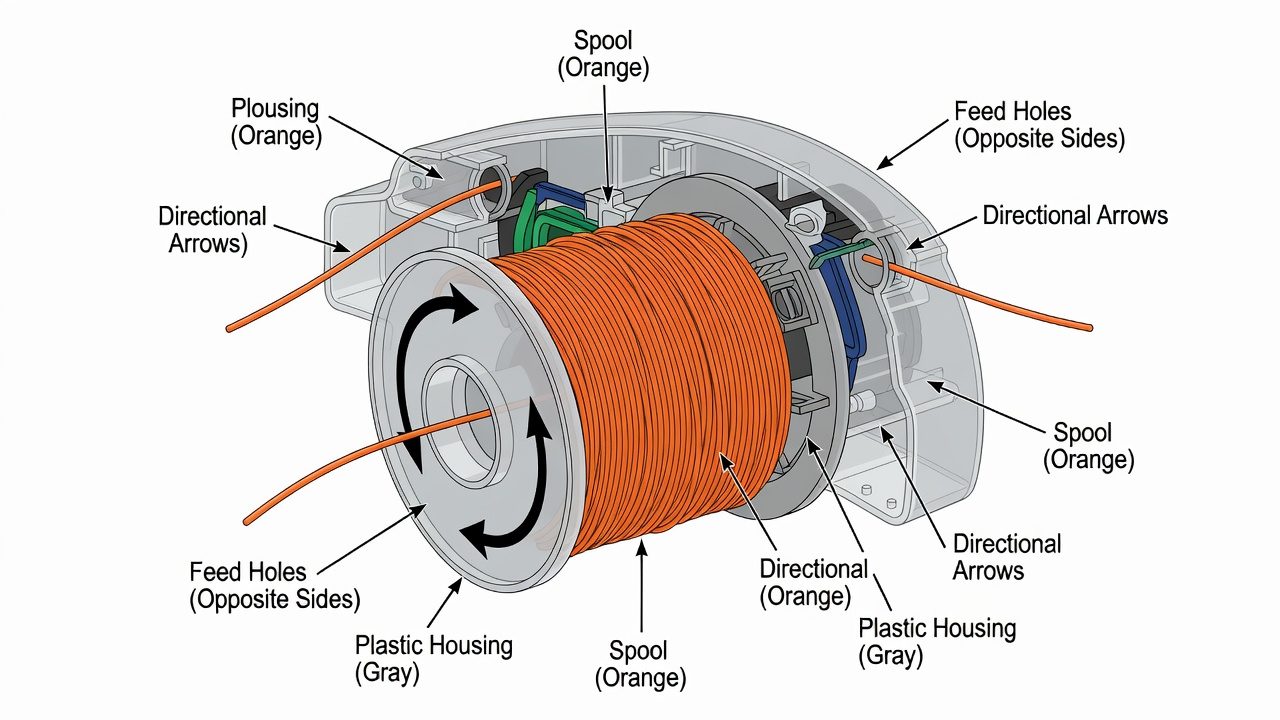
Before you load string, it helps to understand the components you’re working with. Most trimmer heads contain a spool (the internal reel where string winds), feed holes (typically two openings where line exits), and a head housing (the plastic exterior that holds everything together). Some models feature fixed-spool heads, where you manually load and wind the string yourself. Others use auto-feed heads, which automatically release a small amount of string when you tap the head on the ground during use.
The spool usually has directional arrows printed on it showing which way to wind the string. These arrows are critical—winding in the wrong direction causes the string to unravel during operation. Additionally, trimmers use different line gauges (thicknesses), typically ranging from 0.065 inches to 0.130 inches. Your owner’s manual or the trimmer head itself will specify the correct gauge for your model.
Tools and Materials You’ll Need
- Replacement trimmer line in the correct gauge for your model (check the manual or head housing)
- Phillips or flat-head screwdriver (some heads require screws; others twist off by hand)
- Wire cutters or scissors (to trim excess line)
- Clean cloth (to wipe away old string fragments and debris)
Most trimmer line comes in bulk spools or precut lengths. For a standard trimmer head, you’ll typically need 20–30 feet of line, though this varies by head design. Purchase line that matches your trimmer’s specifications exactly; using incorrect gauge can jam the head or cause feeding problems.
Step-by-Step: How to Install Trimmer String
Step 1: Remove the Trimmer Head
Disconnect your weed eater from its power source (unplug corded models, remove the battery from cordless units, or turn off gas models). Locate the trimmer head at the base of the shaft. Most heads twist counterclockwise to remove, though some models have a retaining nut or clip. Check your manual if the head doesn’t unscrew easily. Grip firmly and turn steadily; don’t force it, as you may strip the threads.
Step 2: Remove Old String and Clean the Spool
Once the head is off, unwind any remaining old string from the spool. Use a cloth to wipe away old string fragments, dirt, and grass clippings inside the head cavity. A clean spool ensures the new line winds smoothly and the head closes properly. Pay special attention to the feed holes—debris here can prevent line from feeding correctly during operation.
Step 3: Identify the Feed Holes and Winding Direction
Examine the spool closely. You’ll see one or two small holes near the spool’s perimeter. These are feed holes. The spool also has a directional arrow or marking indicating which way to wind. This direction is essential. If you wind against the arrow, the string will unravel when the trimmer runs. Memorize or note the winding direction before proceeding.
Step 4: Thread the Line Through the Feed Hole
Take your new trimmer line and insert one end through a feed hole. The exact method depends on your head design. For most standard heads, you’ll feed the line completely through the hole and pull a length of string (typically 18–24 inches) through. Some heads have a notch or groove where the line sits; align it properly before winding.
Step 5: Wind the String Tightly Around the Spool
Begin winding the string around the spool in the direction indicated by the arrow. Keep tension on the line as you wind—it should be snug but not so tight that it’s difficult to turn. Wind neatly in layers, ensuring line doesn’t overlap itself or bunch. Most single-spool heads accommodate 20–30 feet of line; wind until you’ve used the appropriate length, then leave about 4–6 inches extending from the feed hole.
Step 6: Insert the Line into the Second Feed Hole (if applicable)
Many trimmers have two feed holes. Once you’ve wound and secured the first section of line, feed the loose end of your line through the second feed hole. Pull until about 4–6 inches extends from this hole as well. Both ends should now be roughly equal in length. Trim excess line with scissors or wire cutters, cutting cleanly to avoid fraying.
Step 7: Reinstall the Trimmer Head
Thread the trimmer head back onto the shaft by twisting clockwise. Turn firmly but don’t over-tighten, as this can damage threads or make future removal difficult. The head should sit flush against the trimmer body with no gaps. Give it a gentle tug to confirm it’s secure.
Brand-Specific Loading Variations
Ryobi trimmers typically use a simple twist-off head with a fixed spool. The loading process follows the standard method above. Ryobi’s heads are straightforward, and the spool usually features clear directional markings. If your Ryobi trimmer has an auto-feed head (bump-feed), you still load line the same way, but the head automatically feeds a short amount each time you tap it on the ground.
Echo and Stihl gas-powered trimmers often feature more complex head designs. Some use a bump-feed mechanism; others use a fixed spool. The core loading process remains similar, but these brands frequently require the line to be inserted through a specific slot or guide before winding. Consult your manual, as Echo and Stihl heads can vary significantly between models.
Cordless and corded electric trimmers universally use the same loading method as their gas counterparts. The power source doesn’t affect how you install string. However, cordless models often have lighter-duty spools, so take care not to over-wind or apply excessive tension.
Common Mistakes to Avoid
- Winding in the wrong direction: This is the most common error. If line unravels immediately after installation or during use, you’ve wound against the directional arrow. Remove the head and rewind correctly.
- Winding too loosely: If string feels slack or doesn’t feed smoothly, the line wasn’t wound tightly enough. Unwind and repeat with consistent tension.
- Overloading the spool: Too much line crammed onto the spool prevents the head from closing. Follow your manual’s recommended line length, typically 20–30 feet.
- Leaving too much line extending: If more than 6 inches extends from each feed hole, the trimmer head may not close, or line may catch on the housing during operation. Trim to 4–6 inches.
- Using the wrong line gauge: Incompatible line diameter causes feeding problems or jamming. Always verify gauge before purchasing.
- Neglecting to clean the spool: Old string fragments prevent smooth winding and can jam the feed mechanism. Always clean thoroughly before reloading.
Maintenance Tips for Trimmer String
Trimmer line is a consumable that eventually wears out or breaks. Most homeowners need to reload their trimmers 1–3 times per season, depending on usage frequency and vegetation thickness. Harder materials like thick weeds or brush wear string faster than soft grass. Store your weed eater indoors during off-season; exposure to sun and temperature fluctuations can make string brittle and prone to breakage.
After reloading, test your trimmer on a small patch before tackling your full yard. This confirms the line feeds correctly and the head closes properly. If you notice the line constantly breaking or the head wobbling, stop immediately and troubleshoot before resuming.
Frequently Asked Questions
Q: How often should I replace trimmer string?
A: Most homeowners replace trimmer string 1–3 times per season. The frequency depends on how often you trim, the thickness of vegetation, and the terrain. Frequent use on dense weeds or rough ground depletes line faster. Inspect your spool monthly during the mowing season and reload when string becomes noticeably shorter or breaks frequently.
Q: What happens if I wind the string in the wrong direction?
A: If you wind against the directional arrow on the spool, the string will unravel as the trimmer head spins. You’ll either experience immediate line breakage or the string will wrap around the shaft. The solution is to remove the head, unwind the line, and wind it correctly according to the arrow.
Q: Why won’t my trimmer head close after loading string?
A: The most common cause is too much line on the spool. Overfilled heads won’t close due to excess material. Remove the head, unwind some line, and try again. Another possibility is old string fragments inside the head creating a bulge. Clean the spool thoroughly before reloading. Additionally, ensure the line is wound neatly without bunching or overlapping.
Q: Can I use any gauge trimmer line on my weed eater?
A: No. Using incorrect gauge line causes feeding problems, jamming, or poor cutting performance. Your trimmer manual specifies the correct gauge (typically between 0.065 and 0.130 inches). Check the manual or the head housing for the required specification, then purchase line that matches exactly. Mixing gauges or using incompatible line can damage your trimmer.