

Quick Answer: How to Remove a Lawn Mower Carburetor
Shut off the fuel supply and disconnect the spark plug wire first. Remove the air filter housing, disconnect the throttle and choke linkages, clamp and pull the fuel line, unscrew the two mounting bolts, and pull the carburetor straight off the intake manifold. Carefully remove the gasket and inspect it before proceeding to clean, rebuild, or replace the carburetor.

Pros
- Large-size design named in product title
- Sharpening and balancing functions listed
- Listed as a new upgraded version

Pros
- Adjustable 15-to-45-degree range in title
- Sharpening and balancing functions listed
Pros
- Includes replacement gaskets and a 98079-55846 spark plug
- Matches Honda HRR216 and HRS216 lawn mower models
- Designed around the 16100-Z8B-901 carburetor specification
Cons
- Restricted to select Honda GCV160 mower applications
- Installation requires basic mechanical tools and skills
Tools and Safety Equipment You Need Before Starting
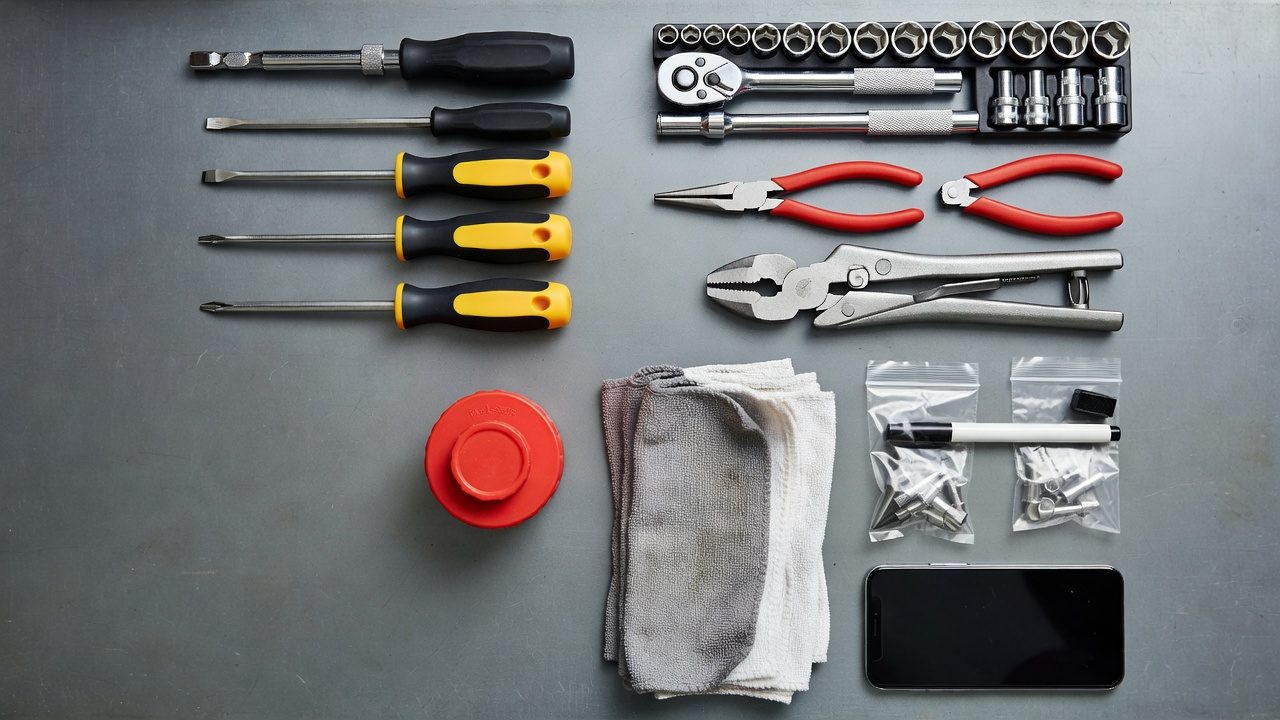
Gather every item on this list before touching the engine. Missing a tool mid-procedure increases the risk of stripped bolts, spilled fuel, and lost spring clips.
Tools Required
- Nut driver set (¼ in. and 5/16 in. cover the majority of air filter housing screws)
- Socket set with ratchet (8 mm and 10 mm sockets handle most carburetor mounting bolts)
- Flathead and Phillips screwdrivers
- Needle-nose pliers (essential for removing spring clips on throttle and choke linkages without losing them)
- Fuel line clamp pliers or locking pliers (pinch the fuel line before disconnecting to prevent spills)
- Small drain pan or fuel-safe container
- Clean shop rags
- Zip-lock bags and a marker (store and label springs, clips, and bolts immediately after removal)
- Smartphone or digital camera (photograph the linkage configuration before disassembly)
Non-Negotiable Safety Steps
- Disconnect the spark plug wire. Pull the rubber boot off the spark plug terminal before any other step. This eliminates all risk of accidental engine start.
- Work in a ventilated area away from ignition sources. Gasoline vapors are heavier than air and accumulate at floor level. No open flames, running motors, or smoking within the work area.
- Let the engine cool completely before touching any fuel components. A hot engine combined with spilled fuel is a fire hazard.
- Wear nitrile gloves. Fuel and carburetor cleaner are skin irritants with repeated exposure.
- Have a fire extinguisher rated for Class B fires nearby whenever working on fuel systems.
You do not need to fully drain the fuel tank to remove the carburetor, but shutting off the fuel valve (if equipped) or clamping the fuel line immediately prevents uncontrolled fuel flow once the line is disconnected.
How to Identify Your Carburetor Type Before Removal
The removal sequence is universal, but two variables change how you handle the carburetor once it is off the engine: carburetor style and engine brand.
Float-Bowl vs. Diaphragm Carburetor
| Feature | Float-Bowl Carburetor | Diaphragm Carburetor |
|---|---|---|
| Appearance | Round or rectangular bowl bolted to the bottom or side | Flat, no external bowl; uses a rubber diaphragm inside |
| Common on | Most Briggs & Stratton, Kohler, and Honda GCV engines | Tecumseh engines, handheld equipment, some older flatheads |
| Can tip freely? | No, tipping causes fuel spill during removal | Yes, no liquid fuel in the carb body |
| Rebuild complexity | Moderate (float, needle, seat, main jet) | Low-to-moderate (diaphragm and gasket kit) |
Push Mower vs. Riding Mower Carburetor Location
On a push mower, the carburetor sits on the side of the engine block directly behind the air filter housing. Access is straightforward with the mower on a flat surface.
On a riding mower, the carburetor is under the hood on the engine, often with additional shrouding, a larger air filter canister, and more complex linkage routing between the throttle pedal or lever and the carb. The removal sequence is the same, but budget extra time to trace and photograph linkage paths before disconnecting anything.
Finding Your Engine Model Number
The engine model number is stamped or printed on a metal tag on the engine shroud or block. Look near the oil fill cap, the recoil starter housing, or the blower shroud. Use the model number on the manufacturer’s website or a parts lookup tool to confirm your exact carburetor part number before ordering replacement parts. Readers comparing setup options can review our technical analysis on z890 vs x870e motherboard.
Step-by-Step: How to Remove a Lawn Mower Carburetor
Follow these steps in order. Skipping the sequence, particularly the fuel shutoff and spark plug wire steps, creates unnecessary hazard.
Step 1: Disconnect the Spark Plug Wire
Grip the rubber boot at the top of the spark plug and pull it straight off the terminal. Tuck the wire away from the plug so it cannot make accidental contact. Do not proceed until this is done. For complementary field maintenance guidelines, examine our breakdown of marshall stanmore iii vs harman kardon onyx studio 8.
Step 2: Shut Off the Fuel Supply
If the mower has a fuel shutoff valve on the tank or fuel line, rotate it to the closed (OFF) position. If no valve is present, use locking pliers or a fuel line clamp to pinch the rubber fuel line near the tank before disconnecting it at the carburetor. This prevents a siphon of fuel from draining the tank onto the floor.
Step 3: Remove the Air Filter Cover and Air Filter
Unscrew the air filter cover , usually one or two wing nuts, a single bolt, or snap clips depending on the engine. Pull the cover off, remove the paper or foam air filter element, and set both aside. Inspect the filter while it is in hand; a heavily clogged filter is often a contributing cause of the carburetor problem you are diagnosing. To evaluate matched hardware tolerances, consult our detailed overview of dyson v8 cyclone vs bissell featherweight stick.
Step 4: Remove the Air Filter Housing
The air filter housing (the plastic or metal box the filter sits in) is bolted directly to the carburetor or intake manifold with two to four screws or bolts. Use a nut driver or socket to remove them. Pull the housing straight off. Some housings have a breather tube connected to the valve cover, if present, twist and pull the tube free before fully removing the housing. Set all fasteners in a labeled bag immediately.
Step 5: Photograph the Linkage Configuration
Before touching any linkage, take two or three clear photos of the throttle linkage, choke linkage, and any return springs from multiple angles. This is the single most effective way to avoid a confusing reassembly. Linkage routing errors are the most common cause of a mower that runs poorly after carburetor reinstallation. When planning workspace deployment, consider the engineering criteria outlined in our bissell crosswave hydrosteam vs shark stainforce guide.
Step 6: Disconnect the Throttle Linkage and Choke Linkage
Use needle-nose pliers to unhook the throttle linkage wire from its tab or hole on the carburetor throttle shaft. The connection is typically a small Z-bend wire end that hooks into a hole, rotate it slightly and pull to release. Do the same for the choke linkage if present. Remove any return springs by hooking one end with needle-nose pliers and pulling off. Place all springs and clips in a labeled zip-lock bag the moment they are free. These small parts are easy to lose and expensive to source individually.
Step 7: Disconnect the Fuel Line
Confirm the fuel line is clamped or the shutoff valve is closed (Step 2). Position a rag under the connection point to catch residual fuel. Use needle-nose pliers to slide the spring clamp back along the hose, away from the carburetor fitting. Twist and pull the fuel line off the inlet fitting on the carburetor. Expect a small amount of fuel to drain, have the rag ready. If the hose is stiff or cracked, this is a good time to replace it.
Step 8: Remove the Carburetor Mounting Bolts
Most push mower carburetors are secured to the intake manifold with two mounting bolts, typically 8 mm or 10 mm. Some smaller engines use a single bolt with a wing nut configuration. Use a socket and ratchet to remove both bolts, turning counterclockwise. Keep the bolts, they are engine-specific in length and thread pitch and are not always sold separately. If a bolt is stripped, stop and source the correct replacement before reassembly.
Step 9: Pull the Carburetor Free from the Intake Manifold
With all bolts removed and all linkages and the fuel line disconnected, grip the carburetor body and pull it straight away from the engine. It may resist slightly if the gasket has formed a light seal, apply steady, even pressure without twisting. Do not pry with a screwdriver against the intake manifold face, as this can gouge the sealing surface and cause an air leak after reassembly.
Step 10: Remove and Inspect the Carburetor Gasket
A thin paper or composite gasket sits between the carburetor and the intake manifold. It may stay on the carburetor or remain on the manifold face. Peel it off carefully. Inspect the gasket for tears, compression marks, or brittleness. A damaged gasket causes an air leak that makes the engine run lean, surge, or refuse to idle. Replace it, carburetor gaskets cost under $5 and are available as part of most rebuild kits.
Engine-Specific Removal Notes: Briggs & Stratton, Kohler, Tecumseh, and Honda GCV
The ten steps above apply to all common lawn mower engines. The notes below cover the one or two steps that differ meaningfully by brand.
Briggs & Stratton Carburetor Removal
Briggs & Stratton engines are the most common on North American push mowers. On OHV (overhead valve) models, the majority of current production, the carburetor is mounted vertically on the side of the engine with two bolts. The choke linkage on many Briggs carburetors routes through the air filter housing itself, so the housing must be fully removed before the choke link can be released. On older flathead models, the carburetor is mounted lower on the block and the fuel tank may be bolted to the top of the air filter housing as a single assembly, remove the tank-and-housing unit as one piece before accessing the carburetor bolts.
Kohler Engine Carburetor Removal
Kohler engines are standard on many mid-range and commercial walk-behind mowers. The carburetor on Kohler Command and Courage OHV engines is accessed after removing a larger, two-stage air filter housing that encloses both a paper element and a foam pre-filter. Note that some Kohler carburetors use a primer bulb with a dedicated fuel return line in addition to the main fuel supply line, both must be disconnected before the carburetor will pull free. Locate and clamp or plug the return line to prevent fuel drainage during the procedure.
Tecumseh Engine Carburetor Removal
Tecumseh flathead engines, common on older push mowers and snow blowers, frequently use a diaphragm carburetor. Because there is no float bowl holding liquid fuel, the carburetor can be tilted freely during removal without spilling. Tecumseh carburetors are often held by a single large bolt passing through the center of the air filter housing and into the carburetor and intake manifold as a single stack, remove this one bolt and the housing, air filter, and carburetor may come off as a unit. Separate the carburetor from the housing on the bench.
Honda GCV Carburetor Removal
Honda GCV series engines (GCV135, GCV160, GCV190) use a float-bowl carburetor accessed from the front of the engine after removing the air cleaner cover and element. The Honda GCV throttle linkage uses a plastic clip-and-lever assembly rather than a bare Z-bend wire. Squeeze the clip tabs and slide the linkage lever off the carburetor shaft, do not pull on the wire itself or the plastic clip will crack. The GCV carburetor is secured with two 8 mm bolts. Honda GCV gaskets are engine-model specific; confirm the GCV model number before ordering a replacement gasket.
After Removal: Should You Clean, Rebuild, or Replace the Carburetor?
Now that the carburetor is off the engine, the condition you find determines the next step. Use this decision framework to avoid unnecessary spending or repeat repairs.
Clean the Carburetor If:
- The engine was running but surging, hunting, or dying at idle
- The mower sat unused for one or more seasons with fuel left in the bowl
- You see varnish (brown or orange film), white mineral deposits, or a gummy residue inside the bowl or on the jets
- All metal components are intact with no cracks, and the needle and seat are undamaged
Rebuild the Carburetor (Use a Rebuild Kit) If:
- Cleaning alone did not resolve the symptoms
- The float needle and seat show wear or pitting
- The diaphragm (on diaphragm carbs) has cracks, stiffness, or holes
- The carburetor body is in good condition but internal components are worn
- Rebuild kits for common engines typically include a new gasket, needle, seat, and diaphragm or float components and cost $8-$20
Replace the Carburetor If:
- The carburetor body is cracked or has a stripped bolt hole
- The throttle or choke shaft is bent or so worn that it allows air to bypass
- The main jet is damaged or corroded beyond cleaning
- A replacement carburetor for common push mower engines costs $15-$40 for aftermarket units, making replacement often more cost-effective than an extended rebuild on an old carburetor
What to Inspect Immediately After Removal
- Gasket: Any tear, crack, or soft spot means replace it before reinstallation.
- Float bowl drain screw: Check for stripped threads or O-ring degradation.
- Fuel inlet fitting: Look for cracks where the fuel line connects.
- Choke and throttle shafts: Wiggle each shaft, more than minimal side play indicates a worn bushing and an air leak source.
- Carburetor body exterior: Any cracks near the mounting flange mean the carburetor cannot be sealed reliably and must be replaced.
Frequently Asked Questions About How To Remove Carburetor From Lawn Mower
Do I need to drain the fuel tank before removing a lawn mower carburetor?
No, draining the full tank is not required. Closing the fuel shutoff valve or clamping the fuel line immediately before disconnecting it at the carburetor is sufficient to prevent fuel flow. Have a rag and small container ready to catch the small amount of fuel remaining in the line and carburetor bowl.
How many bolts hold a carburetor onto a lawn mower engine?
Most push mower engines use two mounting bolts to secure the carburetor to the intake manifold. Some smaller or older engines, particularly certain Tecumseh models, use a single central bolt. Riding mower engines with larger carburetors may use two bolts plus additional bracket hardware. Count the fasteners visible on your specific engine before assuming any number.
What happens if I reinstall the throttle linkage incorrectly?
An incorrectly routed throttle linkage causes the engine to run only at full speed with no governor response, idle without ability to throttle up, or fail to start at all. Always photograph the linkage configuration from multiple angles before disconnecting anything. Refer to those photos during reassembly rather than relying on memory.
Can I remove a lawn mower carburetor without any mechanical experience?
The removal procedure is within reach for a careful first-time DIYer on a push mower. The critical disciplines are: disconnect the spark plug wire first without exception, photograph all linkages before touching them, label every bolt and spring immediately after removal, and work slowly. The steps that catch beginners are losing spring clips and not clamping the fuel line before disconnecting it. Riding mower carburetors involve more complex linkage routing and are better suited to someone who has completed the push mower procedure at least once.
Technical Standards and Compliance
Mechanical safety standards, operational tolerances, and protective gear guidelines align with benchmark specifications established by the American National Standards Institute (ANSI).









