Direct Answer: How to Sharpen a Chainsaw Blade
To sharpen a chainsaw chain, secure the chainsaw in a vise, use a round file matched to your chain specifications, and file each tooth at the correct angle (typically 25-35 degrees depending on chain type). Work from the inside of each tooth outward with consistent pressure, then adjust the depth gauges using a flat file to maintain proper cutting height. Professional sharpening is a viable alternative if you lack experience or the necessary tools.
Understanding Chainsaw Blade vs. Chain Terminology
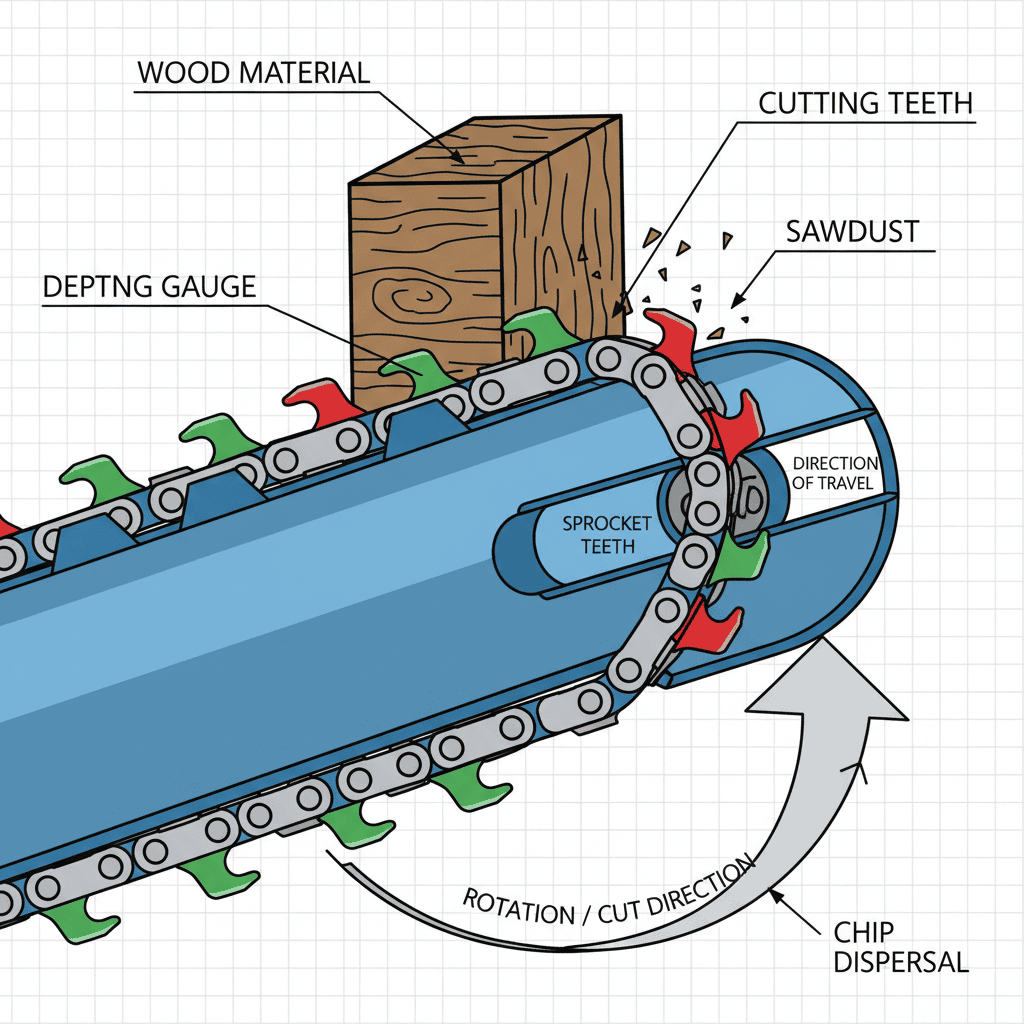
A common source of confusion for chainsaw owners is the terminology used to describe cutting components. What most people refer to as a “chainsaw blade” is technically the cutting chain—a looped assembly of individual teeth (called cutting links) connected by drive links. The chain wraps around the guide bar and rotates during operation. Understanding this distinction matters because it determines how you approach maintenance and sharpening.
The cutting chain consists of three main components:
- Cutting teeth: The angled links that make contact with wood
- Depth gauges: Ramps positioned ahead of each tooth that control how deep the tooth bites into wood
- Drive links: Connectors that fit into the guide bar groove and power the chain forward
Proper sharpening addresses both the cutting teeth and the depth gauges to maintain optimal performance.
Signs Your Chainsaw Chain Needs Sharpening
Recognizing when sharpening is necessary prevents frustration and unsafe operating conditions. A dull chain exhibits several telltale signs:
- Pulling to one side: The chainsaw drifts left or right during cutting, indicating uneven tooth sharpness
- Producing fine sawdust instead of wood chips: A sharp chain ejects larger chips; dull chains generate powder-like debris
- Requiring excessive pressure to cut: You must push hard to make the saw advance through wood instead of feeding smoothly
- Bouncing or chattering: Vibration during cutting suggests inconsistent tooth engagement
- Cutting at an angle: Wood cuts are no longer perpendicular, indicating unbalanced tooth sharpness across the chain
- Reduced cutting speed: The saw slows significantly compared to its previous performance
These symptoms indicate the chain has dulled enough to warrant immediate attention. Continuing to operate a dull chain increases engine strain, generates excessive heat, and creates unsafe kickback conditions.
Essential Tools and Materials for Chainsaw Sharpening
Proper sharpening requires specific tools matched to your chain specifications. Using incorrect file sizes or types compromises results and can damage the chain.
Round Files
The primary sharpening tool is a round file (also called a cylindrical or needle file) that matches your chain’s tooth size. Chain specifications vary by model, typically designated by pitch (the distance between drive links) and gauge (the thickness of the drive link). Common round file sizes include:
- 4.8mm (3/16″) for narrow-kerf chains with .325″ pitch
- 5.5mm (7/32″) for standard chains with .325″ or .404″ pitch
- 6.5mm (1/4″) for large-format chains with .404″ or .500″ pitch
Consult your chainsaw manual or the markings on the chain to identify the correct file diameter. Using a file that is too large or too small prevents proper contact with tooth surfaces and creates an unsafe cutting edge.
Depth Gauge Tool and Flat File
A depth gauge is a ramp-shaped component positioned ahead of each cutting tooth that controls how deep the tooth penetrates into wood. These gauges must be maintained at precise heights relative to the cutting edge. A depth gauge tool is a simple metal template that fits over the chain and identifies which gauges need reduction. Paired with a flat file, the tool ensures consistent depth gauge heights across all teeth.
Filing Guide (Highly Recommended)
A filing guide is a clamping device that holds the round file at the correct angle while you work. These guides significantly improve consistency and reduce the skill required for proper sharpening. Many guides feature adjustable angles and marked positions for each tooth, making the process more straightforward. While experienced operators can hand-file without a guide, guides reduce errors and produce superior results for most users.
Chainsaw Vise or Clamping System
Secure the chainsaw firmly during sharpening using a bench vise or dedicated chainsaw clamping system. The saw must not move or rotate during filing to prevent slips and injuries. A vise mounted to a workbench keeps both hands free for filing work.
Filing Angle and Technique Fundamentals
The filing angle is critical to chainsaw performance. This is the angle at which you hold the round file relative to the tooth as you sharpen it. Incorrect angles produce cutting edges that either undercut (too shallow) or oversharpened (too steep), both of which reduce cutting efficiency and chain lifespan.
Standard Filing Angles by Chain Type
Most chainsaw chains require a filing angle between 25 and 35 degrees, measured as the angle between the file and the plane of the chain. This angle varies slightly by chain design:
- Standard crosscut chains: Typically 30-35 degrees (this range is most common for home and professional use)
- Ripping chains (designed to cut along wood grain): May use 10-15 degrees for specialized applications
- Skip-tooth chains (fewer teeth for faster cuts in thick wood): 25-30 degrees
Your chainsaw manual specifies the exact angle for your model. Many filing guides include angle markings or adjustable settings to maintain consistency.
Correct Filing Direction and Stroke Pattern
File each tooth using consistent outward strokes, moving the file from inside the tooth toward the outside edge. This unidirectional technique ensures uniform metal removal and a properly shaped edge. Typical sharpening follows this pattern:
- Position the file inside the tooth, with one end resting against the adjacent tooth
- Apply light to moderate pressure while pushing the file outward
- Lift the file and return it to the starting position without applying pressure (the return stroke removes no metal)
- Repeat 2-5 strokes per tooth, depending on dullness and tooth design
The number of strokes required varies: a lightly dulled chain may need 2-3 strokes per tooth, while severely neglected chains may require 5-8 strokes. Use consistent stroke count on each tooth to maintain balanced sharpness across the chain.
Step-by-Step Manual Sharpening Process
Preparation and Chainsaw Securing
Step 1: Stop the Engine and ensure the chainsaw has cooled. Remove the spark plug wire to prevent accidental starting during maintenance.
Step 2: Secure the Chainsaw in a bench vise using padded clamps that won’t damage the housing. Position the saw horizontally with the chain fully visible and accessible. The chain should not rotate freely; it must remain stationary throughout sharpening.
Step 3: Inspect the Chain for damage before sharpening. Look for broken teeth, cracked drive links, or bent sections. Damaged chains should be replaced or professionally repaired rather than sharpened.
Identifying and Filing Teeth
Step 4: Select Your Starting Tooth on the chain and identify its orientation. On most chains, teeth alternate direction—one set faces left, the next set faces right. This alternation ensures balanced cutting on both sides of the cut.
Step 5: Apply Filing Guide (if using one) according to manufacturer instructions. Align the guide to position the round file at the correct angle.
Step 6: File the First Tooth with consistent outward strokes. Maintain even pressure throughout each stroke. Count your strokes to ensure you apply the same number to each subsequent tooth.
Step 7: Move to the Next Tooth of the Same Direction. Skip the alternating-direction teeth and progress around the chain, sharpening all teeth facing one direction before switching to the opposite-facing teeth.
Step 8: Repeat for Opposite-Facing Teeth using the same stroke count and angle. This staged approach ensures consistent results and prevents confusion about tooth orientation.
Adjusting Depth Gauges
Step 9: Place the Depth Gauge Tool over the chain. This metal template sits on the cutting teeth and identifies which depth gauges extend above the correct height. Gauges that contact the tool need reduction.
Step 10: File Oversized Depth Gauges with the flat file. Use light, even strokes to reduce the gauge height until it no longer contacts the depth gauge tool. Work carefully—removing too much material reduces the tooth bite and cutting efficiency.
Step 11: Recheck All Gauges after filing. Place the depth gauge tool again and confirm all gauges pass beneath it without resistance.
Final Inspection and Testing
Step 12: Reinstall the Spark Plug Wire and perform a test cut on a log or scrap wood. The chain should feed smoothly with minimal pressure, produce large wood chips, and cut perpendicular to the wood surface.
If performance issues persist after sharpening, re-inspect your work or consider professional sharpening services.
Safety Considerations When Sharpening
Chainsaw sharpening involves sharp files and dangerous cutting edges. Follow these safety practices without exception:
- Disconnect the spark plug wire before any maintenance to prevent accidental engine starting
- Wear cut-resistant gloves to protect hands from the sharp chain teeth and file edges
- Keep the engine off and allow adequate cooling time before beginning sharpening work
- Position yourself safely with proper lighting and adequate workspace to avoid awkward postures or reaches
- Never wear loose clothing or jewelry that could catch on the chain or files
- Use light file pressure to maintain control; excessive force increases slip risk and causes file breakage
- Store files safely in a designated location away from work areas to prevent accidental contact injuries
- Inspect the chain for damage before sharpening; broken or cracked components create dangerous conditions
Professional Sharpening vs. DIY Hand-Filing
When to Choose Professional Sharpening Services
Professional chainsaw sharpening services offer advantages for certain users:
- No tool investment required: Saves cost if you sharpen infrequently or own multiple chainsaw types
- Consistent results: Professional shops use precision equipment that produces uniform sharpness across the entire chain
- Speed and convenience: Many shops offer same-day service, getting your saw back quickly
- Damage repair: Professionals can restore chains with minor damage (bent teeth, worn drive links) or replace severely damaged chains
- No skill requirement: Eliminates learning curve and errors associated with hand-filing
When DIY Hand-Filing Makes Sense
Hand-filing is practical for regular users who own chainsaws and perform frequent maintenance:
- Cost efficiency over time: Tool investment is recouped after 3-5 sharpening cycles compared to professional pricing
- Immediate maintenance: File the chain whenever needed without waiting for service appointments
- Skill development: Sharpening your own chain builds valuable maintenance competency
- Customization: You can adjust filing angles and depth gauges to match personal cutting preferences
For casual users (occasional yard maintenance), professional sharpening is economical and hassle-free. For regular users, DIY hand-filing provides long-term savings and independence.
Chainsaw Maintenance Beyond Sharpening
Sharpening alone doesn’t guarantee optimal performance. Supporting maintenance extends chain life and reduces sharpening frequency.
Chain Tension and Lubrication
Proper chain tension prevents accelerated dulling. Chains that are too loose rock side-to-side in the guide bar, causing uneven tooth wear. Chains that are too tight bind during rotation and overheat. Check tension regularly according to your manual—typically the chain should pull away from the bar slightly but not hang loosely.
Adequate bar oil prevents friction heat that dulls teeth prematurely. Low oil levels or improper lubricant cause rapid blade wear. Fill the oil reservoir before each use and inspect oil levels during extended cutting sessions.
Air Filter and Fuel Quality
A clogged air filter restricts engine power, forcing you to apply excessive pressure during cutting. This strains the chain and causes premature dulling. Clean or replace air filters regularly according to your manual.
Using fresh fuel with proper oil ratio (typically 50:1 for two-stroke engines) ensures consistent power delivery. Old fuel or incorrect ratios cause engine sputtering and reduced cutting efficiency.
Guide Bar Maintenance
Inspect the guide bar for cracks, bending, or wear grooves. A damaged bar causes uneven chain tension and accelerates dulling on one side. Flip the bar periodically to distribute wear evenly, extending its lifespan and maintaining consistent sharpness.
Frequently Asked Questions
How often should you sharpen a chainsaw chain?
Sharpening frequency depends on usage and wood type. Chainsaws used multiple times weekly may require sharpening every 2-3 hours of operation. Casual users (once or twice monthly) might sharpen every 3-6 months or as needed when you notice dulling signs. Cutting softwood typically dulls chains faster than hardwood; debris and dirt in wood (common from fallen trees) accelerates dulling significantly. Rather than following a fixed schedule, monitor cutting performance and sharpen when you notice the signs described earlier.
Can you over-sharpen a chainsaw chain?
Yes, excessive sharpening removes too much metal and weakens the tooth structure. Using too many file strokes or applying excessive pressure causes tooth thinning, which reduces strength and sharpness retention. Sharpen only until the chain cuts efficiently—typically 2-5 strokes per tooth for light maintenance. Once a chain is severely worn (possibly after 5-10 sharpenings), it should be replaced rather than sharpened further.
What’s the difference between manual filing and electric sharpening tools?
Manual hand-filing (the method described in this guide) offers maximum control and works with basic, inexpensive tools. It requires practice to master consistent angles and pressure. Electric sharpening tools automate the process using rotating stones or discs, producing very consistent results with less skill required. However, electric tools are more expensive, require electricity or batteries, and may be overkill for casual users. Most professionals and frequent users find hand-filing adequate and more portable for on-site sharpening.
Should you sharpen a new chainsaw chain?
New chains from the manufacturer typically come pre-sharpened, but some users report marginal sharpness or inconsistent factory sharpening. It’s reasonable to lightly touch up a new chain (1-2 file strokes per tooth) to ensure optimal performance before extensive use. This small investment prevents frustration and helps you become familiar with your sharpening technique on a less critical surface.
Key Takeaways
- Sharpen a chainsaw chain (not blade) by securing the saw, using a round file at 25-35 degree angles, and maintaining consistent stroke counts across all teeth
- Identify dull chains by poor cutting performance, pulling to one side, and producing fine sawdust instead of chips
- Invest in essential tools—round file (correct size), depth gauge tool, flat file, and ideally a filing guide—for reliable results
- Adjust depth gauges after sharpening the teeth to maintain proper cutting height and chain balance
- Prioritize safety by disconnecting the spark plug, wearing protection, and securing the chainsaw firmly during sharpening
- Choose professional sharpening for occasional users; DIY hand-filing is economical for regular chainsaw operators
- Maintain chain tension, lubrication, and air filter condition to reduce sharpening frequency and extend chain life