Direct Answer: How to String a Weed Eater
To string a weed eater, first identify your trimmer head type (bump-feed, fixed-line, or auto-feed), then access the head by removing the cover or unscrewing the spool. Remove any old string, measure and cut new replacement line to the correct length—typically 15–20 feet depending on your model—thread it through the eyelets or slots in the spool according to your head design, wind it tightly in the direction indicated by arrows on the spool, and secure the string ends in the notches before reassembling the head.
Understanding Your Weed Eater Head Type
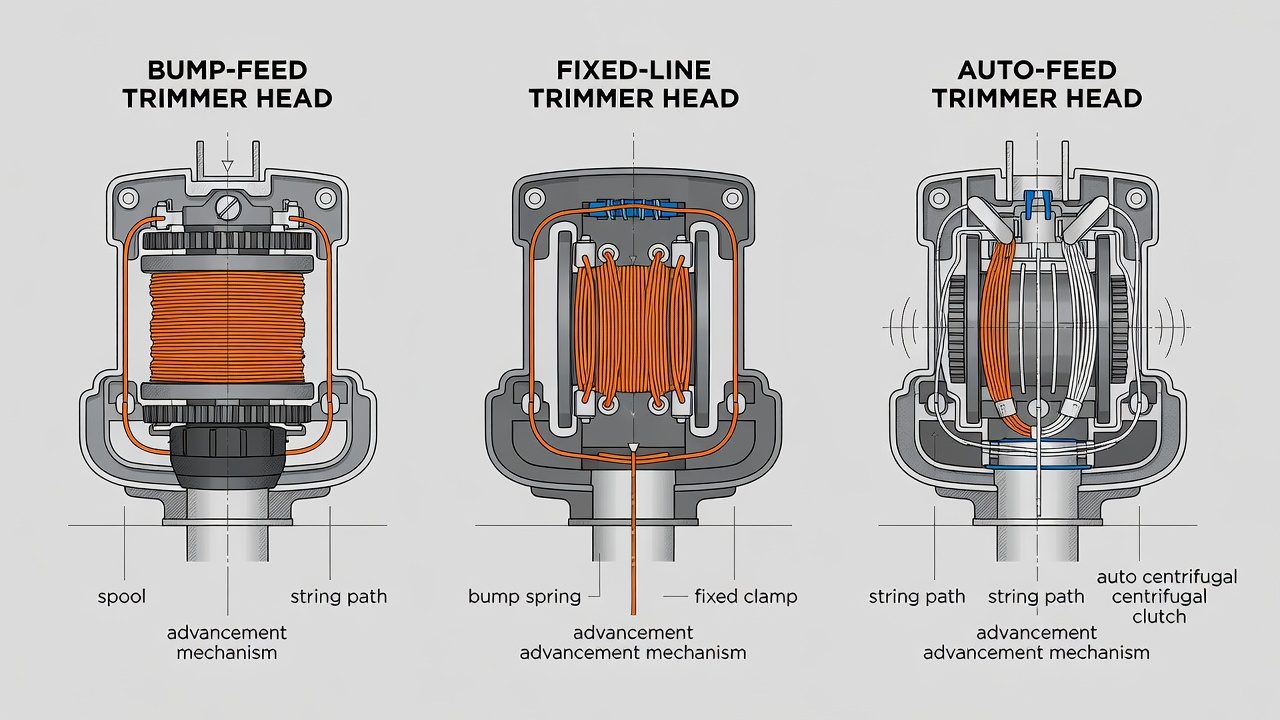
Before you attempt to restring your trimmer, you need to identify which type of cutting head your weed eater uses. Different mechanisms require different stringing methods, and using the wrong approach can lead to tangled line, improper feeding, or wasted string.
Bump-Feed Heads are the most common type found on residential trimmers. These heads advance new line automatically when you tap or “bump” the head against the ground. The string is wound around a spool inside the head, and as the bump mechanism activates, fresh line extends outward. This type is user-friendly and requires manual winding during restringing.
Fixed-Line Heads use a more manual system where the string does not advance automatically. Instead, you manually wind new line onto the spool, and the string remains at the same length until you manually extend it or replace it. These are less common on modern trimmers but still appear on some professional and specialty models.
Auto-Feed Heads use a spring-loaded or cartridge-based system that advances line continuously or on demand without the bump mechanism. Some models use disposable string cartridges, while others have reloadable spools. These heads often require less maintenance but may have specific reloading procedures.
Check your trimmer’s manual or look at the head itself for any labels or icons that indicate the type. Most manufacturers mark their heads clearly.
What You’ll Need Before Starting
Gathering the right materials and tools before you begin ensures a smooth restringing process and prevents frustration midway through.
- Replacement String (Line): Purchase trimmer line in the correct gauge for your model. Common sizes range from .065 inch to .130 inch in diameter. Check your manual or the existing string to determine the right size. A standard spool typically contains 30–50 feet of line, which is enough for multiple restrings.
- Safety Gear: Wear gloves to protect your hands from sharp string edges and the trimmer head mechanism.
- Screwdriver or Hex Key: Depending on your model, you may need a Phillips or flathead screwdriver, or an Allen wrench to remove the spool or head cover.
- Scissors or String Cutter: A sharp pair of scissors or a utility knife ensures clean cuts without fraying the line.
- Measuring Tape (Optional): Helpful for cutting the correct length of new string, though many users estimate after their first restring.
How Much String Do You Need? Most bump-feed and fixed-line heads require 15–20 feet of string total (the line is divided between two cutting points). Auto-feed systems may use different amounts depending on the cartridge or spool design. Your manual should specify the exact length required for your model.
How to Remove the Trimmer Head Cover
Safely accessing your trimmer head is the first hands-on step. Always disconnect the spark plug wire (on gas models) or unplug the unit (on electric models) before disassembling anything.
- Locate the Head Cover: On most trimmers, the cutting head sits at the base of the shaft. The cover is usually a plastic dome or cap that screws or clips onto the head assembly.
- Identify the Fasteners: Look for screws, bolts, or snap clips holding the cover in place. Some covers twist off counterclockwise; others require a screwdriver.
- Remove the Cover: Using the appropriate tool, carefully unscrew or unclip the cover. Set it aside in a clean area where you won’t lose small parts.
- Inspect the Head: Once exposed, examine the spool, eyelets, and any springs or mechanisms inside. Look for cracks, debris, or wear on the spool itself. If the spool is cracked or severely worn, replacement may be necessary.
- Clear Any Debris: Use a dry cloth or brush to remove grass clippings, dirt, or old string fragments from inside the head.
Removing Old String and Preparing the Spool
Clearing old string completely prevents it from tangling with new line and helps you assess whether the spool is in good condition.
- Remove Remaining String: Pull out any old line still wound around the spool. If it’s stuck or hardened, gently pry it free with your fingernail or a plastic tool (avoid metal tools that might scratch the spool).
- Clean the Spool: Wipe down the spool with a dry cloth to remove dust and debris. If old string has left adhesive residue, a small amount of rubbing alcohol on a cloth can help clean it—allow it to dry completely before continuing.
- Check the Eyelets: The small holes or slots where string feeds out should be clear and undamaged. If they’re cracked or have burrs, they can damage new string during feeding.
- Inspect Spring Mechanisms: If your head has a spring-loaded advance mechanism, ensure the spring is intact and moves freely. A damaged spring can prevent proper line advancement.
Threading and Winding New String (Bump-Feed Head)
Bump-feed heads are the most common residential trimmer type. The following steps apply to most standard bump-feed designs:
- Measure Your String: Cut a length of replacement line according to your manual’s specifications—typically 15–20 feet total. Some users cut two 8–10 foot lengths (one for each side of the head) and wind them separately; others cut one long piece and loop it.
- Locate the Anchor Notch: On the spool, look for a small notch or hook where you’ll secure the end of the string. This is usually visible on the edge of the spool and may be labeled or color-coded.
- Insert the String End: Place one end of your cut string into the anchor notch and hold it firmly in place with one hand.
- Wind the String: Turn the spool in the direction indicated by arrows printed on the spool itself (typically clockwise when viewed from above, but always check). Wind the string tightly around the spool, keeping tension so the line remains neat and compact. Leave about 4–6 inches of line free as you approach the other anchor notch.
- Secure the Other End: Once wound, place the free end into the second anchor notch.
- Feed the String Through the Eyelets: Most bump-feed heads have two eyelets (or “eyes”) where the string exits. Pull gently on both string ends so that line emerges from each eyelet—typically 6–8 inches of line should protrude from each side.
- Reassemble the Head: Replace the cover and secure it with screws or clips.
Pro Tip: If winding feels difficult or the spool seems full, you may have wound the string too loosely. Unwind and try again with more tension, or remove some string and start over—a properly wound spool should feel snug but not impossibly tight.
Threading and Winding New String (Fixed-Line Head)
Fixed-line heads work differently and are often found on commercial or professional trimmers. These heads do not use a bump mechanism and require careful manual winding.
- Remove the Spool (If Necessary): Some fixed-line heads require removing the spool from the head assembly. Check your manual—you may need to unscrew a center bolt or nut to access the spool.
- Measure and Cut String: Fixed-line heads typically use 15–20 feet of line, similar to bump-feed models. Cut your replacement line to length.
- Thread Through the Eyelets: Unlike bump-feed heads, fixed-line heads often have you thread the string through eyelets first, then wind it onto the spool. Insert one end of your string through the first eyelet, wrapping it around the spool base.
- Wind Tightly and Evenly: Wind the string around the spool in a single direction (clockwise or counterclockwise—your manual will specify), keeping each wrap level and tight. Avoid overlapping wraps, which can cause tangling or prevent proper feeding.
- Secure the Free End: Once wound, thread the free end through the second eyelet and secure it in a notch or tie it off according to your manual’s instructions.
- Reinstall the Spool: If you removed it, carefully reinstall it into the head assembly, ensuring it seats properly and any bolts or fasteners are tightened securely.
Threading and Winding New String (Auto-Feed Head)
Auto-feed heads vary widely by manufacturer, but the basic process is similar:
- Understand Your Head Type: Determine whether your auto-feed head uses a replaceable cartridge or a reloadable spool. Cartridge systems are simpler—you replace the entire cartridge when empty. Reloadable systems require you to wind new line onto a spool inside the head.
- For Cartridge Systems: Simply remove the old cartridge (usually by pressing a release button or unscrewing), insert a new pre-loaded cartridge, and snap it into place. These require minimal assembly.
- For Reloadable Auto-Feed Heads: Access the internal spool by removing a cover or cap. Wind replacement line onto the spool similar to a fixed-line head, but follow the specific path indicated by grooves or guides on the spool. Auto-feed spools often have a specific slot or path the string must follow.
- Load the Spring or Advance Mechanism: Once the string is wound, ensure the spring or advance mechanism is properly seated. Press or twist the cap back into place, which typically tensions the string and activates the feed system.
- Test the Advance: Before reassembling the full trimmer, bump the head lightly to see if line advances. If it doesn’t, the spring or mechanism may not be properly loaded—consult your manual or the manufacturer’s website for troubleshooting.
Reassembling the Trimmer Head
Once your string is wound and threaded, final assembly ensures everything works properly:
- Position the String Ends: Before closing the head, verify that both string ends protrude evenly from the eyelets—typically 6–8 inches. Uneven lengths can cause the trimmer to cut unevenly or pull to one side.
- Replace the Cover: Carefully align the cover with the head assembly and screw or snap it back into place. Do not overtighten screws, as this can crack plastic covers.
- Verify Alignment: Ensure the cover sits flush against the head with no gaps. Any gaps can allow string to slip or eyelets to misalign.
- Trim Excess String: If your string still protrudes more than 8 inches from the eyelets, trim the excess with scissors. The string should extend just past the eyelet opening.
Troubleshooting Common Stringing Issues
String Loosens or Falls Off During Use: This typically indicates the string was wound too loosely or the anchor notches didn’t hold properly. Rewind the string with more tension, ensuring the ends are firmly seated in their notches.
String Won’t Feed or Advance: If using a bump-feed head, the mechanism may be jammed with debris. Clean the bump collar thoroughly. For auto-feed systems, the spring or advance cartridge may not be properly loaded—remove and reinstall it, checking that all components seat fully.
String Tangles Inside the Head: Tangles usually result from uneven winding or overlapping wraps. Unwind completely and start over, maintaining even tension and avoiding overlaps.
String Frays or Breaks Quickly: Rough eyelets or a cracked spool can damage new string. Inspect the eyelets for burrs; if you find any, lightly sand them smooth with fine-grit sandpaper. If the spool is cracked, it should be replaced.
Trimmer Pulls to One Side: Uneven string length causes this. Trim the longer end to match the shorter one, ensuring both protrude equally from the eyelets.
Frequently Asked Questions
How often should I restring my weed eater?
The frequency depends on use. Casual homeowners may restring every 2–4 weeks during the mowing season, while heavy users might restring weekly or even multiple times per week. You’ll know it’s time when you notice the cutting width is significantly reduced or the trimmer becomes noticeably less effective.
Can I use a different gauge or type of string than recommended?
No. Using the wrong gauge can damage your trimmer’s head mechanism and may void your warranty. Thicker string than recommended can overload the motor, while thinner string may break immediately or fail to cut effectively. Always use the gauge specified in your manual.
What’s the difference between universal and brand-specific replacement string?
Universal string is designed to work with most trimmers of a given gauge and is typically less expensive. Brand-specific string is manufactured to exact specifications for particular trimmer models and may offer slightly better performance or durability. Both work if the gauge matches your trimmer, but brand-specific options provide more assurance of compatibility.
Is it normal for string to be slightly loose when I first reassemble the head?
A small amount of looseness is normal—the string will tighten as the trimmer head spins at full speed. However, it should still be snug when you gently tug on it. If it’s very loose, rewind it with more tension.