Direct Answer: How to Sharpen a Chainsaw Chain
To sharpen a chainsaw chain, secure the saw bar firmly in a bench vise, then select a round file matching your chain’s pitch (for example, 5/32 inch for 3/8-inch low-profile chains). Mount the file in an angle guide set to your manufacturer’s recommended top-plate angle—typically 30°—and file each cutter tooth with steady outward strokes, keeping the same angle and stroke count on every tooth. After sharpening all cutters on both sides of the chain, file down the depth gauges (rakers) so they sit slightly below the cutting edge, then remove burrs, re-tension the chain, and lubricate it before testing.
Why a Chainsaw Chain Dulls and How Sharpening Restores It
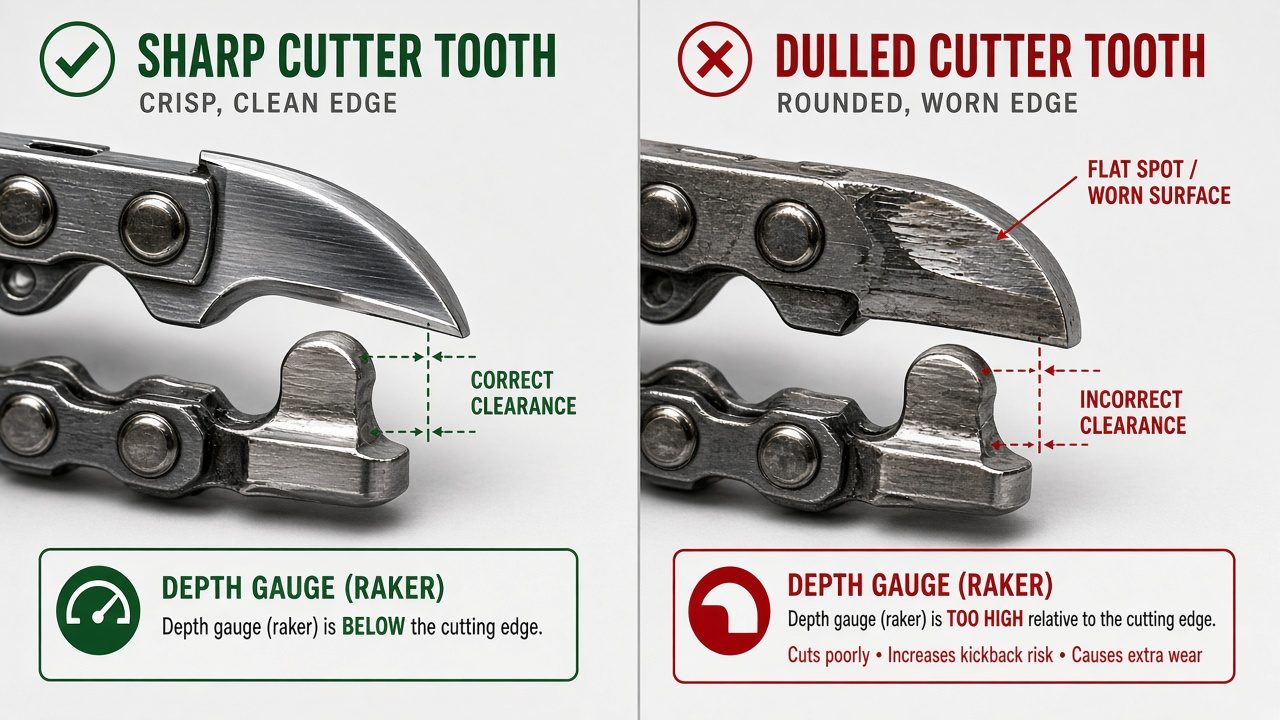
A chainsaw chain consists of individual cutter teeth, each with a top-plate angle, side-plate angle, and a depth gauge (raker) positioned just behind it. The raker controls how much wood the cutter removes per pass; if the raker is too high, the cutter cannot bite deeply and the chain appears dull. The cutter itself loses its edge through repeated contact with wood fibers, dirt embedded in bark, and occasional contact with rocks or metal. Sharpening restores the cutting edge by filing away the dulled metal and re-establishing the correct angles, while lowering the rakers maintains proper cutting depth. Unlike a kitchen knife sharpened with a flat file, a chainsaw chain requires a round file held at a specific angle to maintain the complex geometry of the cutting tooth.
Signs Your Chainsaw Chain Needs Sharpening
- Chainsaw pulls to one side: One or more cutters are duller than others, causing uneven cutting pressure.
- Fine sawdust instead of chips: A sharp chain produces coarse wood chips; a dull chain creates fine dust or powder.
- Saw requires excessive pressure to cut: The operator must push down hard, causing fatigue and safety risks.
- Chain does not cut straight: Indicates uneven tooth heights or severe dulling on one side.
- Visible marks on cutter teeth: Flat spots or visible wear on the cutting edge indicate dulling.
- Chain bounces or chatters: Often a sign of severe dulling or improper depth-gauge height.
Check your chain’s sharpness before every use, especially after prolonged cutting or if you suspect the chain contacted dirt, rocks, or metal.
Tools and Equipment You Need Before Starting
Round File and File Size Selection
The round-file diameter must match your chain’s pitch. Common sizes include:
- 5/32 inch (4.0 mm): Standard 3/8-inch low-profile and .325-inch pitch chains.
- 3/16 inch (4.8 mm): Full-size 3/8-inch pitch chains.
- 7/32 inch (5.5 mm): .404-inch pitch chains (larger professional saws).
Using an oversized or undersized file will distort the cutter angle and shorten chain life. Find your chain’s pitch on the packaging, manual, or by measuring the distance between three consecutive rivets and dividing by two.
File Guide and Angle-Holding Tools
A round-file holder or guide—such as a Stihl Filing Kit, Oregon Power-Sharp, or similar universal guide—holds the round file at the manufacturer-recommended angle and prevents hand-filing errors. The guide typically includes angle markings for top-plate angle (usually 30°) and side-plate angle (typically 10–15°). Using a file guide is highly recommended for beginners because freehand filing is difficult and often results in inconsistent angles that damage the chain.
Depth-Gauge Filing Tool
A depth-gauge tool (often included in file kits) is a flat guide that rests on adjacent rakers and indicates how far to file down the center raker. This prevents over-filing or under-filing the rakers.
Bench Vise and Securing the Saw
Place the saw bar firmly in a bench vise with protective jaw covers (wood or soft metal) to avoid marring the bar. The bar should be positioned so the cutters face outward and are accessible without leaning awkwardly. Never attempt to sharpen a chain while the saw is in your lap or held by another person.
Safety Equipment
- Safety glasses (metal shavings and fragments).
- Work gloves (optional but protective).
- Disconnect the spark plug wire before beginning (standard safety practice to prevent accidental engine start).
Step-by-Step: How to Hand-File Your Chainsaw Chain
Step 1: Prepare the Saw and Mark Your Starting Point
Secure the saw bar firmly in the vise. Clean the chain with a wire brush to remove dirt and sawdust. Identify one cutter tooth as your starting point and mark it with a permanent marker or note its position (some chains have a pre-marked tooth). Marking prevents you from losing your place and ensures you file every cutter exactly once.
Step 2: Select the Correct Round File and Mount the File Guide
Choose the round file that matches your chain pitch (see the file size table above). Insert the file into the angle guide, align the guide markings to your manufacturer’s recommended angles, and ensure the file sits perpendicular to the chain bar and centered on the cutter tooth.
Step 3: File the First Cutter
Position the file guide so the round file contacts the top surface of the first cutter tooth at the marked starting point. Apply light to medium pressure and push the file smoothly outward across the cutter in one steady stroke—do not saw back and forth. Lift the file on the return stroke to avoid dulling it. Complete the number of strokes recommended by your file kit (typically 2–4 strokes per tooth for routine sharpening) until the cutter edge is sharp and reflects light evenly.
Step 4: Move to the Next Cutter on the Same Side
Advance to the next cutter tooth on the same side of the chain. Use the same angle, file size, and number of strokes as the first cutter. Consistency is critical: every tooth should receive identical treatment to ensure uniform sharpness and prevent the chain from pulling to one side.
Step 5: File All Cutters on the First Side
Continue around the chain, filing every other cutter (all cutters facing one direction) with the same angle and stroke count. Work methodically and do not skip teeth. This ensures the chain cuts straight.
Step 6: Flip the Saw and File Cutters on the Opposite Side
Once all cutters on the first side are sharp, rotate the saw bar or flip the saw so the cutters facing the opposite direction are now accessible. Repeat the filing process using the same angle and stroke count on each of these cutters.
Step 7: File the Depth Gauges (Rakers)
With all cutter teeth sharpened, the rakers (depth gauges) may now be too high relative to the sharpened cutters. Use a depth-gauge filing tool: position the guide on two adjacent rakers so it rests flat across them, then use a flat file to carefully lower the center raker until it sits just slightly below the guide surface (typically 0.025–0.035 inches below the cutter edge, depending on manufacturer specs). Lower each raker uniformly around the chain to maintain consistent cutting depth.
Step 8: Remove Burrs and Final Checks
Use a flat file to gently remove any metal burrs or raised edges on top of each cutter. Check that all cutters are approximately the same height and that the chain is uniform around the bar. Ensure chain tension is correct (the chain should pull away from the bar slightly when you lift it at the midpoint).
Step 9: Lubricate and Test
Apply chain oil to lubricate the newly sharpened chain. Run the saw briefly at idle to distribute the oil. Make a test cut in scrap wood; the chain should cut straight, produce coarse chips, and require minimal downward pressure.
Understanding Filing Angles: Top-Plate and Side-Plate Angles
The top-plate angle (typically 30° on most chains) is the angle between the top surface of the cutter and the chain’s direction of travel. This angle controls how aggressively the tooth cuts into the wood. The side-plate angle (typically 50–55° on many chains) is the angle at which the side of the cutter faces inward, affecting sideways shaping of the chip. A file guide automatically sets these angles, eliminating guesswork. If your chain manual specifies different angles, follow the manufacturer’s recommendation instead of the typical 30°, as some brands and styles vary.
Choosing the Right File Size: Avoiding Common Mistakes
Using an oversized file removes too much metal and weakens the tooth; an undersized file fails to properly re-sharpen the tooth and may require excessive strokes. Consult your chain’s manual or packaging for the exact file diameter. If you cannot determine the size, take a photo of your chain to a chainsaw shop or call the manufacturer. Ordering the wrong file wastes time and money; ordering the correct file ensures professional results.
When to Replace Instead of Sharpen
Sharpening restores a dull but otherwise intact chain. Replace the chain if:
- Cutter teeth are worn down to near the raker level: There is insufficient material left to sharpen.
- Chain is bent, has broken links, or has damaged rivets: Sharpening will not fix structural damage.
- The chain has been sharpened many times and cutters are very short: Repeated sharpening eventually removes enough metal that the cutters become too small to cut effectively.
- The chain is stretched or has excessive play: Replacing the chain is safer than attempting repairs.
Alternatives: Electric Sharpeners and Professional Service
Electric Chainsaw Sharpeners
Electric sharpeners mount the chain in a fixed position and rotate a powered grinding wheel across the cutters. Models range from bench-mounted systems (e.g., Oregon, Stihl electric sharpeners) to portable units. Advantages: speed, consistency, and minimal user skill required. Disadvantages: higher initial cost, risk of over-heating the chain if not used carefully, and less control over depth-gauge maintenance. Electric sharpeners work well for frequent users who sharpen many chains.
Dremel and Rotary Tools
A Dremel rotary tool with a sharpening attachment can sharpen chains but requires a steady hand, proper angle guidance, and significant practice. Without a guide, Dremel sharpening often creates inconsistent angles and uneven cutters. It is generally not recommended for beginners and can damage the chain if misused.
Professional Sharpening Service
Many chainsaw shops, hardware stores, and equipment rental centers offer professional chain sharpening for $10–$25 per chain. The service typically takes 1–3 days. Professional sharpeners use precision equipment and expert technique, making this an excellent option if you are uncomfortable hand-filing or lack the tools. For casual users who sharpen once or twice per year, professional service is economical and convenient.
Safety and Post-Sharpening Maintenance
Chain Tension After Sharpening
After sharpening, always re-check chain tension. A properly tensioned chain pulls away from the bar slightly when you lift it at the midpoint but does not slide freely on the bar. Incorrect tension causes premature wear and safety hazards.
Lubrication
Apply fresh chain oil after sharpening to protect the newly exposed metal and ensure smooth operation. Run the saw briefly at idle to distribute the oil through the chain.
Burr Removal
Use a flat file or whetstone to gently remove any raised metal edges or burrs on top of the cutters. Burrs can catch during cutting and cause the chain to bind.
First Test Cut
Make a shallow test cut in scrap wood before returning to heavy work. Listen for smooth operation and watch for straight cutting and coarse chips. If the chain still pulls to one side or produces fine dust, a cutter may not have been sharpened evenly; return to that cutter and file it again.
Extending Chain Life Between Sharpenings
- Avoid dirt and rocks: Cutting into soil, sand, or rocks dulls the chain rapidly.
- Use sharp fuel and bar oil: Low-quality oil allows dirt to accumulate on the chain.
- Maintain proper chain tension: A loose chain derails and wears unevenly; an over-tensioned chain strains the engine and dulls quickly.
- Sharpen regularly: A chain is easiest to sharpen when only mildly dull; waiting until it is very dull requires more aggressive filing.
- Keep the saw well-fueled and cooled: A starved or overheated engine runs rough and dulls the chain faster.
Frequently Asked Questions
Q: Can I sharpen a chainsaw chain while it is still attached to the saw?
A: It is possible but not recommended. Removing the chain and working on it in a vise or filing jig provides better access, safer positioning, and more stable filing. If you must sharpen it on the saw, secure the saw firmly, disconnect the spark plug wire, and ensure the chain cannot move unexpectedly.
Q: How often should I sharpen my chainsaw chain?
A: Sharpen the chain whenever you notice it is dull—typically after every 5–20 hours of use, depending on the wood type and whether you hit dirt or rocks. Regular light sharpening is easier and more effective than waiting until the chain is severely dulled.
Q: What is the correct depth-gauge height?
A: Depth gauges typically sit 0.025–0.035 inches below the cutting edge, but this varies by chain brand and model. Consult your chain’s manual or the file kit instructions for the exact specification. Using the depth-gauge guide included in your file kit eliminates guesswork.
Q: Is freehand chainsaw chain sharpening possible without a file guide?
A: Experienced users can sharpen freehand, but it requires significant practice and is prone to error. Angle mistakes create uneven cutters that cause the chain to pull to one side or cut poorly. For beginners and most homeowners, a file guide is essential for consistent, safe results.
Q: How do I know which file size I need for my specific chain?
A: Check your chain’s packaging, the saw manual, or the chain itself (some chains have the pitch marked on a link). Alternatively, measure the distance between three consecutive rivets, divide by two, and compare to a file size chart. When in doubt, contact the chain manufacturer or visit a local chainsaw dealer with your saw model number.