Quick Answer: How to Clean a Lawn Mower Carburetor
To clean a lawn mower carburetor, shut off the fuel supply, drain the tank completely, disconnect the fuel lines and throttle linkage, remove the carburetor from the engine, disassemble it carefully while documenting the layout, soak internal passages and jets in carburetor cleaner to dissolve fuel varnish, inspect gaskets and seals for damage, rinse all parts thoroughly with fresh solvent, reassemble in reverse order, reinstall on the engine, reconnect fuel lines, and prime the fuel system before starting. The process typically takes 1–2 hours for a standard push mower and restores engine performance when fuel buildup clogs jets or passages.
When You Should Clean vs. Replace Your Carburetor
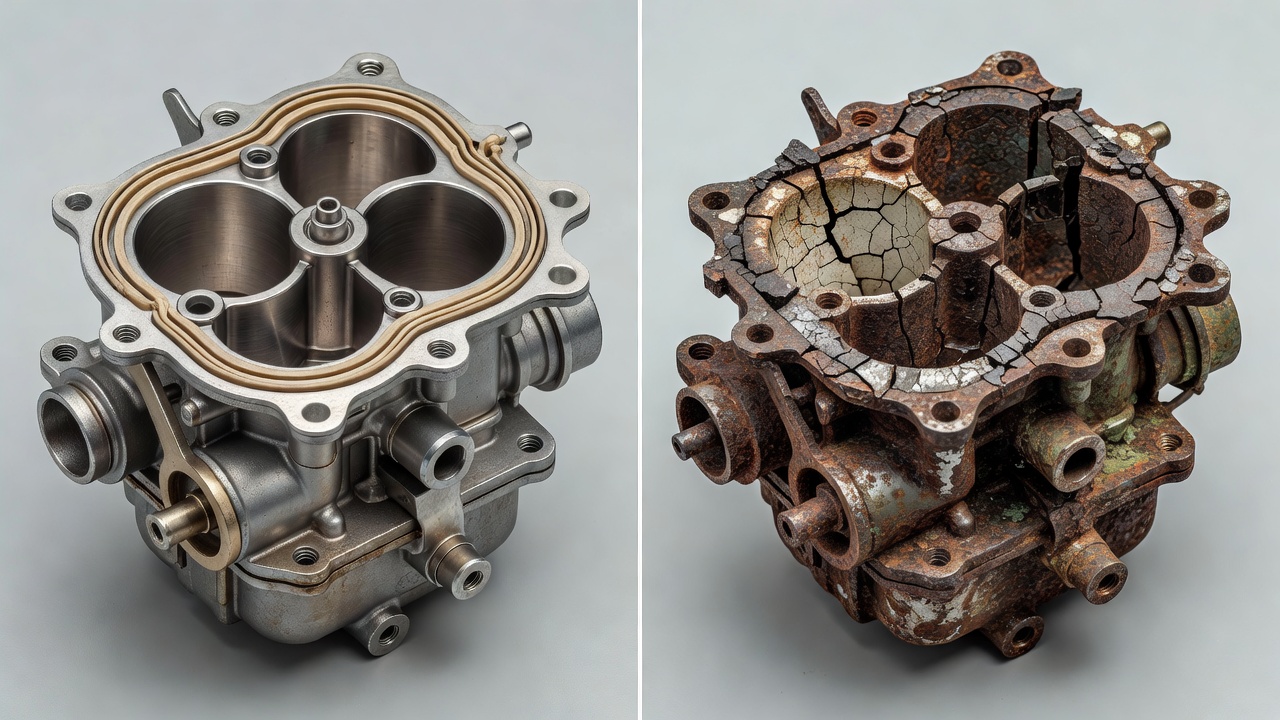
Deciding whether to clean or replace your carburetor depends on the severity of the problem and the age of your mower. Cleaning is worthwhile when your mower exhibits symptoms of a clogged carburetor: rough idle, difficulty starting, sputtering during operation, or loss of power under load. These issues typically stem from stale fuel left in the carburetor for extended periods, which creates varnish deposits that accumulate in jets and passages within 30 days of fuel sitting unused.
Replace your carburetor rather than clean it if:
- The float bowl has visible cracks or corrosion that cannot be cleaned away
- The needle valve is stuck and won’t respond to cleaning solvent
- Internal castings show pitting or erosion indicating metal degradation
- Gaskets and seals are permanently hardened or cracked beyond replacement during cleaning
- Your mower is older than 10–15 years and the carburetor design is obsolete or parts are unavailable
For most standard push mowers with symptoms of fuel blockage, cleaning is cost-effective and restores engine performance in the majority of cases. Professional carburetor cleaning services typically cost $75–$150, while a replacement carburetor may cost $100–$300 depending on the mower model. DIY cleaning costs only the price of carburetor cleaner ($10–$20 per can) and takes a few hours of your time.
Safety Precautions Before Starting
Before beginning carburetor cleaning, establish a safe work environment and prepare your mower to prevent fuel spills, engine damage, and personal injury.
Essential safety steps:
- Disconnect the spark plug wire — Remove the wire from the spark plug to prevent accidental engine start during disassembly.
- Allow the engine to cool — Wait at least 30 minutes after the last use so you don’t burn yourself on hot engine components.
- Work in a well-ventilated area — Carburetor cleaner produces volatile fumes; work outdoors or in a garage with doors open.
- Drain the fuel tank — Run the mower until it stalls to empty the tank, or siphon fuel into a metal container. Do not drain fuel over a floor drain or into soil.
- Wear nitrile gloves and eye protection — Carburetor cleaner is caustic and can irritate skin and eyes.
- Have absorbent material on hand — Keep shop towels, cardboard, or absorbent pads ready to catch drips from fuel lines and the carburetor.
- Use a metal fuel container — Store drained fuel in an approved metal gasoline container, never in plastic.
Fuel drainage is especially critical because residual fuel in the carburetor bowl and lines will spill when you disconnect components. Even small amounts of spilled fuel create fire hazards and environmental contamination.
Tools and Materials You’ll Need
Gather these tools and materials before you begin to avoid interruptions:
- Socket set and wrenches (typically 8mm, 10mm, 12mm for most mowers)
- Screwdrivers (flat-head and Phillips-head)
- Pliers and needle-nose pliers for fuel line removal
- Carburetor cleaner (aerosol or liquid)
- Small container for soaking parts (glass jar or plastic container)
- Clean rags and shop towels
- Gasket scraper (plastic or soft metal to avoid damaging surfaces)
- Small brush or old toothbrush for scrubbing
- Camera or smartphone to document disassembly sequence
- Labels or masking tape to mark fuel lines and linkages
- Gasket set (replacement gaskets for the carburetor — typically included in carburetor rebuild kits)
- New fuel filter (optional but recommended)
How to Remove the Carburetor from Your Mower
Carburetor removal varies slightly depending on whether you operate a push mower, riding mower, or handheld equipment, but the fundamental steps remain consistent.
Step 1: Disconnect fuel lines
Locate the fuel line connecting the fuel tank to the carburetor inlet. Pinch the fuel line with a hose clamp or your fingers to stop fuel flow. Disconnect the line at the carburetor by loosening the fitting or sliding the line off the barbed inlet connector. Allow any residual fuel to drip into your absorbent material. Label the fuel line with masking tape to mark its original position.
Step 2: Disconnect the throttle linkage
On most mowers, a metal or plastic rod connects the engine throttle lever to the throttle arm on the carburetor. This linkage may be secured with a small cotter pin, clip, or bolt. Document the linkage position with a photo before removal. Carefully unhook or unbolt the linkage and set it aside.
Step 3: Disconnect the choke linkage (if applicable)
Some carburetors have a separate choke lever or cable. Document its position, then disconnect it from the carburetor by unbolting or unclipping the linkage.
Step 4: Remove mounting bolts
The carburetor is typically secured to the engine with 2–4 bolts or studs. Using the appropriate socket or wrench, remove these fasteners completely. Some mowers use studs with nuts; others use bolts that thread directly into the engine. Keep these fasteners in a small container so you don’t lose them.
Step 5: Lift the carburetor away from the engine
Gently pull the carburetor straight away from the engine intake manifold. You may encounter a rubber gasket or seal between the carburetor and engine; this gasket will likely stick to one surface. Note which surface it adheres to. Do not force the carburetor or bend fuel line connections.
Step 6: Inspect the intake manifold
With the carburetor removed, examine the intake manifold surface. Scrape away the old gasket material using a plastic gasket scraper or soft brush. Do not scratch the aluminum casting. Wipe the surface clean with a rag so you have a smooth seat for the new gasket during reassembly.
Disassembly and Identification of Key Carburetor Parts
Before disassembling your carburetor, familiarize yourself with its main components so you understand what you’re cleaning and how it functions.
Float bowl: The large metal or plastic chamber at the bottom of the carburetor. Fuel accumulates here before being drawn up through internal passages. The float bowl is secured with bolts around its perimeter and sealed with a gasket. This is where stale fuel varnish typically accumulates.
Float and needle valve: Inside the float bowl, a small floating lever (the float) rises and falls with fuel level. As the float rises, it pushes a needle valve closed, shutting off fuel flow from the tank. When fuel is consumed and the float drops, the needle valve opens, allowing more fuel in. Stale fuel can cause the needle valve to stick, preventing proper fuel flow.
Jets: Small brass or metal passages with precisely sized holes. Main jets control fuel flow during normal operation; pilot jets control idle fuel flow. These jets are removed by unbolting them and unscrewing them by hand. Jets are the most common clogging point because fuel varnish is tiny and hardens inside these small passages.
Gaskets and seals: Rubber or cork material that seals joints between carburetor sections. Old gaskets become hardened and brittle over time and should be replaced during cleaning. Gaskets and seals are always included in carburetor rebuild kits.
Venturi: The narrowed passage where air flows through the carburetor. Fuel is drawn into this airstream through the main jet, creating the fuel-air mixture that enters the engine. Fuel varnish can restrict this passage.
Float-type vs. diaphragm-type carburetors: Most push mowers use float-type carburetors, which are gravity-fed and relatively simple. Handheld equipment like chainsaws and string trimmers often use diaphragm-type carburetors, which use engine pulsation to control fuel delivery. Diaphragm carburetors are generally easier to clean because they have fewer moving parts, but the diaphragm itself (a rubber membrane) must be inspected for tears and cannot be repaired—only replaced.
Document the disassembly: Take photos or videos of your carburetor from multiple angles before you begin disassembly. Zoom in on how linkages, springs, and fuel lines are positioned. This visual record will be invaluable during reassembly, especially for complex carburetors with multiple springs and adjustment screws.
Disassembling the Carburetor
Step 1: Remove the float bowl
Unbolt the float bowl by removing the bolts around its perimeter. These typically use a 8mm or 10mm socket. Place the bolts in a container. Gently pull the float bowl straight down and away from the carburetor body. The float bowl gasket will likely adhere to the bowl; carefully peel it away and discard it (you’ll use a new gasket during reassembly).
Step 2: Extract the float assembly
With the float bowl removed, you’ll see the float and needle valve. The float is typically a hollow plastic or brass chamber that pivots on a pin. This pin may be held in place with a small clip or cotter pin. Remove the clip carefully using needle-nose pliers, then slide the pin out. The float should lift away freely. The needle valve will be attached to the float and will come out with it.
Step 3: Remove jets and internal passages
Locate the main jet and pilot jet inside the carburetor bore. These are typically brass fittings that screw into the carburetor body. Using the correct screwdriver (usually a small Phillips-head), carefully unscrew each jet. Some jets may be tight if they’ve been in place for years; apply gentle pressure and be patient. Do not strip the slots in the jet head. Place each jet in your soaking container immediately so you can begin cleaning.
Step 4: Remove adjustment screws
Most carburetors have idle speed and fuel mixture adjustment screws. These are small screws with springs underneath. Before removing them, count how many complete turns they require to fully seat, or mark the original position with a marker on the carburetor body. This information helps you reset them to their original position during reassembly. Remove the screws and springs carefully, placing them in your soaking container.
Step 5: Separate the carburetor body (if applicable)
Some carburetors have two halves bolted together (an upper body and lower body). If yours does, carefully unbolt the halves. Be cautious not to lose any small springs or parts that may fall between the sections. Document the internal layout with photos before separating the halves.
Cleaning Carburetor Jets and Internal Passages
The core of carburetor cleaning is dissolving and removing fuel varnish from jets and internal passages. This process typically takes 30 minutes to several hours depending on the severity of the buildup.
Why do jets and passages clog?
Fuel is a complex mixture of hydrocarbons. When fuel sits in a carburetor unused for weeks or months, lighter components evaporate, leaving behind heavier residues that oxidize and polymerize into varnish. This varnish is sticky and hardens, coating internal surfaces and completely blocking small jet passages. A clogged main jet prevents fuel from entering the combustion chamber, causing the engine to run lean (too little fuel) and stall. A clogged pilot jet causes rough idle and difficulty starting.
Soaking method:
Place all carburetor components, jets, and small parts into a glass container filled with carburetor cleaner. Carburetor cleaner is specifically formulated to dissolve fuel varnish and is the recommended solvent for jet and passage cleaning. Do not substitute alternative solvents like gasoline or acetone, which are less effective and potentially dangerous. Submerge all parts and allow them to soak for 30 minutes to 2 hours, depending on the thickness of varnish buildup. For heavily varnished carburetors, soak overnight (up to 12 hours).
Scrubbing and brushing:
After soaking, use an old toothbrush or small wire brush to gently scrub away softened varnish from the carburetor body and float bowl walls. For jets, use a soft brass brush or carefully push a small wooden toothpick through the jet orifice to dislodge hardened particles. Do not use metal picks or files, as these will enlarge the jet opening and ruin its precision. Submerge the jet again briefly and repeat brushing until the opening is clear and you can see light through it.
Rinsing:
After scrubbing, rinse all parts thoroughly with fresh carburetor cleaner to remove dissolved varnish. Shake each part under a gentle stream of cleaner and use a brush to remove residual material from crevices and passages. For the carburetor body, pour fresh cleaner through internal passages to flush out loosened deposits. Continue rinsing until the cleaner runs clear with no visible discoloration.
Drying:
Place all cleaned parts on a clean rag and allow them to air-dry completely. Carburetor cleaner evaporates quickly (usually within 15–30 minutes). Do not use compressed air to dry parts, as this can drive moisture into internal passages. If moisture remains inside the carburetor, it will cause rust and continued corrosion. Ensure everything is bone-dry before reassembly.
Inspecting Gaskets, Seals, and Wear Points
Before reassembling your carburetor, identify components that must be replaced rather than reused.
Gaskets and seals: Remove old gasket material from the float bowl and carburetor body using a plastic gasket scraper. Gaskets and seals should always be replaced as part of routine maintenance during cleaning. They become hardened and brittle over time and will not seal properly if reused. Carburetor rebuild kits include new gaskets and seals specific to your carburetor model; use these exclusively. Do not attempt to make gaskets from household materials like cork or felt.
Float integrity: Examine the float (typically a hollow plastic or brass chamber). Shake it gently near your ear—you should hear fuel sloshing inside if it’s intact. If the float is silent and feels light, the float may have a hidden crack and is allowing fuel to seep out. A leaking float will sink instead of float, preventing the needle valve from closing and flooding the carburetor. If the float is compromised, it must be replaced. Float replacement kits are available and inexpensive ($10–$20).
Needle valve: Examine the needle valve seat (the small opening where the needle sits). If you see pitting, corrosion, or a rough surface, the needle valve cannot seal properly and must be replaced. A replacement needle valve typically costs $5–$15 and is included in most rebuild kits. If the seat appears smooth and shiny, the needle valve may be reused if it moves freely and shows no visible damage.
Springs and linkages: Inspect all springs for cracks or permanent deformation. Springs that are bent or flattened will not provide correct tension during operation. Check linkage arms and pins for corrosion or bending. Bent linkages prevent proper throttle or choke movement and must be straightened or replaced.
O-rings: Examine rubber O-rings for cracks, hardening, or shrinkage. Compressed O-rings that have lost their elasticity will not seal properly. O-ring kits are inexpensive and should be replaced during any carburetor cleaning.
Reassembly and Reinstallation Steps
Step 1: Prepare the carburetor body
Place the carburetor body on a clean work surface. Refer to your photos to understand the internal layout. Apply a small amount of carburetor cleaner inside the body and use a brush to clean any remaining varnish from internal passages. Dry thoroughly.
Step 2: Install jets and adjustment screws
Reinstall jets by carefully screwing them back into their original positions. Use gentle hand pressure; do not over-tighten. Install adjustment screws to their original position (the number of turns you counted during disassembly). These adjustments should be fine-tuned after the engine starts and runs, not during initial reassembly.
Step 3: Install the float assembly
Slide the needle valve and float back into position and insert the pivot pin. Secure the pin with its clip or cotter pin. Gently manipulate the float by hand to ensure it moves freely up and down without catching or binding.
Step 4: Install a new gasket on the float bowl
Place a new gasket on the float bowl rim, aligning any bolt holes. If the gasket has notches or markings, ensure these align with fuel inlet ports and passages.
Step 5: Reinstall the float bowl
Carefully position the float bowl against the carburetor body, ensuring the gasket remains seated. Hand-start the bolts around the perimeter, then tighten them in a cross pattern (like tightening a tire) to ensure even pressure. Use a socket wrench to tighten bolts snugly, but not so tight that you risk cracking the bowl. Typical torque is light—usually less than 10 foot-pounds for small engines.
Step 6: Prepare the engine intake manifold
Before reinstalling the carburetor on the engine, ensure the intake manifold surface is clean and smooth (you scraped and wiped it during removal). Place a new carburetor gasket on the intake manifold studs, aligning it with bolt holes.
Step 7: Reinstall the carburetor on the engine
Carefully position the carburetor over the intake manifold studs and align the bolt holes. Hand-start the mounting bolts or nuts, then tighten them in a cross pattern. Tighten firmly but gently to avoid cracking the carburetor body or warping the gasket.
Step 8: Reconnect fuel lines and linkages
Reconnect the fuel line from the tank to the carburetor inlet, sliding it onto the barbed connector or tightening the fitting. Ensure the connection is snug and secure. Reconnect the throttle linkage, using your photos as a guide to restore the original position. Reconnect the choke linkage (if applicable). Verify that all linkages move freely and that springs are properly tensioned.
Step 9: Reconnect the spark plug wire
Reattach the spark plug wire to the spark plug, ensuring a tight connection.
Priming the Fuel System and Testing
Step 1: Prime the carburetor
Before starting the engine, the carburetor must be refilled with fuel. Locate the fuel shutoff valve on the fuel line (if your mower has one) and ensure it is in the ON position. If there’s no shutoff valve, simply ensure the fuel cap is secure and vented. On gravity-fed systems (most push mowers), fuel will flow to the carburetor naturally and the float bowl will fill within a few minutes. On priming-type systems, you may need to manually pump a primer bulb (if equipped) to force fuel into the carburetor.
Step 2: Check for fuel leaks
Before starting, visually inspect all fuel line connections, the float bowl, and around the carburetor gasket for fuel seeps or drips. Fuel leaks indicate a loose connection or an improperly seated gasket. Tighten connections or reseat the carburetor as needed. Do not start the engine if fuel is dripping.
Step 3: Start the engine
Set the engine choke to the cold-start position (if applicable) and attempt to start the mower. The engine may require several pulls before it catches, as the fuel system is being refilled and the engine needs time to develop compression. Do not continuously pull the starter without pausing—this exhausts you and floods the carburetor.
Step 4: Let the engine warm up
Once the engine starts, allow it to idle for 3–5 minutes so it warms up. During this time, watch for fuel leaks, listen for unusual sounds, and observe the exhaust smoke. Exhaust should be grayish-blue; dark smoke indicates the engine is running rich (too much fuel), and white smoke may indicate water in the fuel or incomplete combustion.
Step 5: Adjust idle and fuel mixture (if necessary)
After the engine has warmed, the idle speed and fuel mixture screws may need adjustment. Turn the idle speed screw clockwise to increase RPM or counterclockwise to decrease it. The mower should idle smoothly without stalling or racing. Turn the fuel mixture screw slowly counterclockwise (leaning the mixture) until the engine stumbles, then turn it back clockwise (richening the mixture) until the engine runs smoothly. This is a trial-and-error process; most adjustments require only 1/4 to 1/2 turn from the factory setting.
Step 6: Test under load
Let the engine return to idle, then engage the mower’s cutting blade or increase engine load (if applicable for your equipment). The engine should not stall under load and should maintain steady RPM. If the engine bogs down, dies, or runs roughly, the fuel mixture may need slight adjustment.
Step 7: Verify performance
Run the mower for 10–15 minutes during normal operation (mowing, if possible) to confirm that the cleaning was successful. The engine should start easily, idle smoothly, accelerate smoothly under load, and show no signs of fuel leakage or rough operation. If performance issues persist, the carburetor may require additional cleaning or professional service.
When to Call a Professional
While carburetor cleaning is manageable for most DIYers, some situations warrant professional service:
- Complex carburetors: Ride-on mowers and commercial equipment often have multi-barrel carburetors with sophisticated adjustment systems. These are best serviced by small-engine technicians who have specialized tools and knowledge.
- Multiple issues: If your mower has other problems beyond carburetor clogging (engine compression loss, ignition problems, air filter issues), a professional can diagnose the full picture and avoid wasted time and money.
- Internal engine damage: If the engine runs rough even after successful carburetor cleaning, the problem may be internal (piston wear, valve damage) rather than carburetor-related. A mechanic can perform a compression test to rule this out.
- Carburetor damage: If the carburetor has cracks, internal corrosion, or severely worn needle valve seats, it should be replaced rather than cleaned. Replacement carburetors are sometimes cheaper than professional cleaning labor.
- Time constraints: If you don’t have a few hours to dedicate to the project, professional cleaning (typically $75–$150) may be worth the cost.
Most small-engine repair shops can clean a carburetor within 1–2 days, and warranty coverage typically applies to the service for 30–90 days. Check your mower’s manual to see whether DIY maintenance voids any remaining warranty.
Frequently Asked Questions
How often should I clean my lawn mower carburetor?
For seasonal users, clean the carburetor annually before storing the mower for winter, or if you notice performance issues like difficulty starting or rough idle. For frequent users, cleaning may be necessary every 2–3 years. The best preventative measure is to use fresh fuel (less than 30 days old) and run the mower until the tank is nearly empty before long-term storage. Never leave fuel in the carburetor for more than 3 months without adding fuel stabilizer, which slows varnish formation.
Can I use gasoline or acetone to clean carburetors instead of carburetor cleaner?
Gasoline and acetone are less effective at dissolving hardened fuel varnish than commercial carburetor cleaner, which is specifically formulated for this purpose. Additionally, gasoline is highly flammable and presents greater fire risk in a workshop setting. Acetone can damage rubber seals and gaskets on some carburetors. Carburetor cleaner is the recommended solvent and typically costs $10–$20 per can.
What if my mower still won’t start after carburetor cleaning?
If cleaning didn’t resolve starting problems, verify the spark plug is firing (remove it and check for spark), confirm the fuel filter is clean and fuel is flowing to the carburetor, and ensure the air filter is not clogged. If these components are fine, the problem may be a stuck needle valve that still requires additional soaking, an internal engine compression issue, or an ignition system failure unrelated to the carburetor.
How do I prevent fuel varnish from building up in the carburetor?
Use fresh fuel (purchased within 30 days), run the tank down before winter storage, or add fuel stabilizer to gas if you plan to store the mower for more than 3 months. Consider emptying the fuel tank and carburetor completely before long-term storage (6+ months) by running the mower until it stops, then draining the fuel and pulling the starter several times to expel fuel from the carburetor.