Direct Answer: How to Put String in a Weed Wacker
To put string in a weed wacker, first disconnect the spark plug (gas models) or remove the battery (electric models) for safety. Remove the spool from the trimer head by pressing the release tabs and pulling it free. Cut a length of trimer line matching your unit’s recommended gauge, insert one end through the anchor hole in the spool, and wind it tightly in the direction shown by the arrow on the spool. Leave4–6 inches of loose tail per line end, feed each tail through the eyelets on the trimmer head, and snap the spool back into place. Always consult your owner’s manual, as spool designs vary by model.
Understanding Your Weed Wacker’s Trimer Head
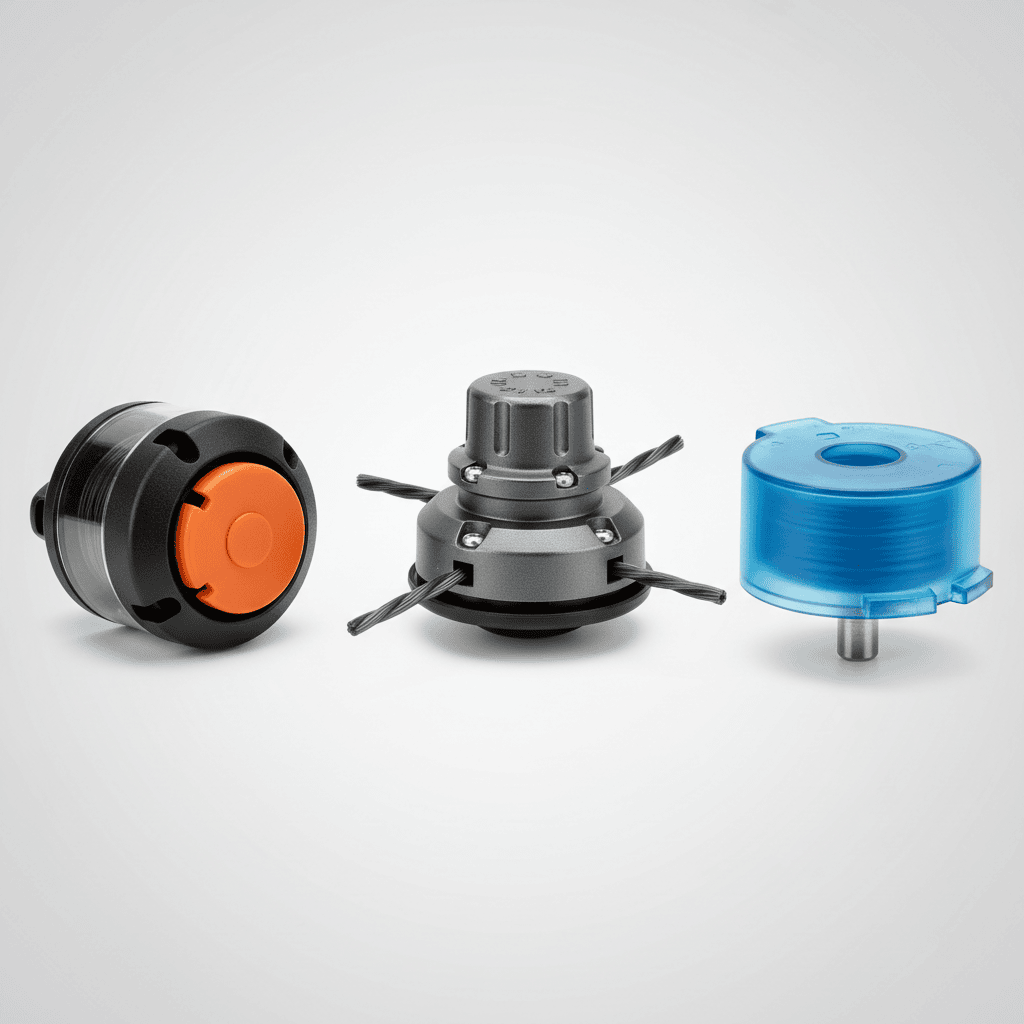
Before loading string, identify which type of trimmer head your weed wacker has. The most common designs arebump-feed heads, fixed-line heads, and pre-wound spool systems. Each design loads and advances line differently.
A bump-feed head automatically advances trimer line as you tap the head on the ground while the string is spinning. This design uses a spring-loaded spool that releases more line with each bump. A fixed-line head requires you to manually unwind and cut the line when it wears short—no automatic feeding. A pre-wound spool is a sealed, ready-to-use cartridge you simply snap onto the trimer head; no winding required.
Look for an arrow or directional marking on your spool. This arrow indicates the winding direction and is critical: the spool must spin in the same direction as your trimer head rotates, or the line will unwind instead of staying wound. Check your owner’s manual to confirm your head type and the correct rotation direction.
Key Factors to Consider Before Loading String
Trimer Line Gauge (Thickness)
Trimer line comes in different gauges, typically ranging from 0.065 inches to 0.130 inches in diameter. Using the wrong gauge can reduce cutting performance or stress your trimmer’s engine or motor. Check your owner’s manual for the manufacturer-recommended gauge for your specific model. Gas-powered trimmers often use thicker line (0.095–0.130 inches), while battery-powered and electric models typically use thinner line (0.065–0.085 inches).
How Much String Do I Need?
The amount of trimer line your spool holds depends on the spool’s size and the line’s gauge. Most residential spools hold 20–40 feet of line. Thinner line allows more footage on the same spool; thicker line means less. Your owner’s manual will specify the recommended line length for your spool. Using too little line reduces cutting width and requires frequent reloading; using too much causes the spool to jam or not seat properly into the head.
Pre-Wound vs. Bulk Line
You can buy pre-wound spools (ready to snap on) or bulk trimer line and wind it yourself. Pre-wound spools are convenient but costlier per foot. Bulk line is more economical if you trim frequently. Gas and electric trimmers use different line types and gauges, so verify compatibility with your model before purchasing.
Step-by-Step: How to Put String in a Weed Wacker
Step 1: Safety First
Before disassembling your trimmer head, always disconnect the power source. For gas models, remove the spark plug wire or cap to prevent accidental starting. For electric or battery-powered models, remove the battery or unplug the unit. Never work on the trimer head while the engine or motor could start.
Step 2: Remove the Spool
Locate the trimer head on the bottom of your weed wacker. Most heads have two plastic release tabs or a central cap. Press or pry these tabs inward and pull the spool straight out. Some models require turning the spool counterclockwise. Refer to your manual if you are unsure. Set the spool on a clean, flat surface.
Step 3: Prepare Your Trimmer Line
Measure and cut a length of trimmer line appropriate for your spool (typically 20–40 feet, per your manual). Cut both ends at a slight angle or with a sharp knife to make insertion easier. Trim away any frayed edges.
Step 4: Insert the Line into the Anchor Hole
Locate the anchor hole (also called a retention slot) on the spool. This small hole or notch is where the trimer line is held before winding. Insert one end of your line into this hole, leaving about 1–2 inches inside the anchor. The line should sit firmly in the anchor so it does not slip during winding.
Step 5: Wind the Line in the Correct Direction
Check the arrow on your spool to confirm the winding direction. Begin winding the line tightly around the spool in the direction of the arrow. Keep tension on the line as you wind so it wraps evenly and compactly. Avoid overlapping layers or loose wraps, which cause the spool to jam or not reseat. Wind until about 4–6 inches of line remain unwound—this loose length will be fed through the eyelets later.
Step 6: Secure the Wound Line
After winding, press or hook the loose end of the wound line into a notch or slot on the spool (if your model has one) to keep it from unwinding. Some spools have small posts or guides for this purpose. Check your manual for the exact method.
Step 7: Feed the Line Tails Through the Eyelets
The trimer head has one or two small eyelets (openings) where the line exits and spins. Take one of the 4–6 inch loose tails and feed it through an eyelet on the head. Repeat for the second tail if your trimer has two eyelets (dual-line design). The tails should pass through cleanly without kinking or twisting.
Step 8: Reassemble the Trimmer Head
Carefully guide the spool back into the trimmer head, ensuring the line tails stay fed through the eyelets. Press or snap the spool into place. You should hear or feel a click when it seats correctly. Gently tug the line tails to confirm they are secure and not pinched.
Bump-Feed vs. Fixed-Line Heads: How to Advance String
Bump-Feed Heads
A bump-feed head uses a spring-loaded spool that advances trimer line automatically. As you operate the trimer, hold the head parallel to the ground and tap it gently on the ground (or a hard surface) while the string is spinning. Each tap compresses the spool and releases a preset amount of line. You can advance line several times during a single triming session. Never tap the head hard or rapidly, as this can damage the spool or cause excessive line feeding. If line does not advance after bumping, the spool may be worn out or the line may be tangled inside.
Fixed-Line Heads
A fixed-line head does not advance line automatically. When the line wears short and cutting performance drops, stop the trimmer, disconnect the power, and manually unwind fresh line from the spool. You may need to losen a cap or release mechanism on the spool to unwind line. Some models allow you to wind additional fresh line around the used line, extending the usable length. Consult your manual for the specific procedure.
Pre-Wound Spools
If your trimmer uses pre-wound spools, simply remove the old (worn-out) spool and snap a new one into place. This eliminates winding altogether and ensures consistent line length and tension. Pre-wound spools are ideal for casual users who trim infrequently.
Troubleshooting Common Problems
Line Not Feeding or Advancing
If your bump-feed head does not advance line when you tap the ground, the spool may be jammed with old, hardened line or debris. Remove the spool, clean out any dried line fragments, and check that the spring and advancing mechanism move freely. If the spool is damaged or the spring is broken, it may need replacement. For fixed-line heads, ensure you are manually unwinding line correctly per your manual.
Spool Popping Apart or Unraveling
If the spool keeps coming loose or line unravels during use, the spool may not be seated correctly in the head. Remove and reseat it, ensuring it clicks into place. Also confirm that you wound the line in the correct direction per arrow—winding against the arrow will cause the line to unwind as the head spins. Check that the line is wound tightly and compactly with no loose wraps or gaps.
Line Snapping or Cutting Poorly
Poor cutting or frequent line breakage suggests the line is worn, old, or the wrong gauge for your trimmer. Trimer line degrades over time and becomes britle, especially in sunlight. Replace old line with fresh line of the correct gauge per your manual. Also, ensure the line length is correct—too little line reduces cutting power, while too much creates drag and stress that can break the line.
How Often Should I Replace or Reload String?
The frequency depends on how often you trim and the trimer’s power. Casual homeowners may reload every 2–4 weeks during the growing season. Heavy-use commercial or professional setups may need to reload daily. Check your line regularly for wear, fraying, or shortness. Replace the line when it no longer extends beyond the trimer head or when cutting performance drops noticeably.
Safety Tips and Best Practices
- Always disconnect power before servicing. Remove the spark plug wire (gas) or battery (electric) to prevent accidental startup while your hands are near the spinning head.
- Wear protective gear when triming. Use long pants, closed-toe shoes, safety glasses, and hearing protection. Trimer line can fling debris at high speed.
- Check line length before each use. Ensure the line extends evenly on both sides and reaches the guard or shield. Uneven or too-short line reduces cutting width and efficiency.
- Inspect the spool and head for damage. Cracks, bent tabs, or broken springs reduce performance and safety. Replace damaged parts per your manual.
- Keep trimer line stored in a cool, dry place. Sunlight and heat degrade line over time, making it britle and prone to breakage.
- Never run the trimmer with the spool partially removed or unsecured. This can cause the spool to spin loose and hit your leg or nearby objects.
- Refer to your owner’s manual for model-specific steps. Spool designs and reassembly procedures vary widely between brands and models.
Frequently Asked Questions
What if I wind the line in the wrong direction?
If you wind the line opposite to the arrow on the spool, the line will unwind instead of staying wrapped when the head spins. Stop triming, remove the spool, and rewind the line in the correct direction per arrow. Always double-check the arrow before winding.
Can I use any trimer line gauge on my weed wacker?
No. Using the wrong gauge can stress your trimmer’s engine or motor and produce poor cutting results. Always use the gauge specified in your owner’s manual. Gas trimmers typically need thicker line (0.095–0.130 inches), while electric and battery models use thinner line (0.065–0.085 inches).
How do I know when my trimmer head needs replacement instead of just reloading string?
If the spool no longer seats properly, the eyelets are cracked, the release tabs are broken, or the advancing mechanism does not work, the head may need replacement. Attempting to reload a damaged head will not improve performance and may cause the line to tangle or the spool to fail during use. Consult your manual or contact the manufacturer if you suspect head damage.
Is it cheaper to buy pre-wound spools or bulk line?
Bulk line is generally cheaper per foot if you trim frequently, but pre-wound spools are more convenient and eliminate winding time. For occasional homeowners, pre-wound spools may be more cost-effective since you avoid the tools and learning curve for winding. Calculate the cost per foot of each option and compare based on your usage habits.