Direct Answer: How to Test a Lawn Mower Coil
To test a lawn mower coil, use a multimeter to measure resistance (healthy coils typically read 2–10 ohms depending on the model), perform a voltage test during engine operation to confirm spark output, or use a spark plug tester for visual spark confirmation. A functioning coil produces consistent voltage readings, generates a strong blue spark, and maintains stable resistance values. If your coil fails these tests, replacement is typically necessary.
Understanding Your Lawn Mower Coil and Its Function
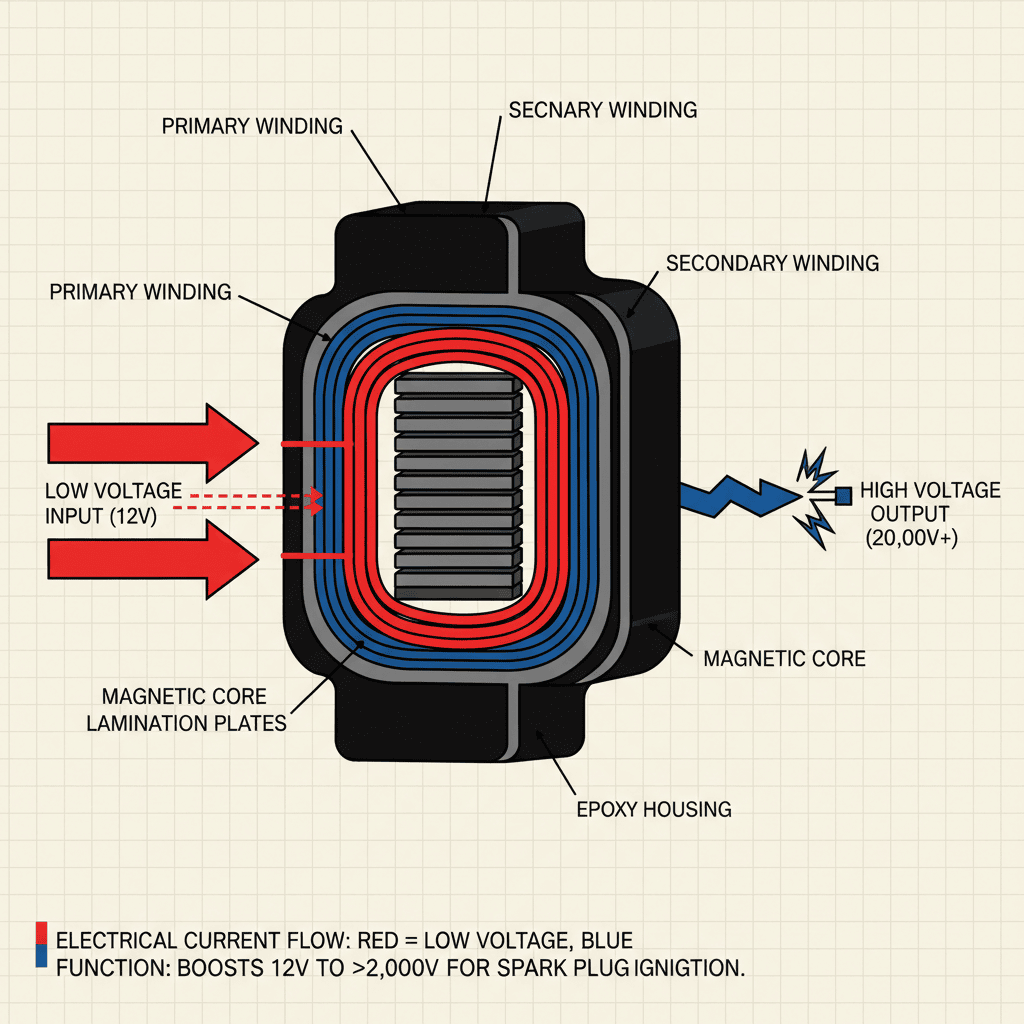
The ignition coil is a critical component of your lawn mower’s ignition system. It converts low voltage from the battery or magneto into the high voltage needed to create a spark at the spark plug. Without a functioning coil, your engine won’t start or will run poorly.
Lawn mower coils fail for several reasons:
- Heat damage from prolonged engine operation
- Moisture and corrosion from exposure to wet conditions
- Vibration stress from engine movement
- Electrical overload from wiring faults
- Age and wear after years of use
Common signs of a failing coil include difficulty starting, weak spark, engine sputtering, stalling under load, or complete failure to start. Testing your coil helps confirm whether it’s the culprit before you replace expensive components.
Tools and Equipment You’ll Need for Testing
Proper tools make coil testing accurate and safe. Here’s what you should have:
| Tool | Purpose | Why It Matters |
|---|---|---|
| Digital Multimeter | Measures resistance and voltage | Provides precise readings for resistance and voltage output testing |
| Spark Plug Tester | Visual spark confirmation | Shows whether spark is being generated without removing the spark plug |
| Insulated Screwdrivers | Remove coil connections safely | Prevents accidental grounding and electrical shock |
| Work Gloves | Hand protection | Protects against cuts and accidental contact with high-voltage components |
| Safety Glasses | Eye protection | Shields eyes from debris or accidental spark discharge |
A multimeter is the most essential tool. Look for a model with resistance (ohms) and voltage (volts) measurement capabilities. Inexpensive digital multimeters ($15–$30) work fine for lawn mower coil testing.
Method 1: Testing Coil Resistance with a Multimeter
Resistance testing is the most straightforward way to check if a coil is internally damaged. This test measures the coil’s electrical resistance in ohms.
Step-by-Step Resistance Testing
- Disconnect the spark plug wire from the spark plug to prevent accidental starting
- Locate the coil on your lawn mower (typically mounted on the engine block or frame)
- Disconnect the coil leads using insulated screwdrivers—note which wire connects to which terminal
- Set your multimeter to the resistance (ohms) setting, usually marked with the Ω symbol
- For primary coil resistance: Place one multimeter probe on the positive terminal and one on the negative terminal. A healthy primary coil typically reads 2–5 ohms
- For secondary coil resistance: Place one probe on the negative terminal and one on the spark plug wire terminal. A healthy secondary coil typically reads 4,000–10,000 ohms (or 4–10 kilohms)
- Record your readings and compare them to your mower’s specifications (check the owner’s manual or manufacturer website)
Interpreting Resistance Results
- Within specification range: Coil is likely healthy
- Zero ohms or very low readings: Indicates an internal short circuit—coil needs replacement
- Infinite resistance (no reading): Indicates an open circuit—coil needs replacement
- Significantly higher than specification: Indicates internal damage or corrosion—coil needs replacement
Note: Resistance values vary by manufacturer and coil type. Always consult your lawn mower’s manual for exact specifications before concluding a coil is bad.
Method 2: Voltage Testing the Coil During Engine Operation
Voltage testing checks whether the coil produces adequate electrical output while the engine is running. This test confirms the coil functions under actual operating conditions.
Step-by-Step Voltage Testing
- Set your multimeter to DC voltage mode (usually marked with a V and a straight line)
- Start the lawn mower engine and let it warm up for 30 seconds
- While the engine is running, place one multimeter probe on the coil’s positive terminal and the other on ground (a clean metal part of the engine block)
- Observe the voltage reading as the engine runs
- A healthy coil typically produces 100–400 volts during operation, depending on the mower model
- Check for consistency: The reading should remain stable, not fluctuate wildly
Interpreting Voltage Results
- Steady 100–400 volts: Coil is functioning properly
- No voltage or very low readings: Coil may be failing or connections may be loose
- Erratic or fluctuating readings: Indicates intermittent coil failure
- Excessively high voltage (over 500V): May indicate a problem with the ignition system circuit
Safety note: Voltage testing involves a running engine. Keep hands, hair, and loose clothing away from moving parts. Never reach near the blade or belts during testing.
Method 3: Using a Spark Plug Tester for Visual Confirmation
A spark plug tester provides quick visual confirmation that your coil is generating spark. This is often the fastest diagnostic method.
Step-by-Step Spark Plug Tester Method
- Disconnect the spark plug wire from the spark plug
- Insert the spark plug tester into the spark plug wire (the tester has a socket that fits the wire)
- Ground the tester by touching its metal body to a clean, unpainted metal surface on the engine
- Pull the starter cord (or turn the ignition key for electric start mowers) while watching the tester window
- Observe the spark: A strong blue spark jumping across the gap indicates a healthy coil
Interpreting Spark Tester Results
- Strong blue spark: Coil is functioning well
- Weak orange or yellow spark: Coil may be failing or connections are loose
- No spark: Coil is likely dead or connections are disconnected
- Intermittent spark: Indicates a failing coil or loose connection
Spark plug testers are inexpensive ($10–$20) and provide immediate visual feedback without needing to interpret numerical readings.
Safety Precautions Before Testing Your Coil
Working with lawn mower ignition systems involves electrical hazards. Follow these safety guidelines:
- Always disconnect the spark plug wire before testing to prevent accidental engine starting
- Wear insulated gloves and safety glasses when handling coil connections
- Never touch high-voltage components with bare hands, even when the engine is off
- Work in a well-ventilated area away from fuel sources
- Allow the engine to cool before handling the coil if you’ve been running the mower
- Disconnect the battery on electric-start mowers before beginning any testing
- Never test a coil in wet conditions or with wet hands
- Keep a fire extinguisher nearby when working with engines
Interpreting Test Results: Good vs Bad Coil Indicators
Understanding what your test results mean helps you decide whether to replace the coil or investigate other problems.
Signs of a Healthy Coil
- Primary coil resistance: 2–5 ohms (within manufacturer specification)
- Secondary coil resistance: 4,000–10,000 ohms (within manufacturer specification)
- Voltage output during operation: 100–400 volts (stable and consistent)
- Spark plug tester shows strong blue spark
- No visible damage, corrosion, or burn marks on the coil
Signs of a Failing or Failed Coil
- Resistance readings outside manufacturer specifications
- Zero ohms or infinite resistance on either primary or secondary test
- No voltage output during engine operation
- Weak, orange, or intermittent spark on spark plug tester
- Visible cracks, burn marks, or corrosion on the coil housing
- Coil gets excessively hot during operation
If your coil fails multiple tests, replacement is the appropriate solution. Coils cannot be repaired—they must be replaced as a complete unit.
Troubleshooting When Coil Tests Appear Normal
Sometimes a lawn mower won’t start even though the coil passes all tests. This indicates the problem lies elsewhere in the ignition system.
Other Components to Check
- Spark plug: Test the spark plug separately; a fouled or worn plug can prevent starting even with a good coil
- Spark plug wires: Check for cracks, loose connections, or corrosion on wire terminals
- Ignition switch: A faulty switch may prevent voltage from reaching the coil
- Fuel system: Engine won’t start without fuel; check fuel lines and carburetor
- Air filter: A clogged air filter can prevent proper engine operation
- Compression: Low engine compression can prevent starting regardless of ignition quality
- Wiring and connections: Loose or corroded connections can interrupt electrical flow
When to Consult a Professional
If coil tests pass but your engine still won’t start, consider professional diagnosis. A technician can perform compression tests, fuel system diagnostics, and electrical system analysis that require specialized equipment.
Testing Coils on Different Lawn Mower Types
While the basic testing methods apply to most lawn mowers, some variations exist:
Push Mowers vs Riding Mowers
Push mowers typically use simpler magneto-based ignition systems with coils mounted directly on the engine. Riding mowers</strong often use battery-powered ignition systems with coils mounted on the frame. Testing methods are similar, but resistance specifications may differ. Always consult your specific mower's manual.
Single-Cylinder vs Multi-Cylinder Engines
Single-cylinder mowers have one coil serving one spark plug. Multi-cylinder riding mowers</strong may have one coil serving multiple cylinders or separate coils per cylinder. Test each coil individually if your mower has multiple coils.
Traditional vs Electronic Ignition
Traditional coils respond to mechanical contact points. Electronic ignition coils</strong use electronic modules to trigger spark. Electronic coils may have additional terminals and different resistance specifications. Check your manual for the correct testing approach for your ignition type.
Frequently Asked Questions
What resistance should a lawn mower coil have?
A healthy lawn mower coil typically shows 2–5 ohms of primary coil resistance and 4,000–10,000 ohms (4–10 kilohms) of secondary coil resistance. However, specifications vary by manufacturer and coil model. Always consult your lawn mower’s owner’s manual or the coil manufacturer’s specifications for exact values. Testing outside these ranges generally indicates a failing coil.
Can a lawn mower coil fail suddenly or does it gradually weaken?
Lawn mower coils can fail both ways. Some coils gradually weaken over time, causing progressively harder starting or weaker spark. Others fail suddenly due to heat damage, moisture exposure, or electrical overload, resulting in complete no-start conditions. Regular testing helps catch gradual failures before they leave you stranded.
How long does a lawn mower coil typically last?
A well-maintained lawn mower coil can last 5–10 years or longer, depending on usage frequency, storage conditions, and engine operating temperature. Coils exposed to moisture, extreme heat, or frequent overloading may fail sooner. Storing your mower in a dry location and maintaining proper engine cooling helps extend coil life.
Is it cheaper to test a coil myself or have a technician do it?
Testing a coil yourself costs only the price of a multimeter ($15–$40) if you don’t already own one, plus your time. Professional diagnostic testing typically costs $50–$100 per hour. If you plan to maintain your lawn mower regularly, purchasing a multimeter is a worthwhile investment. However, if you’re uncomfortable working with electrical systems, professional diagnosis ensures accuracy and safety.
Summary
Testing your lawn mower coil is a straightforward process that requires basic tools and safety precautions. By using a multimeter for resistance testing, performing voltage checks during operation, and confirming spark generation with a tester, you can accurately determine whether your coil is healthy or needs replacement. Remember to always disconnect the spark plug wire before testing, follow safety guidelines, and consult your lawn mower’s manual for specific resistance and voltage specifications. If your coil passes all tests but your engine still won’t start, investigate other ignition system components or seek professional diagnosis.