Quick Answer: How to Remove a Spark Plug From a Lawn Mower
Let the engine cool completely, then twist and pull the spark plug boot straight off the plug terminal. Fit a 5/8″ spark plug socket (or 13/16″ for some Briggs & Stratton models) onto a ratchet, turn counter-clockwise until the plug is loose, then lift it out by hand. Never force a stuck plug — apply penetrating oil first and wait 10 minutes.
Safety First: Before You Start
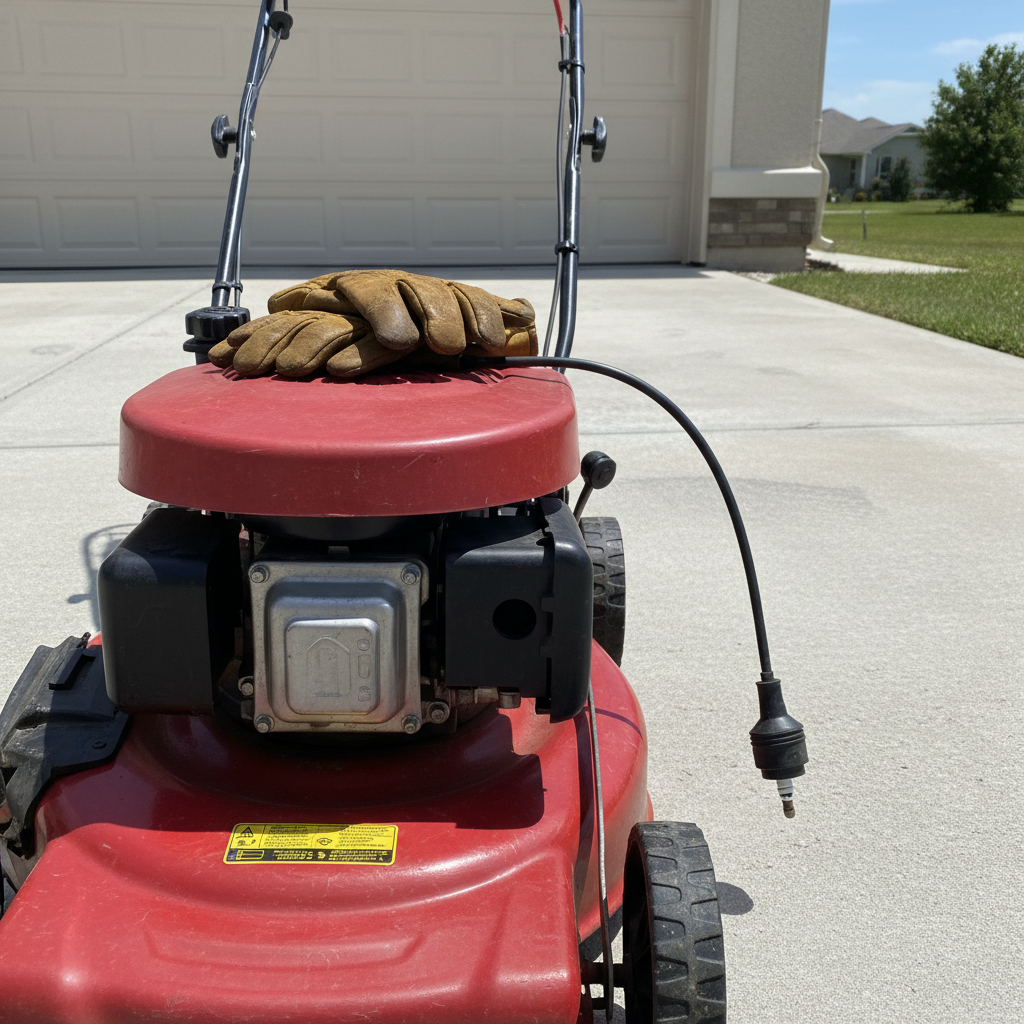
Skipping pre-work safety steps is the most common cause of burns, accidental engine starts, and stripped cylinder heads. Follow every item on this list before touching the plug.
- Let the engine cool for at least 5–10 minutes after shutdown. The cylinder head and exhaust components reach temperatures well above 300°F during operation. Contact with a hot engine causes serious burns, and thermal expansion makes the plug harder to extract cleanly.
- Disconnect the spark plug wire first — always. Pulling the boot off the plug terminal breaks the ignition circuit and prevents the engine from firing accidentally if the flywheel rotates while you work. On a push mower, the wire typically runs from the ignition coil along the side of the engine block to a single plug. On a riding mower, trace each wire from the coil to its corresponding plug.
- Work on a flat, stable surface. Tilt or movement during removal risks fuel or oil contacting the hot engine or spilling from the carburetor.
- Wear work gloves. Even a cooled plug retains residual heat, and the socket edges are sharp.
- Turn off the fuel valve if your mower has one (common on Honda and Kawasaki engines). This prevents fuel flow to the carburetor while the plug is out and the combustion chamber is open.
A five-minute wait is the absolute minimum. If the mower ran for an extended mowing session, wait the full 10 minutes. Touch the area near (not on) the engine shroud — if it still radiates noticeable heat, wait longer.
Tools You’ll Need
Having the right tools before you start prevents mid-job improvisation that strips threads or cracks the porcelain insulator.
| Tool | Spec / Notes |
|---|---|
| Spark plug socket | 5/8″ (16 mm) for most walk-behind push mowers; 13/16″ (21 mm) for many Briggs & Stratton engines and some riding mower applications. Check your owner’s manual. |
| Ratchet or breaker bar | 3/8″ drive ratchet handles most residential mowers. Use a short extension if the plug sits recessed inside a shroud. |
| Extension bar | 3″ or 6″ extension for riding mowers where plugs sit deep in the engine bay or behind shrouding. |
| Penetrating oil | PB Blaster or equivalent. Apply only if the plug is seized — do not use on a standard removal. |
| Wire brush or compressed air | Clear debris from around the plug well before removal to prevent grit from falling into the cylinder. |
| Spark plug gap gauge | Needed only if you plan to inspect and reinstall the same plug rather than replace it. |
| Torque wrench | Required for reinstallation, not removal. Most single-cylinder mower engines spec 12–15 ft-lbs on reinstall. |
| Work gloves | Leather or mechanic’s gloves. Nitrile tears on sharp socket edges. |
Do not use a standard deep socket. Spark plug sockets have a rubber insert that grips the ceramic insulator and prevents it from cracking during removal. A bare deep socket can shatter the plug and leave ceramic fragments in the plug well.
Step-by-Step Spark Plug Removal Process
These steps apply to a standard walk-behind push mower with a single-cylinder engine. Riding mower differences are noted inline and covered in detail in the next section.
Step 1: Confirm the Engine Is Cool and the Mower Is Safe
Verify the engine has been off for at least 5–10 minutes. Set the parking brake on a riding mower. For a push mower, engage the blade-stop bail and confirm the key (if present) is removed. Place the mower on a hard, level surface.
Step 2: Locate the Spark Plug
On a walk-behind push mower, the spark plug is mounted on the front or side of the engine block — look for a short ceramic-tipped component with a black rubber boot and wire attached. It protrudes from the cylinder head, usually within easy reach.
On a riding mower with a single-cylinder engine, the plug is in the same position but may be partially covered by a shroud or air filter housing. Twin-cylinder riding mowers (common on 18 HP and larger engines) have one plug per cylinder — typically one on each side of the engine or both accessible from the front, depending on the engine orientation.
Step 3: Clean Around the Plug Well
Before disconnecting anything, use compressed air or a wire brush to clear grass clippings, dirt, and debris from the area directly around the plug. This is a critical step: any grit that falls into an open cylinder bore during removal causes abrasive engine wear. One pass with compressed air takes 10 seconds and prevents a costly repair.
Step 4: Disconnect the Spark Plug Wire
Grip the boot — the rubber cap at the end of the wire — not the wire itself. Twist the boot gently a quarter-turn in either direction to break the seal, then pull straight off the plug terminal. Pulling on the wire instead of the boot tears the internal conductor and damages the ignition lead, which is a separate repair job.
Tuck the disconnected wire and boot to the side so it cannot accidentally contact the plug terminal while you work.
Step 5: Seat the Spark Plug Socket
Slide the spark plug socket straight down over the plug until the rubber insert grips the ceramic insulator firmly. Attach your ratchet or breaker bar. If the plug is recessed, attach a short extension bar between the socket and the ratchet first.
Confirm the socket is fully seated and not cocked at an angle — a tilted socket rounds the hex on the plug shell and makes the plug extremely difficult to remove.
Step 6: Turn Counter-Clockwise to Loosen
Standard automotive thread convention applies: counter-clockwise loosens, clockwise tightens (righty-tighty, lefty-loosey). Apply steady, even pressure counter-clockwise. Most spark plugs installed at the factory or at the correct torque spec (12–15 ft-lbs for most single-cylinder mower engines) break free with moderate hand force on a standard ratchet.
If the plug does not move: Stop. Do not force it. A seized plug — usually caused by corrosion from extended service intervals or incorrect installation — can strip the aluminum threads in the cylinder head if forced. Apply a small amount of penetrating oil around the base of the plug where it meets the head, wait 10 minutes, then try again. Repeat once more if needed. If the plug remains seized after two applications, consult a small engine mechanic.
Step 7: Remove the Plug by Hand
Once the plug is loose enough to turn freely, remove the ratchet and spin the plug out the rest of the way by hand (using the socket as a grip). This gives you tactile control and prevents the plug from falling into the engine bay or onto the ground, where the electrode or ceramic can be damaged.
Lift the plug and socket assembly straight up and out of the plug well. Set it on a clean rag or paper towel for inspection.
Step 8: Inspect the Plug Well Opening
With the plug removed, the combustion chamber is open to the environment. Cover the plug hole with a clean rag if you are not immediately proceeding to inspection or reinstallation. Keep the mower level — tilting it now risks oil entering the combustion chamber through the piston rings.
Spark Plug Removal: Push Mowers vs. Riding Mowers
Walk-Behind Push Mowers
Push mowers use a single-cylinder engine (common brands: Briggs & Stratton, Honda GCV, Kawasaki, Tecumseh) with one spark plug. The plug is almost always accessible without removing any covers, making the entire process a 5–10 minute job. The 5/8″ socket fits the majority of push mower plugs. Briggs & Stratton engines — the most common engine found on Toro, Husqvarna, Craftsman, and MTD push mowers — frequently use a 13/16″ socket. Check the specification label on the engine shroud or the owner’s manual before purchasing a socket.
Riding Mowers and Zero-Turn Mowers
Single-cylinder riding mowers follow the same procedure as push mowers. Twin-cylinder engines require removing two plugs — complete one side fully before moving to the other to avoid mixing up the wires on engines where the plugs are not interchangeable by position.
On many riding mowers, the plug or plugs are partially obscured by:
- The engine hood or top panel — lift or remove it before starting
- Air filter housings — may need to be unclipped or unbolted to reach the plug
- Exhaust shields — do not remove these; work around them
A 3″ or 6″ extension bar on your ratchet resolves most access issues. For V-twin engines where one cylinder faces rearward (common on some Kohler and Kawasaki riding mower engines), a universal joint adapter on the extension allows you to reach the plug at an angle without forcing the socket.
What to Do After Removal: Inspection and Next Steps
Removal is the gateway to the real diagnostic value. A 60-second visual inspection of the old plug tells you more about the engine’s condition than most other quick checks.
Read the Plug
- Light tan or gray electrode and insulator: Normal combustion. The plug may be reused if it is within service interval (typically every 25 hours or annually for most residential mowers).
- Black, sooty, or oily deposits: Rich fuel mixture, oil burning, or a failing air filter. Replace the plug and investigate the root cause.
- White or blistered insulator: Engine running lean or overheating. Replace the plug and check the carburetor and cooling fins.
- Worn, rounded, or eroded electrode: Plug is past service life. Replace it regardless of other findings.
- Cracked ceramic insulator: Replace immediately. A cracked plug misfires and can cause the engine to run rough or not start.
Clean or Replace?
Annual replacement is the standard recommendation for residential mowers used on a typical seasonal schedule. A new plug costs $3–$8 for most small engine applications — less than 10 minutes of a mechanic’s labor rate. Cleaning a plug with a wire brush extends service life marginally but does not restore a worn electrode gap, so replacement is almost always the better economic decision.
Check the Gap Before Reinstalling a New Plug
Most small engine spark plugs are pre-gapped at the factory, but confirm the gap against your engine specification using a spark plug gap gauge. Common gaps for small mower engines range from 0.020″ to 0.030″ (0.51 mm to 0.76 mm). An incorrect gap causes hard starting, misfires, or rough running even with a brand-new plug. Adjust by bending the ground electrode gently — never bend the center electrode.
Reinstallation Torque
Thread the new or cleaned plug in by hand first to avoid cross-threading the aluminum cylinder head. Once finger-tight, use a torque wrench set to 12–15 ft-lbs for most single-cylinder residential mower engines. If you do not have a torque wrench, the accepted field method is: finger-tight plus 1/2 turn for a new plug with a gasket seat, or finger-tight plus 1/16 turn for a tapered-seat plug. Over-tightening strips the threads in the cylinder head — a repair that costs significantly more than a torque wrench.
Frequently Asked Questions
What size socket do I need to remove a lawn mower spark plug?
Most walk-behind push mowers use a 5/8″ (16 mm) spark plug socket. Many Briggs & Stratton engines — found on a large share of Toro, Craftsman, Husqvarna, and MTD mowers — use a 13/16″ (21 mm) socket. Riding mower engines vary by brand. The safest approach: check the engine specification label on the shroud or look up the plug part number in your owner’s manual, then match the socket to the plug’s hex size.
Why won’t my lawn mower spark plug come out?
A plug that won’t turn is almost always seized due to corrosion, over-torquing at last installation, or a plug left in service well past its replacement interval. Apply penetrating oil (PB Blaster or equivalent) around the base of the plug where it threads into the cylinder head. Wait a minimum of 10 minutes — longer is better. Apply a second dose if needed, then retry with steady counter-clockwise pressure. Do not use an impact driver on a stuck mower plug; the shock force risks snapping the plug or stripping the soft aluminum threads in the head.
Can I remove a spark plug from a hot lawn mower engine?
No. Wait at least 5–10 minutes after shutdown before attempting spark plug removal. A hot engine creates two hazards: burn risk from contact with the cylinder head and exhaust components, and thread damage from removing a plug from thermally expanded aluminum. The plug and head expand at different rates when hot, and forcing removal under those conditions increases the risk of galling or stripping the threads.
How often should I remove and replace the spark plug on my lawn mower?
The standard service interval for residential walk-behind mowers is every 25 operating hours or once per mowing season, whichever comes first. For riding mowers used on larger properties, check at 25 hours and replace at 50–100 hours depending on the engine manufacturer’s specification. Always replace the plug if the mower is hard to start, runs rough, or fails to maintain consistent RPM — even if it is not yet at the service interval.