When Your Toro Carburetor Needs Cleaning

A clogged carburetor is one of the most common reasons a Toro lawn mower won’t start, runs rough, or stalls under load. This typically happens when fuel sits in the carburetor for extended periods, leaving behind varnish and sediment that block fuel passages and jets. Recognizing these symptoms helps you determine whether cleaning is the right solution.
Signs your Toro carburetor needs cleaning include:
- Difficulty starting, especially after sitting idle for a season
- Rough idle or inconsistent engine performance
- Engine stalling when you engage the blade or increase throttle
- Black smoke or fuel smell during operation
- Fuel leaking from the carburetor bowl
If your mower sat unused for more than one season without fuel stabilizer, carburetor cleaning is almost certainly needed. Ethanol-based gasoline is particularly prone to leaving varnish deposits that harden and restrict fuel flow.
Safety Precautions Before You Start
Working on a lawn mower engine requires basic safety measures to prevent injury and accidental fuel ignition.
Essential safety steps:
- Disconnect the spark plug wire: Always remove the spark plug wire before any engine work. This prevents accidental engine startup and protects you from electrical shock.
- Drain the fuel tank: Remove all gasoline from the tank before disassembling the carburetor. Use a fuel siphon or small pump—never use your mouth. Drain fuel into an approved metal container in a well-ventilated area.
- Work on a cold engine: Allow the engine to cool for at least 30 minutes before starting carburetor work. Hot engines and fuel vapors create fire hazards.
- Work in a well-ventilated area: Carburetor cleaner and gasoline produce harmful fumes. Use your workspace outdoors or in a garage with doors open.
- Wear gloves and eye protection: Carburetor cleaner can irritate skin and eyes. Nitrile gloves and safety glasses protect against splashes.
Locating and Removing the Carburetor
On most Toro push mowers, the carburetor sits between the air filter housing and the engine. Riding mowers and zero-turn models may have carburetors in slightly different locations, but the removal process is similar.
Step 1: Remove the Air Filter and Housing
Most Toro carburetors are accessed by removing the air filter cover and foam or paper filter element. These are typically held in place by a single bolt or plastic clip. Set these aside in a clean location.
Step 2: Disconnect Fuel Lines
Locate the fuel line running from the fuel tank to the carburetor. It’s usually a rubber hose held in place with small hose clamps. Before disconnecting, place a small container or rag underneath to catch any remaining fuel. Loosen the hose clamp with a screwdriver or wrench and slide the hose off the carburetor inlet. If a second fuel line exits the carburetor (overflow line), disconnect it the same way.
Step 3: Remove Mounting Bolts
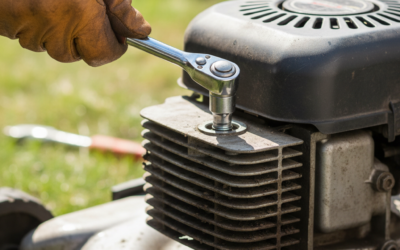
The carburetor is typically held to the engine by two or three bolts. Using the appropriate wrench or socket, carefully remove these fasteners. On some models, the carburetor is held by a single mounting bracket. Set all fasteners in a small container so they don’t get lost.
Step 4: Disconnect the Throttle Cable
On many Toro mowers, a throttle cable connects the engine speed control to the carburetor. This cable usually clips or bolts to a lever on the carburetor. Carefully unhook or unbolt this connection. Take a photo before disconnection if you’re unsure how it attaches—this helps during reassembly.
Once all connections are removed, gently lift the carburetor away from the engine. Some carburetors have a rubber seal or gasket between the carburetor and engine mounting surface; if this comes free, set it aside for inspection.
Disassembling and Inspecting Carburetor Components
Once removed, the carburetor must be carefully disassembled to access internal passages where varnish accumulates.
Step 1: Remove the Carburetor Bowl
The bowl is the reservoir at the bottom of the carburetor that collects fuel. It’s secured by a single bolt in the center or by several bolts around the perimeter, depending on your Toro model. Carefully unscrew these bolts (they’re often small and easy to strip). Once removed, the bowl should slide off, possibly with a rubber gasket attached. Place the gasket somewhere safe; you’ll need it during reassembly.
Step 2: Inspect the Bowl Contents
Look inside the bowl for sediment, varnish, or water. A small amount of brown or tan varnish is normal; thick black deposits or a strong fuel smell indicate significant clogging. If you see water or rust particles, the fuel tank may also need draining and cleaning.
Step 3: Remove Internal Components
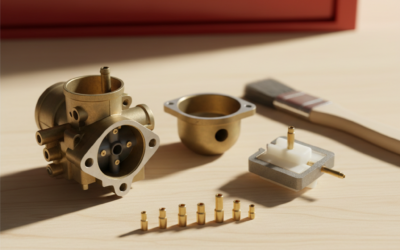
With the bowl removed, you’ll see internal passages and jets. Most carburetors have a small pilot jet (idles the engine) and a main jet (controls full-throttle fuel flow). These jets are typically brass and are screwed into the carburetor body. Very carefully unscrew these jets using a small wrench or jet tool. Do not force them—if they’re stuck, soak the entire carburetor body in cleaner first.
Some carburetors also have a float and float pin that should be removed. The float is a small plastic or metal piece that rises and falls with fuel level, controlling fuel entry. Note the orientation before removal so you can reinstall it correctly.
Step 4: Check Gaskets and Seals
Inspect all rubber gaskets and seals. If they appear cracked, dry, or hardened, they should be replaced. Many Toro models have gasket kits available separately. A degraded gasket can cause fuel leaks even after cleaning.
Cleaning Carburetor Parts Effectively
The cleaning method depends on the severity of buildup and the tools you have available.
Soaking Method (Recommended for Heavy Varnish)
Place all removable carburetor parts—bowl, jets, gasket, float—in a container filled with carburetor or parts cleaner. Commercial carburetor cleaners like Gumout or Berryman are designed to dissolve varnish without damaging metal or rubber. Soak for 15–30 minutes. For heavily clogged carburetors, leave parts soaking for up to an hour. This dissolves varnish that brushing alone cannot remove.
Brushing and Air Pressure
After soaking, use a soft brass brush or old toothbrush to gently scrub loosened varnish away. Avoid wire brushes, which can scratch carburetor surfaces. Pay special attention to the exterior of jets and the walls of the bowl. Once brushed clean, rinse parts in fresh carburetor cleaner to remove loose debris.
For internal passages in the carburetor body, use compressed air at 80–100 PSI to blow cleaner and debris through passages. Start at the fuel inlet and direct air toward the outlet passages. This dislodges stubborn deposits without requiring disassembly of the carburetor body itself. Wear safety glasses during this step—pressurized cleaner and debris can spray unexpectedly.
Cleaning Jets Safely
Carburetor jets are delicate and easily damaged. Never poke them with wire, needles, or screwdrivers. Instead, soak jets in cleaner and use light air pressure to clear passages. If a jet remains clogged after soaking and air pressure, it’s better to replace it than risk creating an internal blockage.
Drying
After cleaning, allow all parts to air-dry or dry them with compressed air. Do not wipe internal carburetor passages with cloths, as lint can leave behind fibers that block fuel flow.
Reassembly and Testing
Proper reassembly is critical for carburetor function.
Step 1: Reinstall Internal Components
Begin by inserting the float and float pin (if removed) into their original positions. Next, carefully screw the main and pilot jets back into the carburetor body. Tighten them by hand first, then use your jet tool to snug them down. Do not over-tighten—these jets are easily damaged. If your carburetor has internal springs or clips, ensure they’re reinstalled in their original positions. Refer to photos or online diagrams for your specific Toro model if you’re uncertain.
Step 2: Reinstall the Bowl and Gasket
Place the rubber gasket on the carburetor body, ensuring it sits evenly. Position the bowl and install the fastening bolts. Tighten evenly—start by hand-tightening all bolts, then use a wrench to snug them. Uneven tightening can pinch the gasket and cause fuel leaks.
Step 3: Reattach the Carburetor to the Engine
Align the carburetor’s mounting holes with the engine studs. If the engine-side gasket came off during removal, clean its mating surface and apply a fresh gasket or a thin bead of gasket sealant. Install the carburetor bolts and tighten evenly to prevent air leaks. Do not over-tighten—carburetor bodies are aluminum and can crack if excessive force is applied.
Step 4: Reconnect Fuel Lines and Throttle Cable
Slide the fuel line onto the carburetor inlet and tighten the hose clamp securely. If there’s an overflow line, reconnect that as well. Reattach the throttle cable to its lever on the carburetor, ensuring it moves freely when you manipulate the engine speed control.
Step 5: Reinstall Air Filter Components
Place the air filter element and housing back on the carburetor, ensuring they’re seated properly and all fasteners are tight. A loose air filter can allow unfiltered air into the carburetor, potentially clogging it again.
Step 6: Reconnect Spark Plug Wire and Fuel Tank
Reconnect the spark plug wire by pushing it firmly onto the spark plug terminal. Add fresh fuel to the tank—use the fuel you drained earlier if it’s clean, or use new gasoline with a fuel stabilizer if the mower will sit again. Fill the tank slowly to allow air to escape from the carburetor.
Step 7: Test the Mower
Start the mower and observe its behavior. The engine should start within a few pulls and run smoothly at idle. If you hear hesitation or stalling, the carburetor may not be properly reassembled or fuel lines may have air bubbles. Stop the engine, let it sit for a minute, and try again. If the mower starts and runs smoothly through multiple throttle settings, the cleaning was successful.
When to Replace Instead of Clean
In some cases, cleaning won’t fully restore carburetor function.
Replace your Toro carburetor if:
- Internal passages remain clogged after soaking and compressed air cleaning
- Gaskets are cracked or hard and won’t seal fuel properly
- Jets are corroded or damaged beyond cleaning
- The carburetor body has cracks or stripped bolt holes
- After reassembly and testing, the mower still runs rough, stalls, or won’t start
Toro carburetor replacement kits are readily available online and cost between $30 and $150 depending on your mower model. For many older machines, replacement is more practical than extensive cleaning if the carburetor is severely damaged.
Preventing Future Carburetor Buildup
Regular maintenance extends carburetor life and prevents future clogging.
Use Fuel Stabilizer During Storage
Before storing your Toro mower for more than 30 days, add fuel stabilizer (like Sta-Bil) to the gas tank according to package instructions. Stabilizer prevents ethanol in modern gasoline from breaking down into varnish. It’s inexpensive insurance against carburetor problems.
Run the Mower Regularly
If you store your mower seasonally, run it for 10–15 minutes every 2–3 weeks during storage months. This keeps fuel circulating through the carburetor and prevents stagnation. Running the engine also keeps gaskets and seals flexible.
Drain Fuel for Extended Storage
If your mower will sit unused for more than three months, consider draining the fuel tank completely and running the carburetor dry. This is more effective than stabilizer alone for very long storage periods.
Check the Air Filter
A clogged air filter can force the carburetor to run rich, leaving excess fuel that eventually varnishes. Clean or replace your air filter every 50 hours of mower use, or more often if you mow in dusty conditions.
Frequently Asked Questions
How long does it take to clean a Toro lawn mower carburetor?
Most people can complete carburetor cleaning in 1–2 hours, including disassembly, soaking, cleaning, and reassembly. If you’re experienced, it may take 45 minutes. First-time jobs often take longer because you need to carefully identify components and take photos for reassembly reference. Don’t rush—a mistake during reassembly can waste time troubleshooting.
Can I clean a carburetor without removing it from the engine?
Partial cleaning is possible by pouring carburetor cleaner through the fuel inlet while the carburetor is attached, but this approach is far less effective than full disassembly. Complete cleaning requires access to internal jets, passages, and the bowl—all of which are best reached by removal. Full removal takes only 30 additional minutes and produces much better results.
What’s the difference between carburetor cleaner and gasoline for soaking?
Commercial carburetor cleaners are specifically formulated to dissolve varnish and carbon deposits without damaging metal, rubber, or plastic components. Gasoline can work in a pinch, but it’s flammable, produces strong fumes, and isn’t as effective at dissolving hardened varnish. Use proper carburetor cleaner for best results and safety.
Do I need to replace gaskets and seals during cleaning?
It depends on their condition. If gaskets appear flexible and undamaged during disassembly, reusing them is acceptable. However, if they appear cracked, dry, or compressed, replacement is worthwhile. New gasket kits are inexpensive and prevent fuel leaks. Many people prefer replacing gaskets during cleaning as preventive maintenance, ensuring a better seal after reassembly.
Why does my Toro mower still run rough after carburetor cleaning?
Rough running after cleaning may indicate air leaks (loose fuel lines or carburetor bolts), incorrect reassembly (jets installed backwards or internal components misaligned), or issues beyond the carburetor (worn spark plug, fuel filter clogged, or engine compression problems). Double-check all fuel line connections and bolt tightness first. If the issue persists, inspect the spark plug and fuel filter before assuming carburetor reassembly is incorrect.