Direct Answer: How to Sharpen a Chainsaw Chain
To sharpen a chainsaw chain, first secure the saw and lock the guide bar so the chain cannot move. Mark the starting cutter tooth with a marker so you know when you have completed one full pass. Select a round file that matches the chain’s pitch (commonly 4.0 mm, 4.8 mm, or 5.5 mm) and attach it to a file guide set to the manufacturer’s specified top-plate angle, usually 25–35 degrees. File each cutter from the inside of the tooth outward, using smooth, consistent strokes in one direction only, applying light pressure and matching the number of strokes per tooth so every cutter is sharpened equally. After all cutters are filed, check the depth gauges (rakers): use a flat file with a depth gauge guide to lower any raker that sits above the recommended height (typically 0.025–0.030 inches or 0.6–0.8 mm below the cutter tip). Finally, clean the guide bar groove and oil ports, remove any burrs, and re-tension the chain. Alternatively, you can use a powered chainsaw sharpener or a bench-mounted grinder for faster, more consistent results, but manual filing remains the recommended method for field maintenance.
Why Is My Chainsaw Chain Dull? (Recognizing When Sharpening Is Needed)
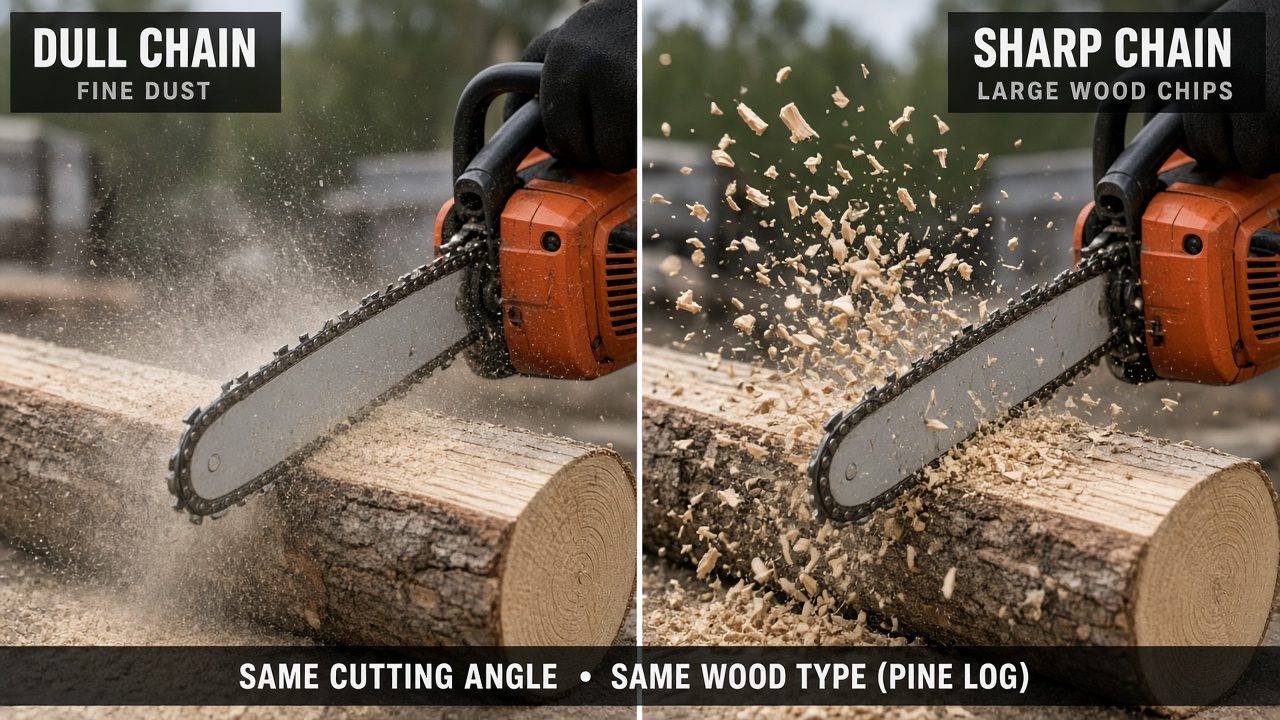
A chainsaw chain dulls through normal use because the cutter teeth constantly impact wood fibers, dirt, and grit. Even clean wood contains silica and other abrasive compounds that slowly round over the cutting edge. The moment the edge loses its sharpness, the saw stops slicing through wood fibers and starts scraping or tearing them instead.
What Symptoms Indicate a Dull Chainsaw Chain?
- Fine sawdust instead of coarse wood chips: A sharp chain produces large, chunky wood chips. A dull chain grinds the wood into fine dust because it is not cutting cleanly.
- The saw pulls to one side: If one side of the chain is duller than the other, the saw will veer sideways during a cut. This usually means the cutters on one side were filed more aggressively or the chain was damaged.
- Increased pressure is required: You have to lean into the saw or push hard to make it bite. A sharp chain should pull itself into the wood with minimal downward force.
- Smoke and burning smell: A dull chain generates excessive friction, which scorches the wood and produces a burnt odor.
- Vibration and rough cuts: Instead of a smooth, steady cut, the saw jerks and vibrates because the teeth are bouncing off the wood rather than slicing it.
How Often Should a Chainsaw Chain Be Sharpened?
There is no universal interval because it depends on the wood, the chain, and how often you hit dirt. As a rule of thumb, sharpen the chain every time you refuel, or after every 1–2 hours of cutting. If you cut dirty, sandy, or previously burned wood, you may need to sharpen much more often. Some professionals sharpen after every tank of fuel to keep cutting performance consistent.
What Tools Do You Need to Sharpen a Chainsaw Chain?
Manual sharpening requires only a few inexpensive tools, but using the correct sizes and guides is essential for a safe, even edge. Below is the complete tool list for hand sharpening a chainsaw chain.
Round File
The round file is the primary cutting tool. It must match the diameter of the chain’s pitch, which is the distance between drive links. Common file sizes are 4.0 mm (for small chains), 4.8 mm (for most mid-size chains), and 5.5 mm (for larger chains). Using a file that is too small will not reach the full radius of the cutter, while a file that is too large will file the side plate incorrectly and shorten the life of the chain.
File Guide
A file guide is a small plastic or metal jig that holds the file at the correct angle relative to the cutter. It ensures consistent top-plate and side-plate angles across every tooth. Without a guide, it is very easy to file one tooth at 30 degrees and the next at 20 degrees, which produces an uneven chain that cuts poorly and pulls to one side.
Flat File and Depth Gauge Guide
After the cutters are sharp, the depth gauges (rakers) must be checked. A flat file is used to lower any raker that protrudes too far above the cutter tip. A depth gauge guide is a slotted tool that sits over the cutter and raker, showing exactly how much material should be removed. This step is critical because rakers that are too high make the chain cut aggressively and grab, while rakers that are too low cause the chain to dig in violently and increase kickback risk.
Chainsaw Sharpening Kit
Many manufacturers sell complete kits that include a round file, file guide, depth gauge tool, flat file, and a handle. These kits are ideal for beginners because the guide is pre-set to the correct angles for the included file size. Just make sure the kit matches your chain’s pitch.
Safety Gear
- Heavy-duty work gloves to protect your hands from sharp cutters.
- Safety glasses or goggles to guard against metal filings.
- A sturdy workbench or sawhorse to hold the saw securely.
Can I Use an Electric Chainsaw Sharpener Instead of a Hand File?
Yes. Electric chainsaw sharpeners and bench grinders are faster and produce highly consistent results because they use a fixed grinding wheel angle. They are especially useful for sharpening many chains in a short time or for restoring badly damaged cutters. However, they remove more metal than a hand file, so overuse can wear out a chain faster. Many professionals recommend hand filing for routine maintenance and a powered sharpener only when the chain is very dull or damaged.
Key Factors to Understand Before Sharpening
Before you touch a file to the chain, you need to understand the anatomy of a cutter and the angles that determine how well it bites into wood. Getting these basics right prevents costly mistakes.
Cutting Tooth Anatomy
- Top plate: The horizontal top edge of the cutter that slices across the wood fiber.
- Side plate: The vertical side edge that cuts the side of the kerf and determines the width of the cut.
- Depth gauge (raker): The small leading point in front of each cutter that controls how deep the cutter bites into the wood.
- Drive link: The part of the chain that rides in the guide bar groove and pulls the chain around the bar.
- Tie strap: The connecting link that holds the cutters and drive links together.
Correct Filing Angles
Most chainsaw chains are designed to be filed at a top-plate angle of 25–35 degrees relative to the direction of travel. The exact angle is stamped on the cutter or listed in the chain manufacturer’s documentation. The side-plate angle, which is the angle of the file relative to the vertical side of the cutter, is typically 85–90 degrees for standard chains. A file guide set to the correct top-plate angle automatically maintains the side-plate angle when you hold the file level.
Why Matching the Round File Diameter to Chain Pitch Matters
The chain pitch determines the spacing of the drive links and therefore the size of the cutter’s radius. If you use a file that is too small, the file will not contact the full curve of the cutter, leaving the edge rounded and dull. If the file is too large, it will cut into the tie straps and weaken the chain. Always check the chain’s pitch (printed on the bar or in the manual) and select the matching file diameter.
What Happens If You File at the Wrong Angle or Use Too Much Pressure?
Filing at the wrong angle produces a cutter that cannot penetrate the wood properly. A top-plate angle that is too steep makes the chain grab and vibrate; an angle that is too shallow makes it scrape rather than slice. Using excessive pressure with the file can overheat the cutter, remove too much metal, and create a rough edge that dulls quickly. Always use light, even strokes and let the file do the cutting.
Should You Sharpen the Chain While It Is Mounted on the Saw or Remove It First?
For routine sharpening, leave the chain mounted on the saw. This keeps the chain tensioned and stable, which makes filing easier and ensures the cutters are filed in their natural operating position. You only need to remove the chain if you are using a bench grinder, replacing the chain, or cleaning the guide bar groove thoroughly.
How to Sharpen a Chainsaw Chain Step by Step
Follow this beginner-friendly procedure to sharpen your chain by hand. It takes about 10–15 minutes for a standard 18-inch bar.
Step 1: Secure the Chainsaw and Lock the Chain
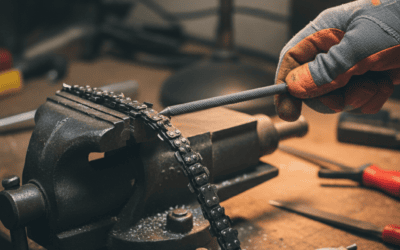
Place the saw on a sturdy workbench or clamp it in a bench vise. Make sure the chain brake is engaged so the chain cannot rotate. If your saw has a bar-tightening mechanism, ensure the bar is firmly attached. The chain should still have some tension — not loose, but not overly tight. If the chain is too loose, tighten it slightly before filing.
Step 2: Mark the Starting Cutter
Use a permanent marker to place a dot on the top of one cutter tooth. This is your reference point. You will file every cutter on one side of the chain, then move to the other side, and stop when you return to the marked tooth. Marking prevents you from accidentally filing the same tooth twice or skipping one.
Step 3: Set Up the File and Guide
Attach the correctly sized round file to the file guide. Set the guide to the top-plate angle specified by the chain manufacturer (usually 25–35 degrees). The file should protrude slightly above the cutter’s top plate so you can file the top plate and side plate simultaneously.
Step 4: File Each Cutter from Inside to Outside
Position the file on the cutter so it contacts both the top plate and the side plate. Push the file forward in a smooth, steady stroke from the inside of the cutter toward the outside, following the angle of the guide. Use light pressure and file in one direction only — never drag the file backward across the cutter. After each stroke, lift the file and return it to the starting position.
Step 5: Use the Same Number of Strokes Per Cutter
Count your strokes and apply the same number to every cutter. Most chains need 5–10 strokes per cutter when they are only moderately dull. If a cutter is badly damaged, you may need more strokes, but always match the stroke count on the opposite cutter on the other side of the chain to keep the chain balanced.
Step 6: Move to the Next Cutter
After filing one cutter, rotate the chain forward to the next cutter on the same side. Continue until you reach the marked starting tooth. Then rotate the chain to the other side and file every cutter on that side using the same number of strokes. Do not alternate sides as you go; finish one side completely before starting the other.
Step 7: Check and File the Depth Gauges
Once all cutters are sharpened, check the depth gauges. Place a depth gauge guide over each cutter-raker pair. The guide has a slot that exposes the raker. If the raker protrudes above the guide’s surface, use a flat file to lower it until it is flush with the guide. This sets the raker height to the recommended 0.025–0.030 inches (0.6–0.8 mm) below the cutter tip. File in one direction only, and be careful not to round over the front edge of the raker.
Step 8: Clean, Lubricate, and Re-Tension
After filing, remove the chain from the bar (or at least rotate it fully) and clean out the guide bar groove with a small screwdriver or bar groove cleaner. Clear any metal filings from the oil ports. Use a flat file to remove any burrs from the sides of the cutters. Apply a light coat of bar and chain oil to the chain, reinstall it if removed, and adjust the chain tension so the chain fits snugly against the bar but can still be pulled freely around the bar. Finally, test the saw on a piece of wood. A properly sharpened chain should produce large chips and pull itself into the cut with minimal pressure.
How to Sharpen with a Powered Chainsaw Sharpener (Alternative Method)
Powered sharpeners are a practical alternative for people who sharpen multiple chains or want a more consistent edge without the physical effort of hand filing.
Advantages of an Electric Chainsaw Sharpener
- Speed: A powered sharpener can grind all cutters in a few minutes.
- Consistency: The grinding wheel is fixed at a set angle, so every cutter receives the same edge.
- Ease of use: You do not need to maintain a steady hand angle; the machine does the work.
How to Set the Grinding Angle and Depth
Place the chain in the sharpener’s clamp with the cutter aligned with the grinding wheel. Set the wheel’s angle to match the chain’s top-plate angle (usually 25–35 degrees). Adjust the depth stop so the wheel only removes the minimum amount of metal needed to restore the edge. Grind each cutter with a light touch — do not force the wheel into the steel. After grinding all cutters on one side, rotate the chain and grind the other side.
Can a Bench Grinder Damage the Chain?
Yes. A bench grinder removes metal very quickly and generates significant heat. If you hold the chain against the wheel too long or press too hard, you can overheat the cutter, which ruins the hardness of the steel and makes the edge dull almost immediately. You can also remove too much metal, shortening the chain’s life. Always use a light touch, keep the cutter moving, and let the wheel do the cutting.
Which Method Is Better for a Beginner: Manual Filing or Powered Sharpening?
Manual filing is the better choice for beginners. It is slower but much more forgiving, and it teaches you the correct angles and cutter anatomy. A file guide makes the process nearly foolproof. Powered sharpeners require a larger investment and carry a higher risk of overheating or over-grinding if you are not experienced.
Common Mistakes to Avoid When Sharpening a Chainsaw Chain
Even experienced users make mistakes that ruin cutters, create uneven chains, or shorten chain life. Avoid these common errors:
Filing Only One Side of the Chain
If you only file the cutters on one side, the chain will pull to the side with the sharper teeth. Always file both sides with the same number of strokes to keep the chain balanced.
Filing the Tie Straps or Drive Links
The round file should only contact the cutter’s top plate and side plate. If the file is too large or angled incorrectly, it will cut into the tie straps and drive links, weakening the chain and causing premature failure.
Filing the Depth Gauges Too Low
Lowering the depth gauges below the recommended height makes the cutters bite too aggressively. This increases vibration, makes the saw hard to control, and significantly raises the risk of kickback. Always use a depth gauge guide and never file the rakers below the guide surface.
Using the Wrong File Size
As noted earlier, a file that is too small or too large will not produce a correct edge. Check your chain’s pitch and use the matching file diameter.
Pushing Too Hard with the File
Heavy pressure removes more metal than necessary and creates a rough edge. Use light, even strokes and let the file’s cutting action do the work.
Not Removing Burrs
After filing, small burrs can remain on the edges of the cutters. These burrs make the chain feel sharp but actually reduce cutting efficiency. Remove them with a flat file or a fine stone.
When Should You Replace the Chain Instead of Sharpening?
Replace the chain when the cutters are filed down to the wear mark (a small notch or line on the cutter that indicates the end of the usable tooth), when the drive links show excessive wear, or when the chain has broken or stretched beyond adjustment. Also replace the guide bar and sprocket if they are worn, because a worn bar or sprocket will quickly destroy a new chain.
Frequently Asked Questions
What is the quickest safe way to sharpen a chainsaw chain by hand?
Secure the saw, engage the chain brake, mark the starting cutter, and use a correctly sized round file with a file guide set to the manufacturer’s angle. File each cutter from inside to outside with the same number of light strokes, then check the depth gauges with a flat file and depth gauge guide. The whole process takes about 10–15 minutes.
What is the recommended filing angle range for most chains?
Most chainsaw chains use a top-plate angle of 25–35 degrees. The exact angle is stamped on the cutter or listed in the chain’s documentation. A file guide set to this angle ensures consistent results.
What is the correct depth gauge height for most chains?
Most chains require the depth gauge (raker) to sit 0.025–0.030 inches (0.6–0.8 mm) below the cutter tip. Use a depth gauge guide to set this height precisely.
How do I know when to stop filing and test the chain on wood?
Stop filing when you have used the same number of strokes on every cutter and the cutters show a clean, bright edge. Then test the saw on a piece of wood. If it produces coarse chips and pulls itself into the cut without extra pressure, the chain is sharp. If it still produces fine sawdust, continue filing with a few more strokes per cutter.