Quick Answer: How to Test a Lawn Mower Starter
Testing a lawn mower starter begins with determining whether the engine cranks when you pull the cord or turn the key. Listen for resistance, grinding, or clicking sounds that indicate starter engagement. If the engine cranks but won’t fire, the problem is likely fuel or spark—not the starter. If there’s no crank or only a weak click, your starter needs electrical testing or replacement. Most issues can be diagnosed with visual inspection and simple manual checks before requiring specialized tools.
Quick Diagnostic Flowchart: Is Your Starter the Problem?
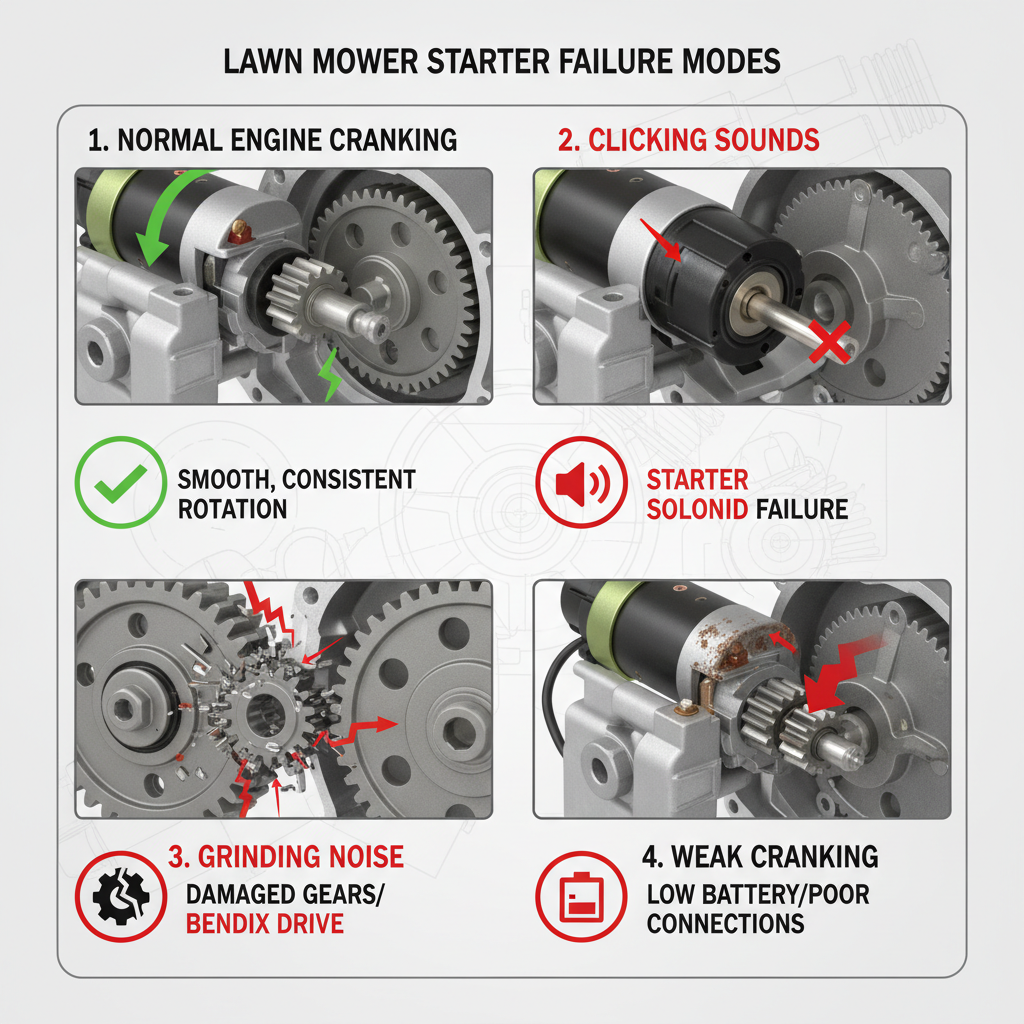
Before you invest time in detailed testing, determine whether the starter is actually at fault:
- Engine cranks normally, but won’t start: Starter is likely working. Check fuel delivery, spark plug condition, and carburetor function instead.
- No cranking sound; starter makes a clicking noise: Battery may be dead (electric starters) or pull cord may be jammed. Test battery voltage or check for mechanical obstruction.
- Grinding or grinding-then-nothing noise: Starter motor teeth may be stripped, or pull-cord recoil spring is broken. Replacement is typically needed.
- Slow or weak cranking: Battery voltage is low (electric) or pull cord has excessive friction. Clean battery terminals or inspect cord for tangles.
Visual Inspection: What to Look For Before Testing
Begin every starter diagnosis with a safe, non-powered inspection. This step often reveals the problem immediately:
- Pull-cord starters: Check that the cord is not frayed, kinked, or partially detached from the handle. Look for a visibly broken recoil spring housing or cracks in the starter cover. Ensure the handle moves freely and isn’t stuck against the mower deck.
- Electric starters: Inspect battery terminals for corrosion (white or blue-green buildup). Tighten any loose cable connections. Look for cracks in the starter motor housing or bent mounting bolts that could prevent engagement.
- Both types: Check for oil leaks pooling around the starter housing, debris blocking the pull cord or starter motor, and visible damage to any external components.
If you spot fraying, corrosion, or obvious damage at this stage, you’ve likely found your problem. Proceed to the section matching your starter type.
Testing a Pull-Cord Starter
Pull-cord starters rely on mechanical tension and spring engagement. Testing is straightforward and requires no tools beyond your hands.
Step 1: Assess Pull Resistance and Sound
- Hold the mower firmly on level ground. Ensure the ignition is off and the fuel valve (if present) is in the ON position.
- Slowly pull the cord to feel resistance. A healthy starter should offer steady, noticeable tension—not too loose or impossibly tight.
- If resistance is extremely high or you cannot pull the cord at all, the engine may be seized, or the recoil spring is stuck. Do not force it; this suggests internal damage beyond the starter.
- If there is almost no resistance, the pull cord may be detached from the flywheel or the recoil spring is broken.
Step 2: Listen for Spring Recoil
- After pulling the cord, release it and listen for a sharp snap or whip sound as the recoil spring returns it to rest. This confirms the spring and cord are engaged.
- If you hear no snap—only a slow, sluggish return—the recoil spring may be weakened or broken.
- If the cord does not retract at all, the spring is likely broken and requires replacement.
Step 3: Check Flywheel Engagement
- Disconnect the spark plug wire (remove the wire from the spark plug terminal) to prevent accidental engine start.
- Slowly pull the cord while watching the pull-cord hub (the component where the cord winds). You should see the hub rotate smoothly without slipping or grinding.
- If the hub spins freely without turning the engine shaft, the cord is not engaging the flywheel. The pull-cord assembly likely needs replacement.
- If you hear grinding or feel grinding resistance, the flywheel gear teeth may be stripped. This requires engine disassembly and is typically a job for a small-engine technician.
Testing an Electric Starter
Electric starters depend on battery power and motor continuity. These tests require a multimeter (a basic model costs $15–$30) but are otherwise safe and straightforward.
Step 1: Test Battery Voltage
- Locate the battery on your electric-start mower. Most lawn mower batteries are either 6V or 12V systems.
- Set a multimeter to DC voltage mode. Place the red probe on the positive terminal and the black probe on the negative terminal.
- A healthy 12V battery should read 12.6V or higher at rest. A 6V battery should read 6.3V or higher. If your reading is below these thresholds, the battery is dead or dying.
- If the battery is low, charge it fully using a compatible charger. Retest after charging. If voltage remains low even after a full charge cycle, the battery needs replacement.
Step 2: Check for Corrosion and Loose Connections
- Visually inspect both battery terminals. If white, blue-green, or crusty buildup is present, disconnect the negative cable first, then the positive cable. Clean corrosion with a wire brush or baking soda and water solution.
- Reconnect the positive cable, then the negative cable. Tighten both connections so they do not wiggle.
- Retest battery voltage after cleaning. Corrosion can cause voltage readings to drop artificially.
Step 3: Test Starter Motor Continuity
- With the battery disconnected, set your multimeter to resistance (ohms) mode.
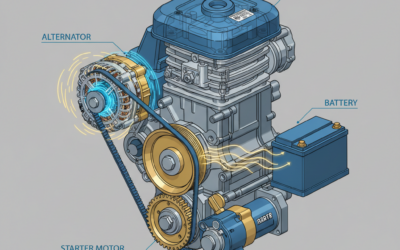
- Locate the starter motor—a cylindrical component bolted to the engine. There are typically two or three terminals on the motor.
- Place the multimeter probes on the two main motor terminals (not the small sensing wire, if present). A healthy motor should show resistance between 0.5 and 5 ohms. If the reading is infinite (no continuity), the motor is open and needs replacement.
- If continuity is present but the motor does not crank when you reconnect the battery and turn the key, a solenoid or relay may be faulty. This requires professional diagnosis.
Step 4: Listen for Starter Motor Engagement
- With the battery connected and the spark plug wire disconnected, turn the ignition key to the START position and hold it for 1–2 seconds.
- A working starter motor should produce a loud whirring or cranking sound as it engages. The engine should turn over, even if it doesn’t start.
- If you hear only a single click or a rapid series of clicks, the battery may be weak (even if it showed acceptable voltage) or the solenoid is failing. Tighten battery terminals and retest.
- If you hear no sound at all, the starter circuit may be broken. Check the ignition switch and starter relay before concluding the motor is faulty.
Spark Plug and Fuel System Checks
A faulty starter is not always the culprit in a no-start condition. Rule out spark and fuel before concluding the starter has failed.
Checking for Spark
- Remove the spark plug wire from the spark plug terminal. Hold the wire end 1/4 inch away from a metal part of the engine (not near fuel lines).
- Pull the cord (pull-cord starter) or turn the key (electric starter). Watch for a blue spark jumping the gap between the wire and the engine.
- If no spark appears, the spark plug or ignition coil may be faulty—not the starter. Replace the spark plug and retest.
- If a blue spark is present, the ignition system works, and the no-start issue is likely fuel or compression-related.
Inspecting the Spark Plug
- Remove the spark plug and examine its condition. A healthy plug should have a light tan or light brown electrode tip with minimal carbon buildup.
- If the plug is black with heavy carbon, flooded with fuel, or has excessive gap wear, replace it. Old or fouled plugs can prevent engine firing even if the starter works perfectly.
Verifying Fuel Flow
- Locate the carburetor fuel inlet (where the fuel line connects). Carefully disconnect the fuel line at the carburetor.
- Turn the fuel valve to ON (if your mower has one) and observe whether fuel drips from the line. Fuel should flow freely.
- If no fuel flows, check that the fuel valve is truly open, the fuel tank is not empty, and the fuel line is not kinked or clogged. If fuel flows into the carburetor bowl but the engine still won’t start, the carburetor may need cleaning.
When to DIY vs. When to Replace
Once you’ve identified the starter as the problem, decide whether repair or replacement makes sense.
Pull-Cord Starters: Repair vs. Replace
- Broken or frayed pull cord: DIY repair. Replacement cords are inexpensive ($10–$25) and can be installed by carefully unwinding the old cord, threading a new one through the recoil spring, and tying secure knots. Many YouTube tutorials are available for specific mower models.
- Broken recoil spring: Difficult DIY. The spring is under tension and can snap unexpectedly during removal. Unless you are experienced with small engines, professional replacement ($50–$150 at a repair shop) is safer.
- Stripped flywheel teeth or broken pull-cord hub: Professional repair or replacement required. This involves engine disassembly. Replacement starters for pull-cord mowers typically cost $80–$200 depending on mower type.
Electric Starters: Repair vs. Replace
- Dead or weak battery: DIY replacement. Lawn mower batteries are simple to disconnect and install. A replacement 12V battery costs $40–$80.
- Corroded battery terminals: DIY cleaning. A wire brush and a few minutes can restore electrical contact and save a repair bill.
- Faulty starter motor: Professional or DIY replacement depending on comfort level. The motor is bolted to the engine and requires careful disconnection of electrical terminals. Replacement motors cost $100–$250, plus any labor if you choose professional installation.
- Faulty solenoid or relay: Professional diagnosis and repair. These components regulate power to the starter motor and require electrical troubleshooting beyond basic testing.
Safety Precautions During Starter Testing
- Disconnect the spark plug wire before any manual starter testing to prevent accidental engine start.
- Secure the mower on level ground. Never test a starter while standing on or leaning over the machine.
- Avoid fuel hazards: Do not test a starter near open flames or in enclosed spaces. Lawn mower engines produce exhaust fumes; test outdoors or in a well-ventilated area.
- Use a multimeter safely: Never place multimeter probes on energized battery terminals while wearing damp clothing or standing in wet conditions.
- Allow the engine to cool before touching the spark plug, carburetor, or exhaust. These components retain heat after running.
Frequently Asked Questions
What does it mean if my pull-cord starter makes a grinding noise?
Grinding typically indicates that the flywheel teeth are stripped or the pull-cord hub is damaged. When the cord pulls, it tries to turn the engine shaft but slips or catches on broken gear teeth, producing a grinding sound. This requires replacement of the starter assembly or flywheel. Do not continue pulling; this will cause further damage. Have a technician inspect the engine.
Can I replace a lawn mower starter myself?
Yes, for pull-cord starters and electric starter motors. Pull-cord replacement is straightforward if only the cord is damaged. Electric starter motor replacement requires bolting and unbolting a few components but is manageable for someone comfortable with basic tools. Recoil spring replacement, solenoid repair, and flywheel work are best left to professionals due to injury risk and specialized knowledge.
How long does a lawn mower starter typically last?
Pull-cord starters often last the life of the mower (10+ years) if maintained, though cords fray and recoil springs weaken over time. Electric starters depend on battery health and typically need replacement every 5–7 years. Regular maintenance, such as keeping battery terminals clean and storing the mower in a dry location, extends starter life.
What is the typical cost of a replacement lawn mower starter?
Pull-cord starters range from $80–$200 for a complete assembly. Electric starter motors cost $100–$250. Batteries for electric-start mowers range from $40–$80. Professional installation may add $50–$150 in labor, depending on your area and the repair shop.
Conclusion
Testing a lawn mower starter is a straightforward process that begins with visual inspection and progresses to simple hands-on checks or multimeter testing. By working through these diagnostic steps systematically, you can identify whether the starter itself is faulty or if the no-start condition originates elsewhere. Most issues can be resolved with inexpensive replacement parts or professional service, and early diagnosis prevents unnecessary engine damage or costly repair bills.