How to Sharpen a Chainsaw Chain
Sharpen a chainsaw chain by filing each tooth at a 25–35° angle (typically 30°) using a round file matched to your chain’s pitch and gauge. Most chains need sharpening every 5–10 hours of cutting use. For frequent users or if the chain is severely damaged, professional sharpening is often faster and more precise than DIY filing.
Understanding Chainsaw Chain Anatomy
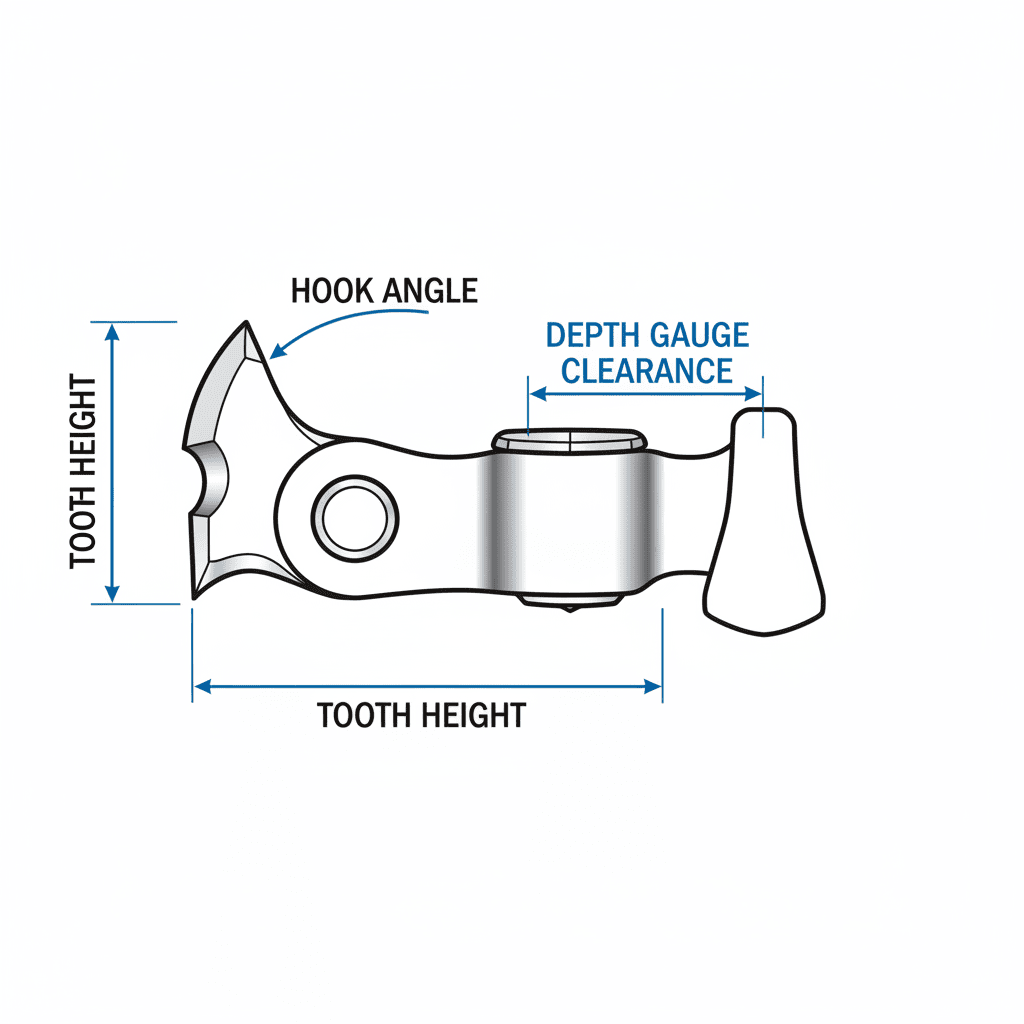
Chainsaw “blades” are actually chains—metal loops with individual cutting teeth, depth gauges (also called rakers), and drive links. Understanding this distinction is crucial for effective sharpening.
Each cutting tooth has three critical dimensions:
- Tooth height: The cutting edge that removes wood
- Hook angle: The angle at which the tooth attacks the wood (typically 25–35°)
- Depth gauge: A raker tooth ahead of each cutter that controls how deep the tooth bites into the wood
A chain dulls because repeated contact with wood (and occasional rock or dirt) wears the tooth edge. When teeth wear unevenly—often because the chain is running at an angle or the bar is bent—the chain will pull to one side and cut inefficiently.
Identifying When Your Chain Needs Sharpening
Don’t wait for your chainsaw to stop cutting. Recognizing early signs of dullness prevents frustration and unsafe operation.
Signs your chain needs sharpening:
- The saw produces fine dust instead of chips
- You must apply excessive pressure to make cuts
- The chainsaw pulls or drifts to one side
- Cuts are uneven or jagged at the top
- The saw vibrates more than usual
- Cutting speed has noticeably dropped
A dull chain is a safety hazard—it increases kickback risk, reduces operator control, and causes fatigue that leads to mistakes. Most professional arborists and frequent users sharpen their chains every 5–10 hours of cutting. Occasional homeowners might sharpen once or twice per season.
Can a chain be too damaged to sharpen? Yes. If teeth are broken, cracked, or worn down to near the depth gauge, replacement is safer and often cheaper than attempting restoration. If only a few teeth are damaged, a professional sharpening service can sometimes salvage the chain by restoring all teeth to a consistent level.
Tools and Materials You’ll Need
Successful sharpening depends on having the correct tools. Using the wrong file size is one of the most common mistakes homeowners make.
Round Files (The Most Critical Tool)
Round files are matched to your chain’s pitch (spacing between teeth). Common sizes are:
| Chain Pitch | File Diameter |
|---|---|
| 1/4″ and .325″ | 4.0–4.8 mm |
| 3/8″ (standard) | 5.5–5.6 mm |
| .404″ | 7.0–7.2 mm |
Check your chainsaw manual or look for markings on your chain to determine pitch. Using a file that’s too small won’t cut efficiently; too large and you’ll round over the tooth edge.
Additional Sharpening Tools
- File holder or guide: Maintains consistent angle and depth (optional for experienced users, essential for beginners)
- Depth gauge tool: A flat file used to check and adjust raker height
- Caliper or ruler: Measures file position and tooth alignment
- Vise or clamping device: Secures the chainsaw bar during sharpening
- Marker or chalk: Marks teeth to track progress
Sharpening Method Options
File sharpening (manual): Most affordable and portable; requires skill and patience. Best for occasional maintenance.
Electric grinders: Faster and more consistent for high-volume users; costs $200–$500; requires practice to avoid over-grinding.
Professional sharpening services: Fastest option for complex or severely dulled chains; typically costs $15–$30 per chain depending on region and condition. Ideal if you have multiple saws or prefer precision results.
Step-by-Step Chain Sharpening Process
1. Prepare Your Workspace
- Secure the chainsaw in a vise or clamping bench with the bar horizontal and stable
- Turn off the engine and ensure it has cooled
- Mark the starting tooth with chalk or marker to avoid skipping or double-filing
- Wear cut-resistant gloves and eye protection
2. Position the File Correctly
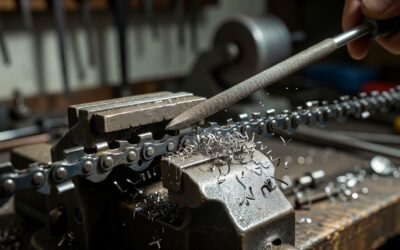
Hold the round file perpendicular to the chain bar. The file should sit inside the tooth’s gullet (the curved area between two teeth). Most chains require a 25–35° sharpening angle; 30° is the standard for general-purpose chains.
If using a file guide, follow its instructions for angle alignment. Without a guide, use visual reference—the file should be roughly parallel to a line drawn at 30° across the bar.
3. File Each Tooth with Consistent Strokes
- Start at the marked tooth and move toward the tip of the bar
- Use steady, even pressure—don’t force the file
- Typical filing requires 2–4 strokes per tooth, depending on dullness
- Lift the file at the end of each stroke (don’t drag it backward)
- File only in one direction: from the center of the tooth outward
- Move to the next tooth and repeat
All teeth must receive the same number of strokes to maintain balance. Uneven filing causes the chain to pull sideways during cutting.
4. Sharpen Depth Gauges (Rakers)
After sharpening all cutting teeth, check the depth gauges. These raker teeth control how aggressively the chain cuts. If they’re too high, the chain won’t bite; too low, and the chain cuts too aggressively and may bind.
- Use a depth gauge tool or flat file to check height
- Most depth gauges should sit 0.025–0.030″ below the tooth tip (consult your chain’s manual for exact specification)
- If gauges are too high, lightly file them down to correct height
5. Verify Consistency
Sight down the bar to confirm all teeth are at similar height and sharpness. Any teeth noticeably shorter or duller than others indicate uneven filing.
Common Mistakes and Troubleshooting
Chain Pulls to One Side After Sharpening
Cause: Teeth are sharpened unevenly. One side of the chain is sharper or taller than the other.
Fix: Refile the duller side with extra strokes until all teeth match. Consider using a file guide to maintain consistent angle.
File Doesn’t Seem to Cut the Tooth
Cause: File is dull, wrong size, or held at incorrect angle.
Fix: Replace the file (they wear out), verify correct diameter, and ensure the file sits fully inside the tooth gullet at proper angle.
Sharpened Chain Still Seems Dull
Cause: Depth gauges are too high, preventing the chain from biting properly.
Fix: Lower the depth gauges using a flat file and gauge tool.
Can You Over-Sharpen a Chain?
Yes. Filing too aggressively or too many times removes excess metal, weakening the tooth structure and shortening chain life. File only until the edge is sharp; sharp chains require fewer strokes than you might expect.
Safety Considerations
- Always turn off and cool the chainsaw before sharpening. Never work on a running or warm engine.
- Secure the chainsaw firmly in a vise or bench clamp to prevent slipping.
- Wear cut-resistant gloves and eye protection. Files and chainsaw teeth are sharp.
- Avoid loose clothing that could catch on the chain or file.
- File in good lighting to see tooth alignment clearly.
- Never reach across the chain or behind the bar where hands could slip into the tooth line.
DIY Sharpening vs. Professional Service
Choose DIY Sharpening If:
- You sharpen chains infrequently (1–2 times per year)
- You’re willing to invest time in learning proper technique
- Your chains are in good condition (no broken teeth)
- You enjoy hands-on maintenance
Choose Professional Sharpening If:
- You use your chainsaw regularly (20+ hours per month)
- You own multiple saws and want consistent results
- The chain is severely dulled or damaged
- You value speed and precision over cost
- You lack workspace or clamping equipment
Professional services typically complete sharpening in 24–48 hours and cost $15–$30 per chain. For frequent users, this often pays for itself through faster, safer cutting.
Preventative Maintenance to Reduce Sharpening Frequency
Proper Chain Tension
A chain that’s too loose will derail; too tight increases wear and dulling. Check tension regularly—the chain should pull away from the bar slightly but not hang loose. Correct tension reduces friction and wear by 15–20%.
Adequate Lubrication
Always use proper chainsaw bar oil. A dry chain dulls faster and risks binding. Keep the oil reservoir filled and verify oil is flowing during operation (look for oil mist on the bar).
Avoid Rocks, Dirt, and Metal
Hitting rock or embedded soil dulls a chain instantly. Clear debris from the work area and cut only wood when possible. Hitting nails or wire also damages teeth beyond economical repair.
Monitor and Adjust Bar Alignment
A bent or misaligned bar causes uneven chain wear and pulling. If the chain consistently drifts, have the bar checked by a professional or replace it.
Frequently Asked Questions
What Size File Do I Need for My Chainsaw?
Match the file diameter to your chain’s pitch. Common chainsaws use 3/8″ pitch chains requiring 5.5–5.6 mm files. Check your chainsaw manual, look for markings on the chain or bar, or count the number of drive links and measure the distance between them. When in doubt, ask your equipment dealer—using the wrong file size is a common cause of poor sharpening results.
How Often Should I Sharpen My Chainsaw Chain?
Professional users sharpen every 5–10 hours of cutting. Homeowners typically sharpen once or twice per season depending on use. The best indicator is performance: if the saw produces dust instead of chips or requires excessive pressure, it’s time to sharpen. Regular sharpening (before the chain is very dull) is faster and easier than waiting for severe dulling.
Can I Sharpen a Chainsaw Chain Without a File Guide?
Yes, but it’s more difficult. File guides hold the correct angle and prevent over-filing, making them valuable for beginners. Experienced users often free-hand file once they understand proper angle and technique. If you choose to free-hand file, practice with scrap or less-critical chains first, and mark your teeth to track progress.
When Should I Replace My Chain Instead of Sharpening It?
Replace the chain if more than 2–3 consecutive teeth are broken or cracked, if the chain has stretched (measure the distance between drive links—if it’s grown significantly, the chain is worn), or if sharpening no longer improves performance. A new chain typically costs $30–$60; professional sharpening costs $15–$30. If your chain is 3+ years old and dulls frequently, replacement may be more economical than repeated sharpening.